Welcome, Guest
Username: Password: Remember me
  • Page:
  • 1

TOPIC: Freeing Merc IA,IB,IC

Freeing Merc IA,IB,IC 2 years 7 months ago #146540

Have read a bunch of threads here, but not finding the right piece of information to help me out.

Got a '65 SabreCraft with a Mercruiser 150hp, sporting what I think is the IA,IB,IC(EZ-shift) outdrive. I'm impatiently awaiting delivery of the shop manual. But really wanted to do some serious engine maintenance this weekend. Outdrive is badly damaged, but I hope to salvage it, so I'm trying to gently remove it. It's stuck, as seems to happen a lot. With some persuasion I've got about 1/8" of separation, but seem to have stopped there.

Based on my reading, I know the usual suggestions but they don't seem to work. (1) yes, I've got the gear shift/throttle lever in forward; (2) I can't use tilt hydraulics to push outdrive off, because the hoses are shot, and I can't get the tilt motor to work; (3) I've "dropped" the outdrive which gave me my first 1/32" of separation, but no more, so maybe I'm doing this wrong; (4) outdrive was, I believe, drained of oil long ago (like, when the lower housing froze and cracked at some distant moment in the past) so I have not oil to evaluate, but every reason to suspect water intrusion just from condensation in our very wet environment.

So, my questions are (1) how do I get some sort of penetrant into the drive shaft/gimbal area to start loosening up the corrosion? (2) there is a cover on top of the outdrive, 4 screws holding it down, which seems like it covers an oil reservor, 2 of the 4 screws won't move, they've been soaking in either PB Blaster or my homemixed ATF/acetone soup for several days. I've tried the traditional methods (big ass screw driver with a wrench on the handle for leverage; swearing; impact driver (not a real impact gun, but a Makita cordless drill-drivers from Makita that shoots screws into wood like nobody's business) to the point of breaking a #3 phillips bit; heating the body with a torch; heating the screw with a torch; more swearing), given this resume of prior efforts, I'm wondering whether I even want to remove this cover, and will removing it give me a way to apply penetrant to stuck bearings, gimbal, joints, whatever and if so, any suggestions on what to try next. I don't own one of those manual impact drivers that you hit with a hammer, but wondering if I should go get one.

BTW, there are two reasons I'm removing outdrive, first because I want to spend some time on engine maint/repair, and I can't tell whether muffs are getting water into impeller and manifold so I'd rather just remove it; and, second, because the outdrive is pretty obviously damaged, and I need to pull it apart to see how badly and if it's repairable.

Thanks for any suggestions you might have.

Please Log in or Create an account to join the conversation.

Freeing Merc IA,IB,IC 2 years 7 months ago #146543

Lots of questions probably best answered with a conversation over the phone.

A few pointers:
1) The 1A,B,C refers to gear ratio only. That ratio happens in the top housing. The 6 cylinder standard ratio is "C". Gears have equal numerous of teeth (24 I believe) and will have timing marks (That should look like small letter c). They will need to be reassembled together to minimize wear & noise.
2) Removing the top cap will not help remove the drive but eventually it needs to come off. On 2nd thought, if you get the cover off & remove the nut holding the gear on, the shaft will pull out of the housing leaving the shaft assembly stuck inside the bellows area. That may be easier to pull on later to break it free of the stuck splines. Penetrating oil, heat on the sides of the housing and the hammer type impact are probably your best bet. Get them loose prior to getting the drive off. The boat is a good vise to hold your work in place.
3) Fwd gear and steady pulling pressure and it should pull off but probably won't if it hasn't by now. The splines are stuck. Fortunately, working around the back of a 6 cylinder probably isn't horrible. Penetrating oil sprayed onto the drive shaft where it slides into the crankshaft coupler may help. Or maybe a Sawzall & cut the driveshaft where you see it in the boat. I'm almost certain an inline 4 or 6 cyl shaft all the way to early 80s will fit.
4) Should be an EZ Shift. Look at the shift interface where cable from helm meets cable to unit. Is there a switch with a roller arm that rides in a V type lever? If yes, then EZ shift.
5) Hydraulic tilt will NOT be any assistance to push drive off studs.
6) Now for bad news, you cannot replace your drive with a 1967 or later (120/160) model. You will need to fix yours or perform an entire swap using a complete 160/165 250 CID package including transom plates / trim system.
I may have an entire upper housing with no guts inside, would need casting/part number to verify effectively.

Please Log in or Create an account to join the conversation.

Freeing Merc IA,IB,IC 2 years 6 months ago #146544

Thanks for those insights.

I managed to get the drive off. The shaft was not corroded together, but the probably 40-yar-old grease/oil/dirt made one hell of a glue. I built a quick stand for it so I can easily work on it in the garage. My plan was for a full tear down, but the shaft turns pretty easily, and the u-joint has light surface rust and turns smoothly.

Right now I'm elbows deep in the engine ignition system. With a fresh battery the engine turns, makes compression-like noises, but won't generate a spark. Bench tested the coil, it seems good. There's a brand new contact point in there (somebody was in here trying to get this thing running before me). I THINK the condenser in the distributor is shot (my multimeter is crap and not to be trusted with fine measurements at the low end of any scale). Picked one up last night. But it behaves jus tlike the old one when I put my multimeter on it. I've read the new condensers tend to have poor quality control, so I ordered another but will go ahead and install what I've got to see if I can a plug to spark.

Please Log in or Create an account to join the conversation.

Freeing Merc IA,IB,IC 2 years 6 months ago #146548

You have power TILT with a key switch on the TILT control panel?
If yes, turn that switch on too because there is a kill switch in the gimbal ring that is probably bad and you will loose your ignition with the TILT switch off.

For easy troubleshooting, run 12 volts from battery directly to + side of coil and bypass the boat's wiring & the ballast resistors. If no spark then, trouble is coil or points/condenser. Run some fine sandpaper between the points too to verify they aren't corroded.

Please Log in or Create an account to join the conversation.

Freeing Merc IA,IB,IC 2 years 6 months ago #146557

Yes, I have the power tilt rocker switch biult into a small dash panel that has its own key.

The keys are long gone on this thing, but a random key of approximately the right size turned it, and I got electric motor noises from the transom area when I pushed the rocker. What do you mean by losing my ignition with the tilt switch turned off? Is that related in any way to what the Seloc manual calls a "shift control switch?"

I've got all the symptoms of a bad condenser, but if that's the case then I've had a strong run of bad luck with the boat coming to me with a bad condenser, and the cheap duralast condenser I just bought also being bad. Possible, though.

Please Log in or Create an account to join the conversation.

Freeing Merc IA,IB,IC 2 years 6 months ago #146565

I have no idea what the Seloc manual is referring to. Possibly the neutral safety switch? There was also a 215E (#2 drive) model that used an electric shift module but I'm not experienced with the #2 or #3 drives.
The key switch on the electric tile panel turns thr tilt mechanism on AND overrides the TILT limit switch in the gimbal. The concept was because the gimbal offered side support up to 15 degrees of tilt that should you clobber something & the drive kick up, the ignition would be shut off to minimize damage.
So after lowering the drive fully down onto the tilt adjustment pin (remember you have power TILT, not TRIM) you selected the key off while operating the boat.
Selecting the key on bypassed the tilt limit so you could tilt & operate at low RPM.
Failure of the switch located on the gimbal could be shorting the ignition out. Turn the key on would bypass the entire kill system.

In any event, the main engine harness is as simple as can be. Like I said, just apply 12volts direct to the coil & see if you get spark. The points corrode from sitting extended time. Simple quick running some fine sand paper should clean them.
With 12v direct to coil & distributor/engine turned so points are closed, open & close points manually & you should see a spark across points.

Please Log in or Create an account to join the conversation.

Freeing Merc IA,IB,IC 2 years 6 months ago #146566

Well, it eventually turned into one of those jobs where you just keep trying different things, you get no results, so you do it all again and it works. After replacing the connectors on the primary circuit wire from coil to distributor, cleaning and resetting the conact points three times, a second new condenser, and another round of cleaning the contacts in each ignition wire, I finally got spark. With that I sprayed some starting fluid in the carb and got it to fire.

So, after dinner I pulled the fuel line from the filter, stuck that end in a nearly empty gas can (all I have at home at the moment), and let her run for a bit. I'm not real familiar with these old inline sixes, so I don't know if it really should "chug" along at idle but it sounded okay to me. I ran it just enough to warm things up, which was enough to tell me about some leaks of various kinds here and there.

Getting it to run is huge. Now I'm fully confident this boat can be restored to somethign similar to its original glory. The sterndrive has some challenges, but I'll ask for everyone's help on those after I finish tuning this engine a bit more. In the meantime, I've confirmed that steering and the throttle both work. I've ordered new fuel line and a fuel/water separator filter. Wondering if I should add another simple, inline fuel filter for extra protection?

Please Log in or Create an account to join the conversation.

Freeing Merc IA,IB,IC 2 years 6 months ago #146588

Trying to evaluate and plan repairs for the stern drive.

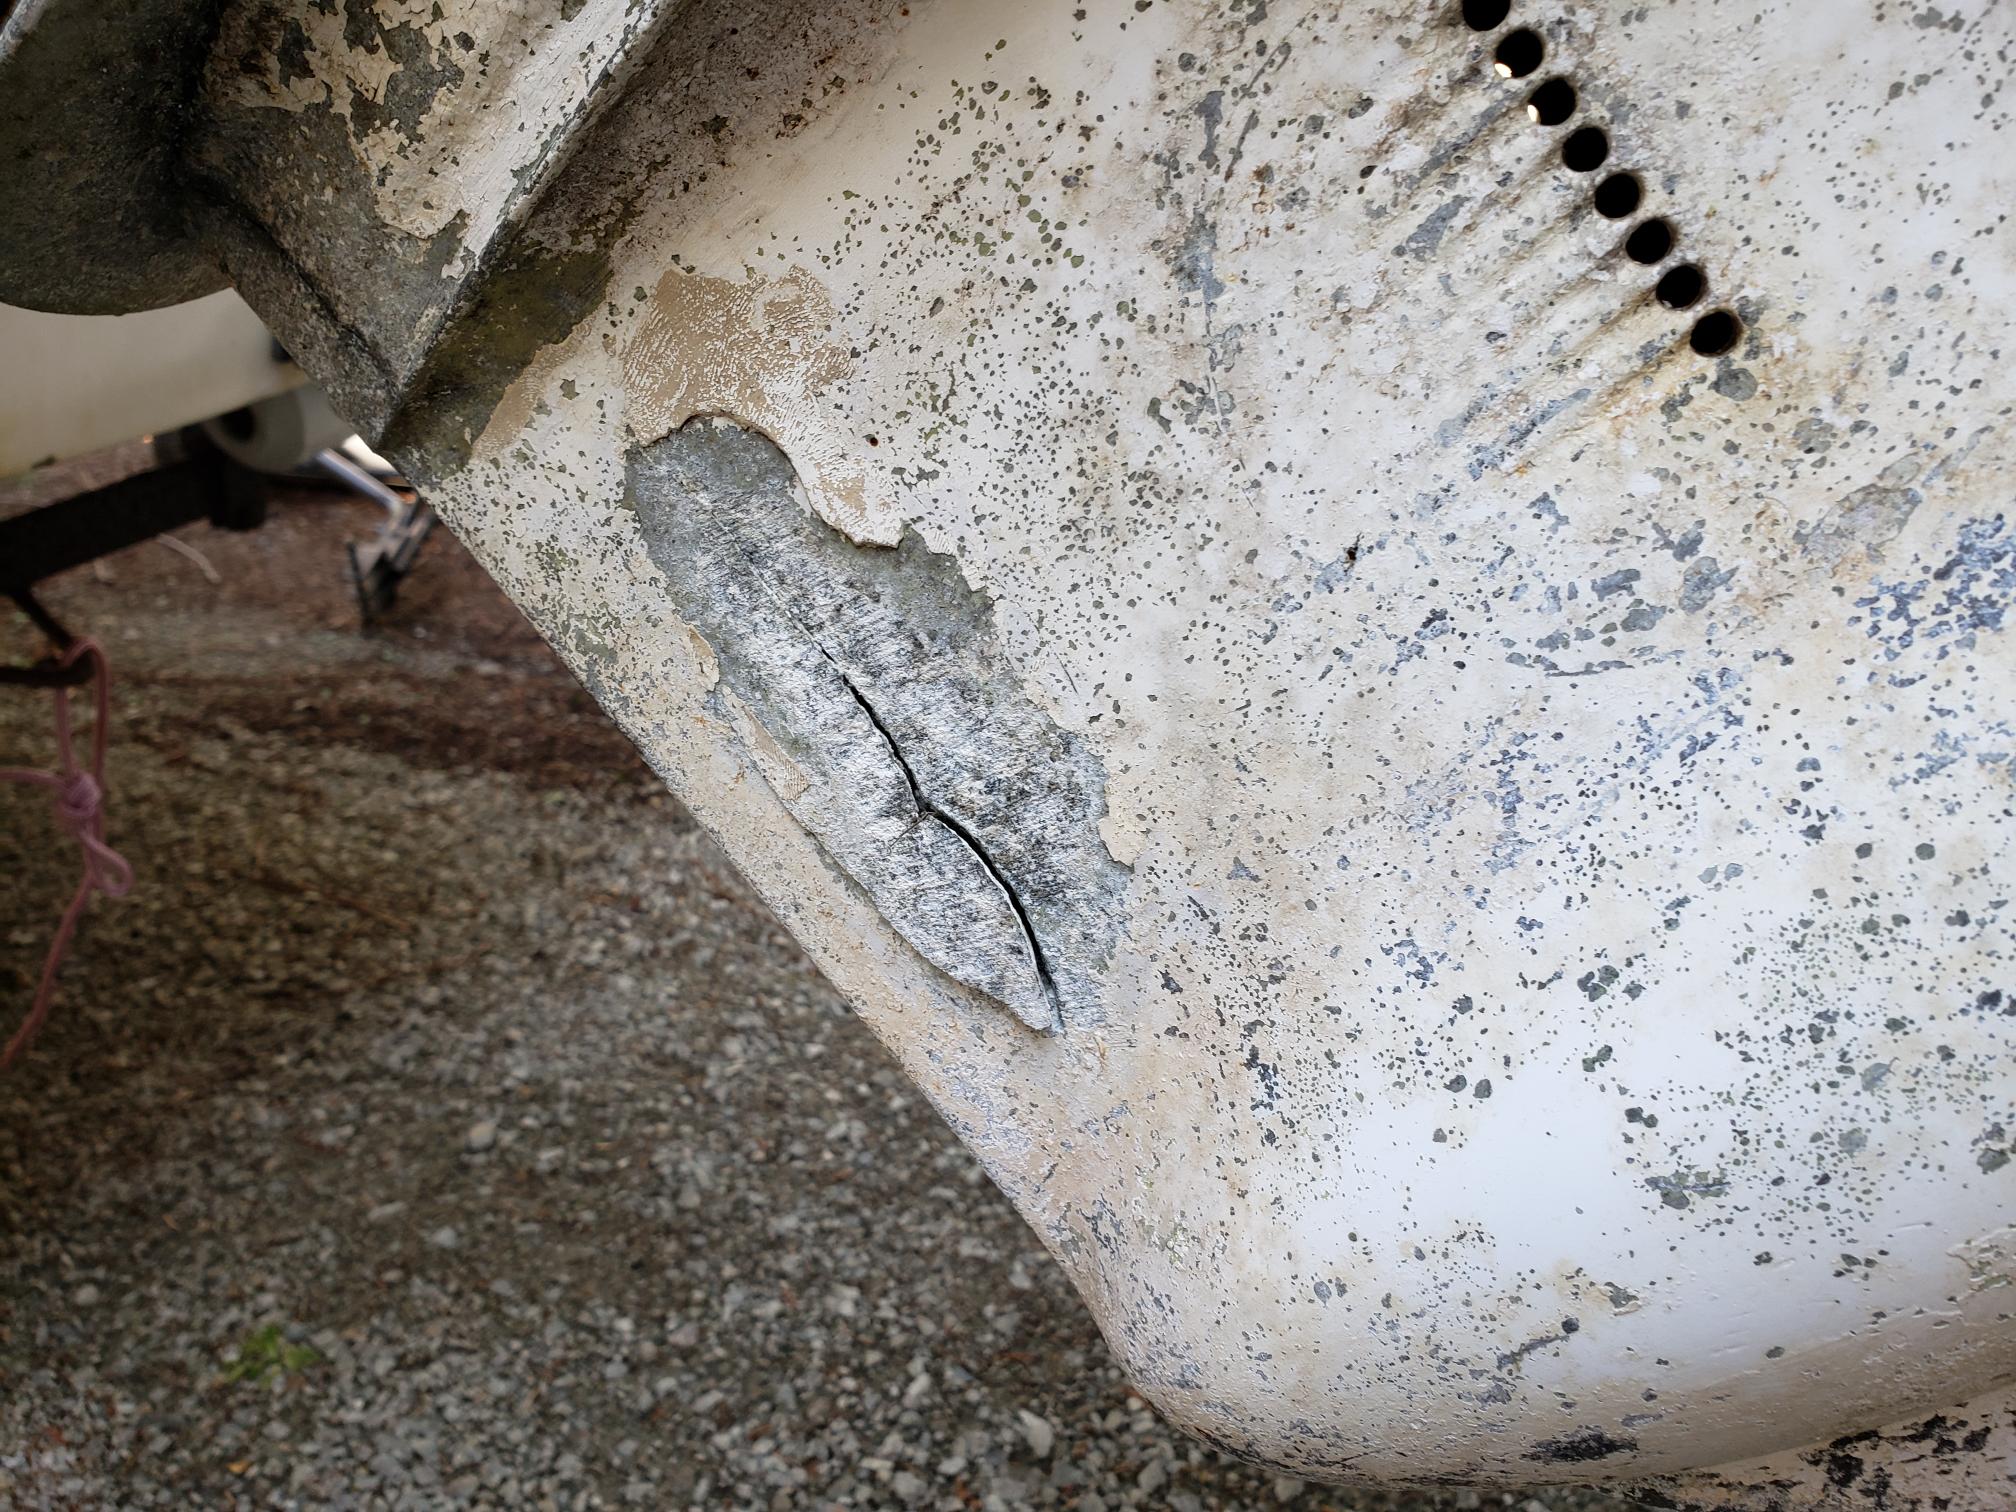
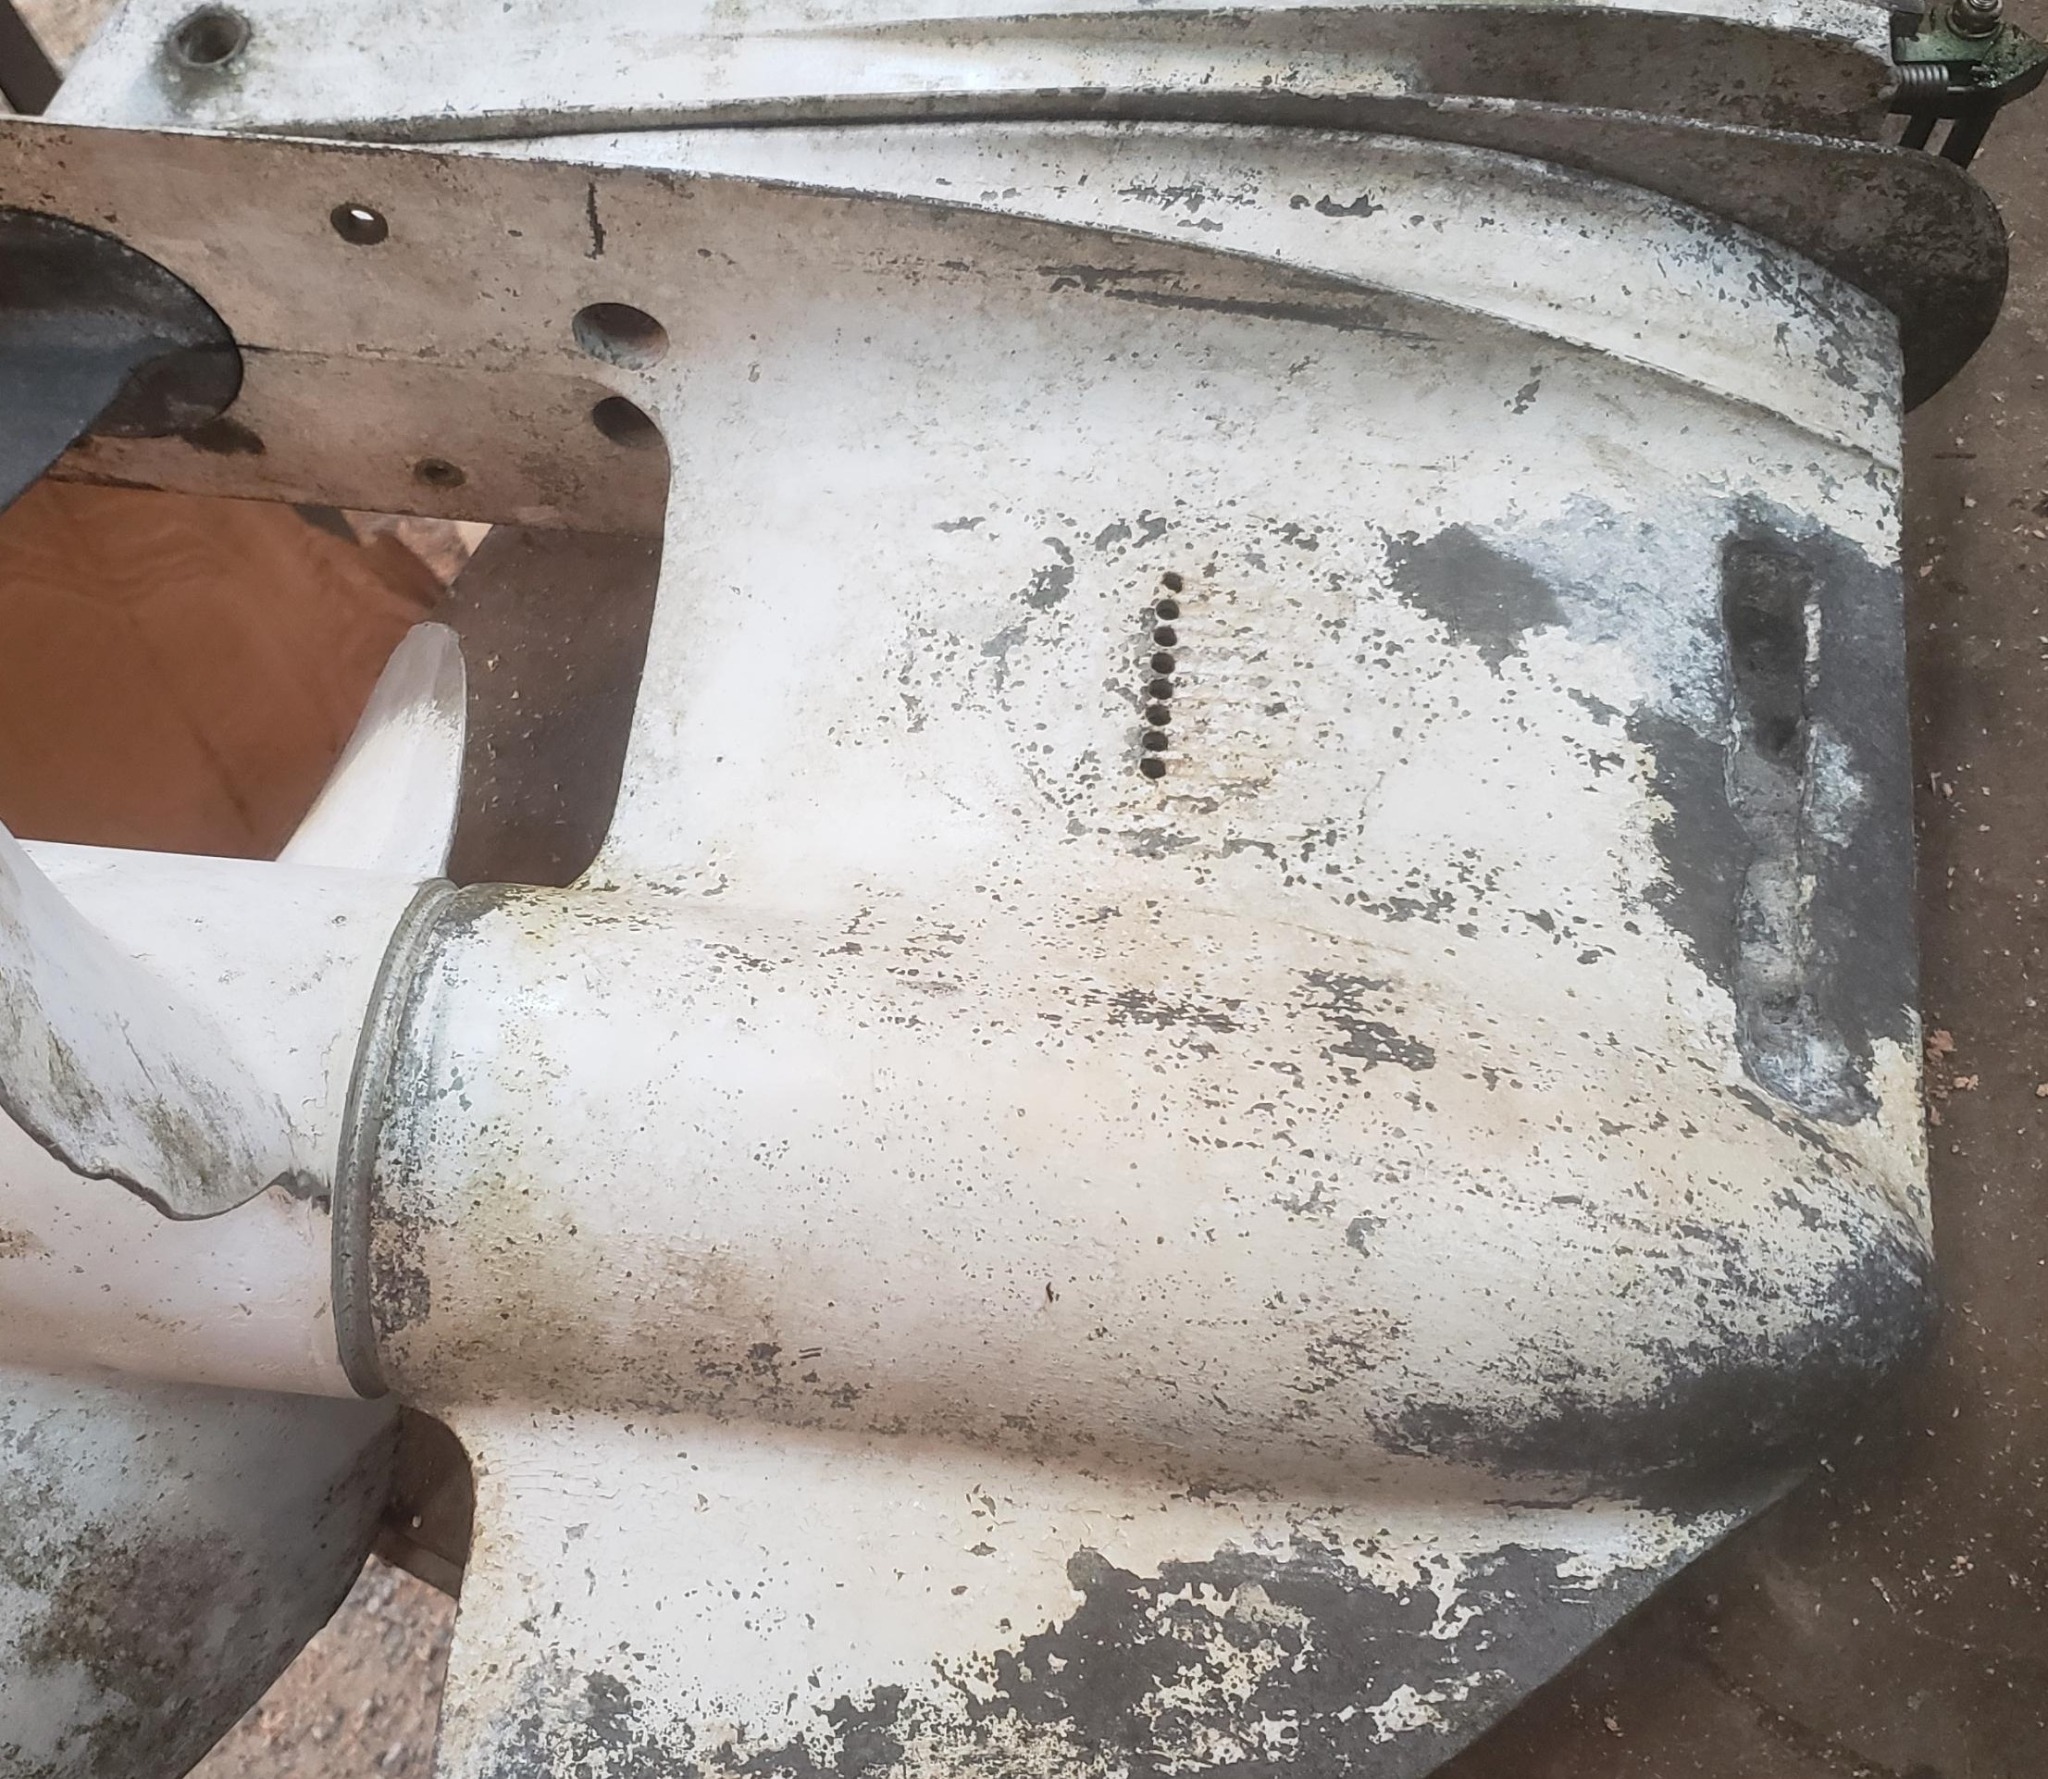
Upper and lower units both have issues. Pics below. Lower unit (are these called somethign else on a Merc?) has matching damage on port and starboard sides. On stbd side the aluminum casing has cracked and then broken leaving a huge gouge and an underlying material that is a bit mysterious to me. On port, it's just an enormous crack which has not yet broken off.

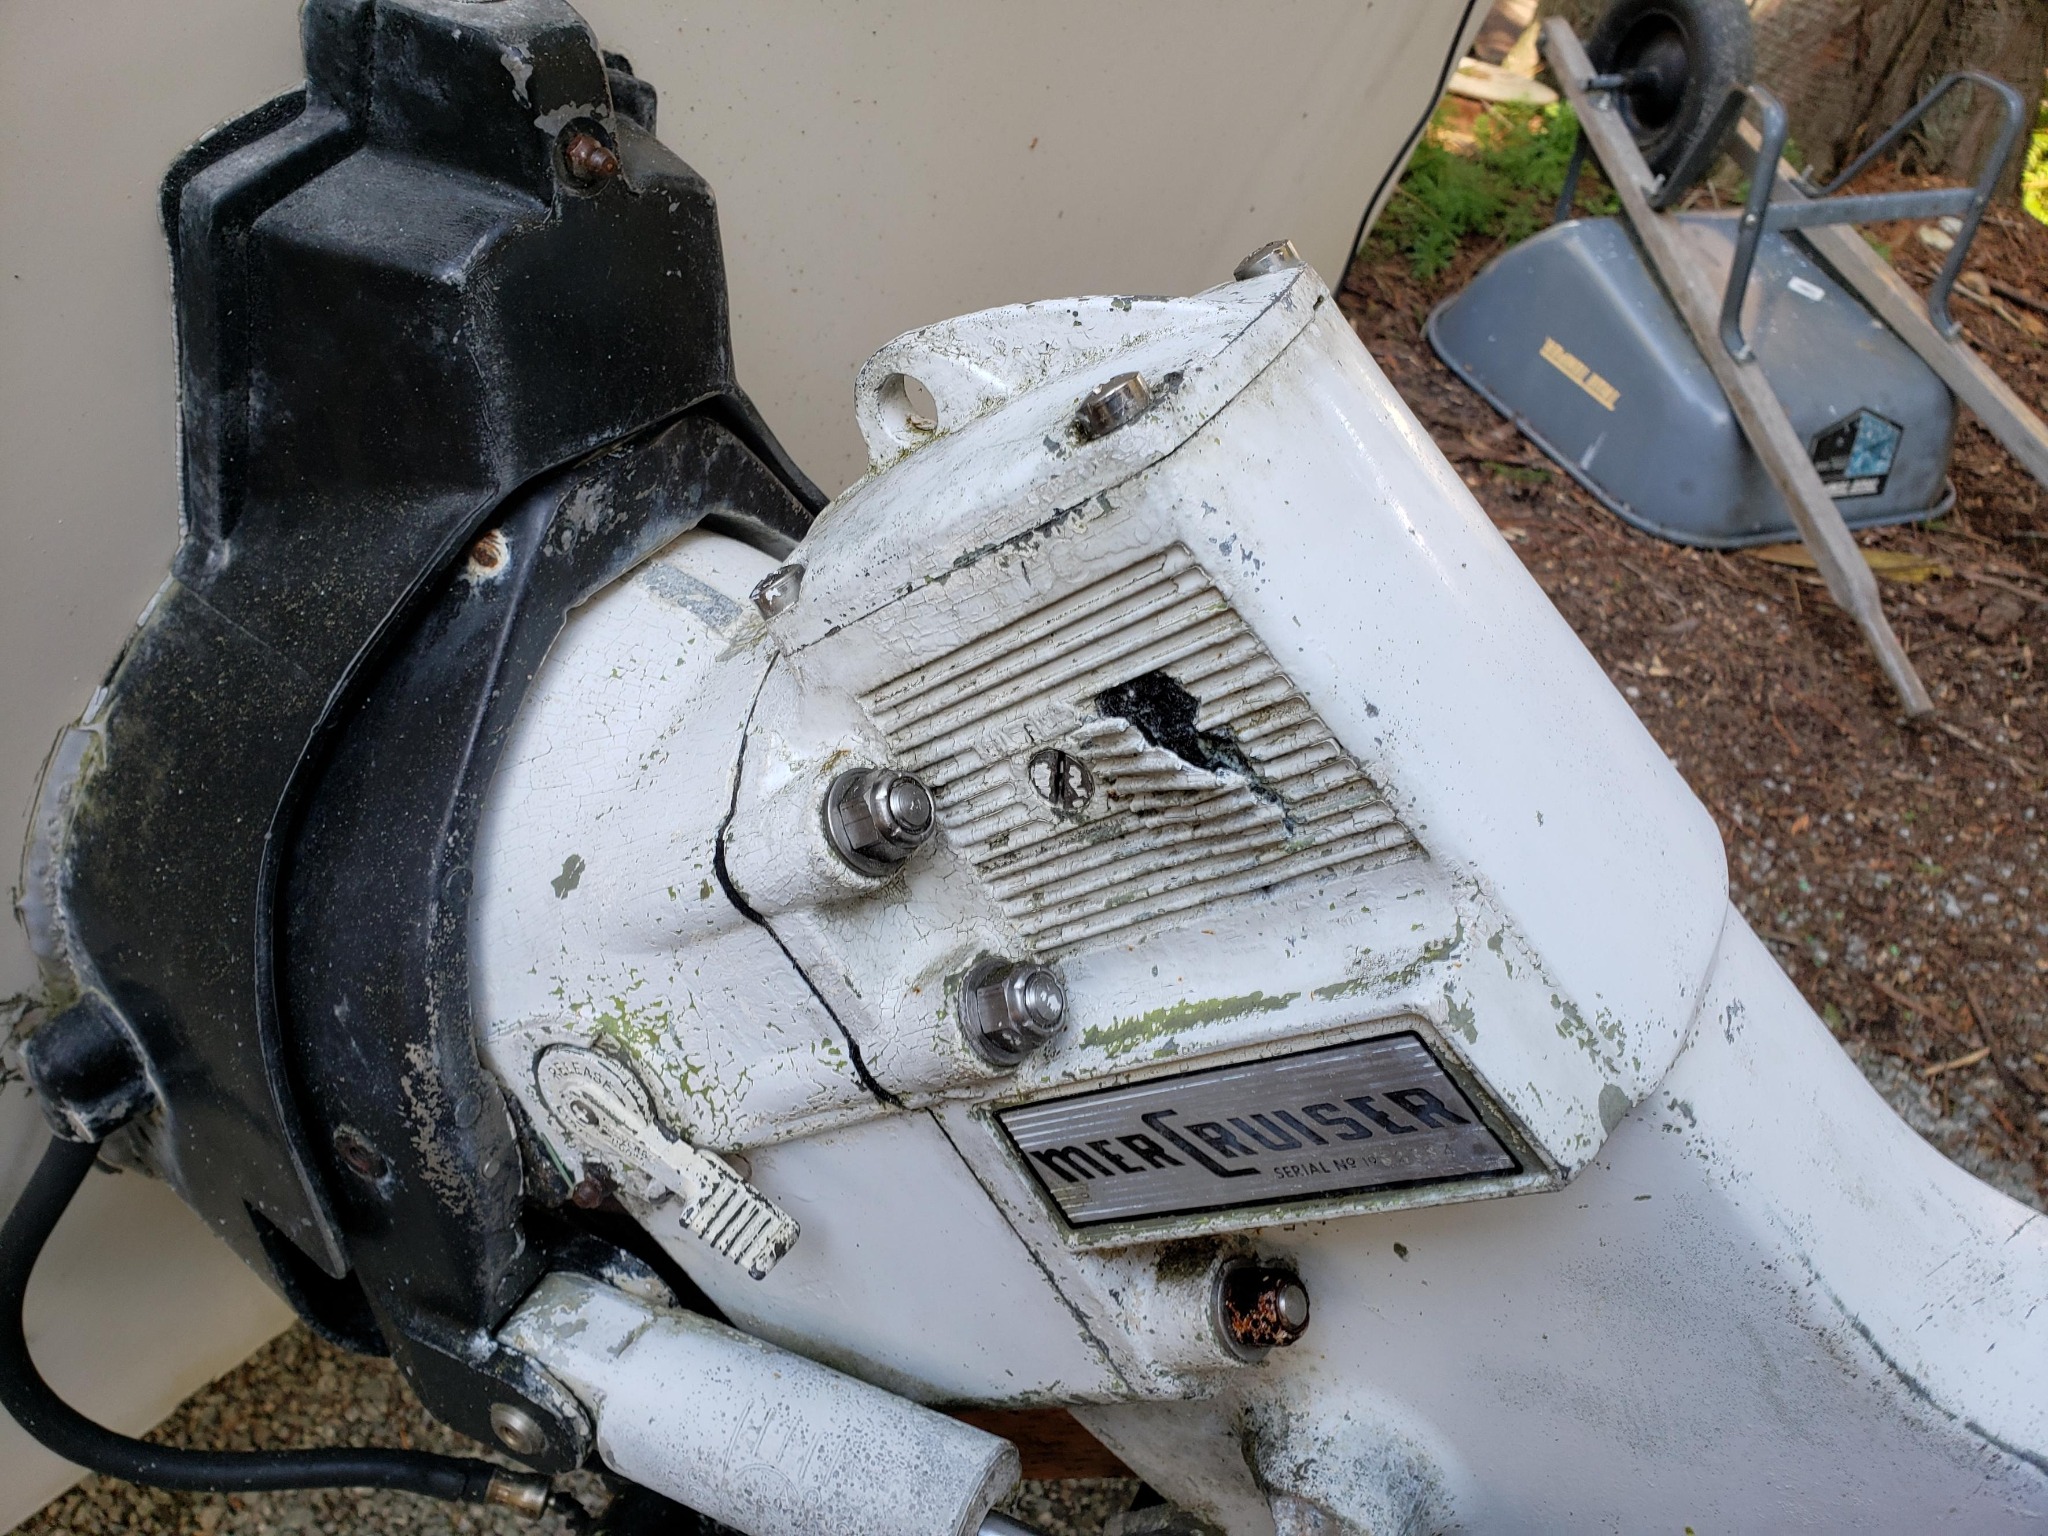
On upper unit there is a similar bit of damage on the port side (see pic). Three of the screws holding the top cover on are seriously stuck. Been soaking them such as I can in various fluids, and giving them a working over every few days, but no luck yet. And the u-joint is dripping oil. At least it was. I drained what I could.

Would love your informed opinions on whether this is at all salvageable (and if so, how you think it could be done) or whether instead I'm gonna be searching for replacement or donor for both parts of this drive.
Attachments:

Please Log in or Create an account to join the conversation.

Freeing Merc IA,IB,IC 2 years 6 months ago #146614

Work progresses. Engine idles okay right now, but can't run it for long because no cooling as stern drive is removed. So, was a good time to replace some very sketchy-looking cooling hoses, that turned into some serious clean up of the parts they connect to, and since I'm doing it all I want my work to look good so now I'm painting parts. Discovered why the gas/water separator looked so old, somebody mounted it in such a way it was impossible to get a strap wrench around it. In the course of messing with that I discovered more rotten fuel line. Parts are ordered and work is progressing on all those fronts.

It took some effort to separate the lower unit, but it's done. I think that is also the first time in a very long time that has happened. The chamber through which the shift lever/switch/rod goes is also where the huge holes in the casing are located. I think prior owner basically filled the area around those holes, leaving space for the shift rod, because it seems to work beautifully. I'm going to remove the fill material and attempt a more permanent repair.

The holes/cracks are abou ta 1/2" from leading edge of the lower unit. There doesn't seem to be a lot going on in that part of the unit. Shouldn't be any internal pressure there. I'm wondering if I could just braze in aluminum patches. That would make things relatively easy to fair, I have to imagine that the holes and cracks created a ton of drag even if the fill-job was otherwise working at keeping water out.

Please Log in or Create an account to join the conversation.

Freeing Merc IA,IB,IC 2 years 6 months ago #146615

Cooling water from the drive comes in at the inner transom plate by the steering tiller arm. Just hook your garden hose to that hose so water flows forward to the the engine & you can run as long as you want without overheating.

Regarding the cracked area, it is a hollow cavity that should have a drain hole near the bottom so water doesn't get trapped & freeze. I guess, maybe yours froze? I would take it to a welder & see if he can make a quality repair on it. You can always use an epoxy filler to blend the area prior to painting it.

Please Log in or Create an account to join the conversation.

Freeing Merc IA,IB,IC 2 years 6 months ago #146626

THanks.

Would that cavity have a drain hole to outside the drive unit, or into the exhaust streeam somehow?

Please Log in or Create an account to join the conversation.

Freeing Merc IA,IB,IC 2 years 6 months ago #146631

There should be a small (about 1/8") on the starboard side of the drive near the bottom of that cavity. At least there is on later production units. It has a habit of plugging with sand & trapping water. The hole was enlarged to about 5/32" on the Alpha units.
That cavity is forward & above the prop shaft so there is no way it could be tied into the exhaust.

Please Log in or Create an account to join the conversation.

Freeing Merc IA,IB,IC 2 years 6 months ago #146684

Work progresses, to th epoint where reassembly of the sterndrive has begun.

This old Merc has power tilt. Both hydraulic hoses were shot. Was pleased to find replacements. Am now completely stymied by trying to attach the new lines to block inside the transom plate, under the gimbal housing, up against the side of the exhaust. Took forever to remove the old one, turning 1/8 turn at a time. Even worse on replacement, can't get the threading started at all. ANy tricks?

Please Log in or Create an account to join the conversation.

Freeing Merc IA,IB,IC 2 years 6 months ago #146685

If you are talking about the ones that snake between the u-joint bellows and the exhaust bellows, remove the exhaust bellows for access. While you are in there, do a close check of the u-joint bellows and shift cable bellows. Now is the time to fix everything.
Pre 1970 hoses are a pain in the ass. FYI, your u-joint bellows is "without ridge" style.

Please Log in or Create an account to join the conversation.

Freeing Merc IA,IB,IC 2 years 6 months ago #146686

You aren't kidding. They were a huge PITA. I removed the exhuast bellows, and even so, there's not much room to work. I just kept trying, failure after failure, until I managed to get each one threaded. The new hoses are installed, after what was at least an hour and a half of fiddly, fingertip work to ge tthe threads started.

My u-joint bellows is not properly attached to the bell housing. WHen I titlt the bell housing al lthe way up it comes loose. Far as I can tell, there's no hose clamp in place. There is, however, some kind of spring wire inside the u-joint bellows. I suspect someone tried to rig a "fix" here in place of a proper hose clamp, and it has failed. Getting a clamp in there and properly tightened is not going to ge fun, either.

Please Log in or Create an account to join the conversation.

Freeing Merc IA,IB,IC 2 years 5 months ago #146688

The "spring" is inside the bellows to keep its shape as you turn/tilt the drive. There should be a clamp on both ends of the bellows. You really need a 5/16" 1/4 drive swivel socket and long extension to access the clamps. Trying to use a universal joint on e regular socket doesn't work well.

Your bellows is the "without ridge" style. Bellows adhesive is a must. If you're in there that far, be sure your gimbal bearing is smooth. 2 fingers in it & rotate CCW & CW to check for smoothness & noise. Check alignment too.

Closely check the shift cable bellows, and be sure that cable moves smoothly. Replacing the cable bellows requires removing the cable, a many hour job!

Bellows is p/n 36223A1 or Sierra 18-2752
Gasket set is 27-35996A1 or Sierra 18-2617

Don't let anyone tell you you can use the later bellow w/ridge or gasket set 27-64818 (Sierra 18-2614) gaskets are not exactly the same.
The following user(s) said Thank You: Jamespio

Please Log in or Create an account to join the conversation.

Freeing Merc IA,IB,IC 2 years 5 months ago #146690

Thanks, yet again. YOu clearly know these drives inside out.

I will order just such a socket. I suspect the difficulty of installing the clamp is why there isn't one on stern end of the ujoint bellows.

The exhaust bellows is in very good shape, so I'll be reinstalling. Will check the shift cable as you suggest. I think it's in good shape. The Seloc manual also mentions bellows adhesive. So I'll order some.

One of the Power Tilt cylinders is badly damaged. Not sure I can salvage it. Someone was, again, in there ahead of me, and I think they gave up on fixing it, and I can see why. Any idea where to find a replacement? They're different from the Alpha cylinders, single acting for one thing, but I'm thinking one of those might work with a breather on one end.

Please Log in or Create an account to join the conversation.

Freeing Merc IA,IB,IC 2 years 5 months ago #146691

There was a huge evolution of tilt systems prior to 1967. I believe your cylinders are mounted "backwards" from the 1967 and later 120/160.

For clarification, Alpha didn't happen until 1986 but that drive actually came out later in 83 as an "MR" without any fanfare. 1982-83 there was an "R" drive that looked like an Alpha but had old style guts. I point this out because calling all the drives Alpha will buy you the wrong parts at some time.

1967 had tilt standard and trim optional. Tilt had the "one way" cylinders that had only an up line vs trim that had up & down lines. Unfortunately, the size of the hardware (pins & bushings) is different between tilt & trim. I'm thinking the gimbal ring & upper housing are machined different too because I think the pin is physically larger diameter with trim. And of course, the cylinders are mounted cylinder body forward from then to now. Trim became standard in 1968, so the 1967 tilt cylinders were a one year deal & rare too. I don't know if 1967 cylinders will fit but if so, I guess you would need a pair. I may have a cylinder but if so it's 300 miles away & not handy for a few weeks.

Please Log in or Create an account to join the conversation.

  • Page:
  • 1
Time to create page: 0.571 seconds

Donate

Please consider supporting our efforts.

Glassified Ads

1967 23 ft powercat flybridge
( / Boats)

noimage
11-17-2024

Mercury outboard
( / Engines)

noimage
11-03-2024

Classic Mercury Outboard Motors
( / Engines)

Classic Mercury Outboard Motors
10-18-2024

FG Login

FiberGoogle

Who's Online

We have 10770 guests and no members online