Welcome, Guest
Username: Password: Remember me
  • Page:
  • 1

TOPIC: Speedy Sleeve installation advice

Speedy Sleeve installation advice 10 years 4 months ago #94822

  • Merccooper
  • Merccooper's Avatar Topic Author
  • Offline
  • Senior Boarder
  • Senior Boarder
  • Posts: 180
  • Karma: 6
  • Thank you received: 2
Hi All,
I'm planning on using Speedy Sleeves to repair the drive shaft and prop shaft on my 1960 Merc 350 E. I was looking for any "learnings" that people may have from prior experiences (I don't want to throw money down the drain by screwing up the installation). I'm specifically worried about how to slide the sleeve down the approximately 2 feet of the drive shaft without damaging it.
Thanks for any input.
Tim.

Please Log in or Create an account to join the conversation.

Re:Speedy Sleeve installation advice 10 years 4 months ago #94840

Tim,

I really think it could save a lot of headaches if you take it to a machine shop. As you know, the sleeve is very thin, and easily damaged by accidentally nicking the edges of it. It may be that the shaft diameter needs to be turned a few thousandths smaller (above the installed area) to get the thing on without damage.

Hope this helps -

Bruce

Please Log in or Create an account to join the conversation.

Re:Speedy Sleeve installation advice 10 years 4 months ago #94887

I'm not sure you can put a speedi-sleeve onto the prop shaft where the seals ride, without turning the prop shaft down so that the sleeve's outside diameter (OD)becomes the same OD as the original shaft. Other wise, you won't be able to assemble or disassemble in the future because the needle bearing in the carrier will not be able to slide over the sleeve.
Consequently - if you can find a machine shop that can turn down the shaft only at the seal surface - I would recommend simply finding a seal with a smaller inside diameter (ID), and original OD rather than spending further loot on a speedi-sleeve.

There should be an additional 'sleeve' in the speedi-sleeve kit for the driveshaft.
The speedi-sleeve should freely slide down the driveshaft to about the water pump area (maybe just below the impeller placement) where the driveshaft gets a wee bit larger.
If the speedi-sleeve won't freely slide down the driveshaft to this point, you will want to clean up the driveshaft (rust, dings, etc) so that the speedi-sleeve will slide down okay.
Polish the area the best you can where the speedi-sleeve will eventually be installed. Be sure and measure and identify exactly where you want the speedi-sleeve centered for the seal lip.
After thorough cleaning (best you can anyway due to pits, etc on the driveshaft), I apply a thin coating of J&B Weld to the are to fill the voids of the pits, etc.

Now that you are ready to install the speedi-sleeve, be sure and slide it on with its flange (bell-shaped end) at the bottom.
Then slide the other larger sleeve down the driveshaft, over the speedi-sleeve until it comes to rest on the bell shaped flange.

Then I use a large cold chisel and small hammer to drive the speedi-sleeve home.
Put the chisel against the top edge of this sleeve at a 45 degree angle, and begin tapping the assembly down the shaft.
Rotate the point of impact on the sleeve to insure the speedi-sleeve doesn't get cocked sideways as you go.
If the sleeve (driver sleeve) becomes messed up due to the cold chisel impacts, simply tap the sides of the driver sleeve with your hammer against the driveshaft to somewhat straighten it out for further smacking with the hammer.

Once the speedi-sleeve is down in its proper placement, you should remove the bell shaped flange. I do this by using a small dremel disk and cut the flange at a 45 degree angle being careful not to cut into the speedi-sleeve above the scribed ring that will separate the speedi-sleeve from its bell shaped flange.
Then grab the end of the angle cut flange with a pair of pliers and peel the flange off the speedi-sleeve.
Wipe off all excess J&B Weld, and clean the ball bearing below the speedi-sleeve if it has been installed during this procedure.
Let the J&B Weld (or epoxy of choice) set before adding oil to the gear case, but you can immediately go ahead with the install of the driveshaft & complete reassembly of the lower unit.

Doc
If pictures would help - I can work up a few showing the steps - just ask.

Please Log in or Create an account to join the conversation.

Re:Speedy Sleeve installation advice 10 years 4 months ago #95036

I had the same issue. After doing the measurements for the two sleeves needed for the top and bottom seals on the drive shaft I got them ordered and ran into the same issue.

I purchased length of black pipe that will slide over the drive shaft to the bottom. Then I purchased reducing fittings that matched the size of the speedi sleeves or as close as i could get.

I ended up having to grind one larger and reduce one with metal filler.

I don't have pics to post of the fittings but will upload some later tonight.

The issue I ran into was once the the top seal was installed the impeller for the water pump would not slide over it. I enlarged it to slide over without damaging the keyway for drive shaft. There is some play where the was one before. I ran the motor over the weekend and am going to take apart the water pump to see how everything worked out.

I used Loctite 660 which can be purchased from Grainger.

www.grainger.com/product/LOCTITE-Retaining-Compound-2TRL2

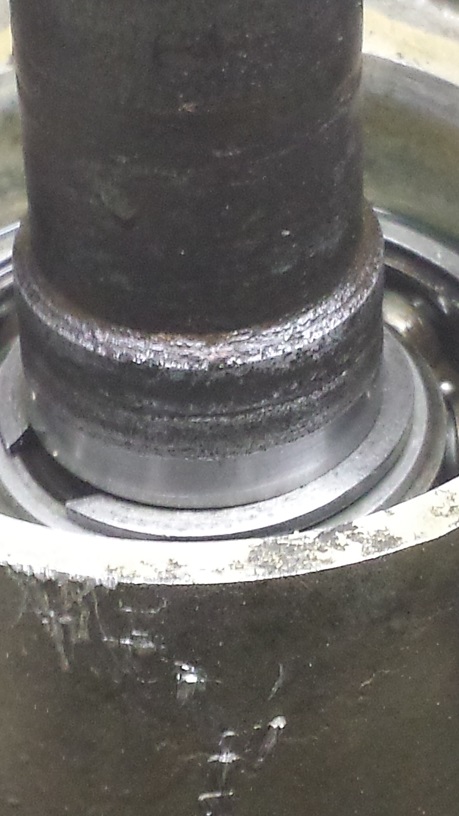
I did fix the leak however which was really bad. This was the drive shaft prior to the sleeve install.
Attachments:

Please Log in or Create an account to join the conversation.

Re:Speedy Sleeve installation advice 10 years 4 months ago #95037

FYI this is for a 1962 Merc 1000

Please Log in or Create an account to join the conversation.

Re:Speedy Sleeve installation advice 10 years 4 months ago #95045

if I am reading this right the speedy sleeve only goes on the bottom seal the top cover seal is a non issue if bad.

Please Log in or Create an account to join the conversation.

Re:Speedy Sleeve installation advice 10 years 4 months ago #95053

I installed them on both top and bottom. It did cause a problem installing the impeller for the water pump as the impeller is a tight fit to the drive shaft. I had to grind the brass out to get it fit over the sleeve but left the keyway intact so the impeller would still spin. I ran the motor the weekend and it was cooling the engine.

I am going to take apart the water pump to see how it looks after around 4-5 hours of use.

The fit between the impeller and drive shaft is not as tight as it was prior to installing the sleeve for the top oil seal.

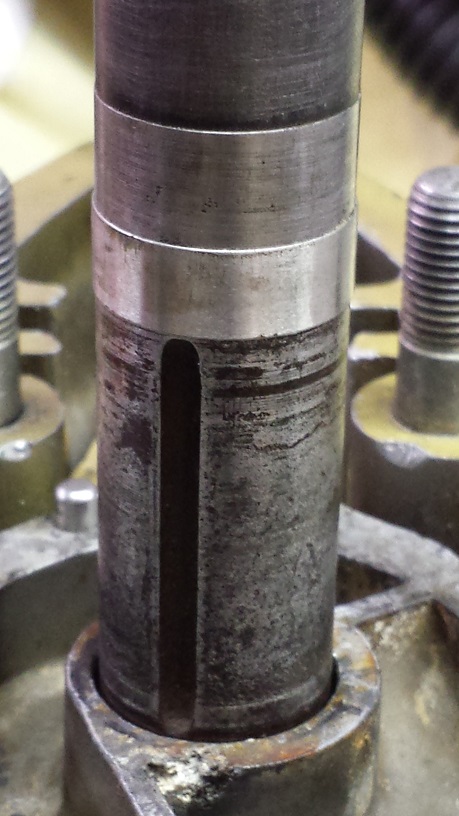
This is pic of the top speedi sleeve post install with the flange removed.
Attachments:

Please Log in or Create an account to join the conversation.

Re:Speedy Sleeve installation advice 10 years 4 months ago #95054

The bottom seal is the one on my drive shaft that caused the most problems. I did both since I needed to the do the bottom one anyway.

Please Log in or Create an account to join the conversation.

Re:Speedy Sleeve installation advice 10 years 4 months ago #95062

with the loose impeller it will spin on the shaft in time . I would remove the upper sleeve and use a new impeller for safety . the upper seal is a non issue for pumping it seals on the impeller quit well.

Please Log in or Create an account to join the conversation.

Re:Speedy Sleeve installation advice 10 years 4 months ago #95065

I'm glad this topic came up. I've considered installing one or more and I can see there's a lot to consider. Great info.

Please Log in or Create an account to join the conversation.

Re:Speedy Sleeve installation advice 10 years 4 months ago #95066

  • ed-mc
  • Offline
  • Platinum Boarder
  • Platinum Boarder
  • Posts: 1408
  • Karma: 232
  • Thank you received: 115
dave bernard wrote:

with the loose impeller it will spin on the shaft in time . I would remove the upper sleeve and use a new impeller for safety . the upper seal is a non issue for pumping it seals on the impeller quit well.


Exactly! You're risking burning up your motor by grinding out the brass impeller insert. I would definitely remove the upper speedi-sleeve and install a new impeller.

What makes it even worse is that you've got the old-style shaft with the pin drive. The impeller must fit tightly over the shaft and not have a lot of slop where it engages the pin, otherwise it's eventually gonna wear some more and then the impeller will spin.

I lost my '64 1000 the summer of '84 to a sloppy fit on the shaft, the impeller eventually started spinning. Of course it did it just after I did a deep-water start on a slalom ski! I still remember the sickening sound of it almost instantly heating up, then locking up! Problem in that case was a worn driveshaft, but you'll end up with the same situation on yours.

Fortunately I was young, had lots of energy and a pile of extra parts in the garage; a little honing, filing, and a few replacement pistons/rings, and she was back in the water the next weekend!!!

The upper sealing area doesn't matter anyway; if you'll note on the impeller, there's a cast-in rib on top & bottom that seals against the stainless pump insert & plate. The newer plastic impeller housings don't even have a seal up there.

Anyway, please do yourself a favor and fix that, trust me you won't regret it!

HTH..........ed

Please Log in or Create an account to join the conversation.

Re:Speedy Sleeve installation advice 10 years 4 months ago #95078

  • 63g3
  • Offline
  • Contributing Member
  • Contributing Member
  • Posts: 465
  • Karma: 62
  • Thank you received: 2
So I'll throw in my 2 cents to add here...
In all deference to the effort spent on the 1000 there is no need to seal the top area where water pump housing sits. The impellor rides against the housing top and pretty much seals from the inside, much like it seals against the wear plate. so a minimal amount of water might squirt out but it is a small leak relative to water volume being pumped so no effect on cooling capacity. A rubber slinger pushed on the shaft above the housing would help deflect the small amount that leaks out. Only worry about the lower seal area on the oil side. The drive shaft is smaller for the length from top spline to the impellor area to facilitate impellor replacement. It then is slightly larger below that where the seal rides (at least on the 6's) The sleeve will get close to it's final resting place with no effort.
The good Dr is the master and I would bow down and kiss his hand should I ever meet him but two things I'd comment on, first on the prop shaft, it is true about the bearing removal not being possible after speedi sleeving so put the sleeve on last, when bearing is in place. The same goes for the drive shaft too. If service is ever needed split it and then reinstall another...this scenario is unlikely as now that the gear case will be sealed well, you can run standard gear oil and the bearings should last forever at least out live us now that lubricant loss and water entry will be near zilch once prop and drive shaft have got the speedi sleeve treatment. I'm on year 14 on my 700 which gets used for a bit nearly everyday during the summer and it's as tight as a drum. Same for my Mark 75 although that sees less use.
DO NOT machine down your prop shaft, these are hard chromed steel for corrosion protection and you will blow through the chrome.
For both shafts:
Clean everything with BRAKE CLEANER to insure no oil or grease is on the surfaces to insure good bonding of the sleeve. For what it's worth I use Loctite red and I use their Primer T to insure cure. It's a spray that evaporates quickly and leaves a molecular film layer to help cure the Loctite, spray the shaft area and the inside of the sleeve, priming is good for several hours so no need to feel rushed, it is zero thickness. I apply Loctite to the sleeve inside diameter with a bead on the bell area so excess will get pushed back along the sleeve. If you put it on the shaft the sleeve install will snow plow the Loctite off the shaft down towards the bearing leaving little behind, if you know what I mean. The Loctite won't initiate cure until sleeve is pressed on. Loctite is made to bond in thin spaces, it's designed for that purpose where JB weld etc is an epoxy and needs film thickness for bonding and strength, where the sleeves are pressed on the minimal clearance is not an ideal situation for the epoxy but is for the Loctite. It will fill the pits etc and fully cure due to primer being there. I generally prep the shaft surface with 220 emery in the seal area only, using a thin strip of emery torn off the whole sheet. When purchasing the sleeves also inquire about longer sleeves, generally there are slightly longer lengths available and makes it more forgiving to exact placement. The lips of the seal must be riding on the new speedi sleeve to work right.
So now how to drive on the sleeves: If you have access to a machine shop which it sounds like you do, have them machine two washers out of Stainless Steel or regular carbon steel, about 1/4 inch thick. The inside diameter of each should be a slip fit in the seal area of each shaft but SMALLER than the outside diameter of supplied install tool!!! So now you will have the sleeve, followed by the supplied sleeve tool followed by the custom washer followed by a suitable length pipe to extend beyond the shaft. The washer outside diameter obviously should be large enough for the pipe to sit on. There you go, you can tap on the end of the pipe to press on the sleeve.
They (speedi sleeve) recommends that you remove the flange after install so split it as the recommend prior to install and they do peel right off, Double check for burrs after and touch up with 600 or finer grit just at the burr.
Wipe all excess Loctite off, particular attention on the bearing side of the sleeve where despite best efforts some will snow plow down to that end.
Keep in mind the magic of Loctite, it will only cure in the absence of air! So exposed Loctite won't cure but the thin layer trapped between the shaft and sleeve will (where you want it to cure) so no worries if you don't get it all.
For any burr from flange removal: I wrap and flat piece of metal with the fine 600 paper to make what looks like a file so I can touch only across the burr and not the seal area itself.
It is WAY easier to do all this with the shafts out but can be done in place with much fiddling.
At component install, be carful when the seal lips start to engage the speedisleeve as the diameter is bigger now with a sudden step up onto it so lube the seals and sleeve generously and work them gently onto the sleeve area.
Good luck!
Randy

Please Log in or Create an account to join the conversation.

Re:Speedy Sleeve installation advice 10 years 4 months ago #95091

Thanks for advice. As a brand new Merc owner I need all the advice I can get.

I'll get the top sleeve removed before I get her back on the water.

Please Log in or Create an account to join the conversation.

Re:Speedy Sleeve installation advice 10 years 4 months ago #95093

Thanks, gonna get that taken care of before I use the boat again.

Please Log in or Create an account to join the conversation.

Re:Speedy Sleeve installation advice 10 years 4 months ago #95216

  • Merccooper
  • Merccooper's Avatar Topic Author
  • Offline
  • Senior Boarder
  • Senior Boarder
  • Posts: 180
  • Karma: 6
  • Thank you received: 2
Thanks everyone for your great input and discussions. Thank you 63g3 for your time and detail of your instructions. I'm sure glad I asked the question! I'm hoping to be able to get back to work on this in the next week or two.

Please Log in or Create an account to join the conversation.

Re:Speedy Sleeve installation advice 10 years 2 months ago #97544

  • Merccooper
  • Merccooper's Avatar Topic Author
  • Offline
  • Senior Boarder
  • Senior Boarder
  • Posts: 180
  • Karma: 6
  • Thank you received: 2
Sorry for bringing back an older thread, but I'm just getting to the rebuild now (Funny how life gets in the way!)

63g3, I've got a couple of questions if you don't mind.

What type of Loctite red do you use?
With regards to filling pits, I thought there was maximum void (which was very thin) that Loctite was appropriate for. Depending on the depth of the pits, would you recommend filling with something like JB weld first (along with sanding of course)?

Although really hard to tell the depth from a picture, here is the drive shaft that I'm fixing.
Thanks for your help.
Attachments:

Please Log in or Create an account to join the conversation.

Re:Speedy Sleeve installation advice 10 years 2 months ago #97553

  • Merccooper
  • Merccooper's Avatar Topic Author
  • Offline
  • Senior Boarder
  • Senior Boarder
  • Posts: 180
  • Karma: 6
  • Thank you received: 2
Somehow I missed the DRs reply and just found it after my post above.

Thank you DR for all the details you provided.

Both the DR and

DR, I see you used JB Weld. From what you posted, it sounds like you put the sleeve on while JB was still "wet". By doing this I'm guessing a sealant (loctite) isn't needed. The JB would likely have a better chance (than loctite) of filling in pits that are deeper. Since I just happen to have JB on hand, I think I'll go that route.

Please Log in or Create an account to join the conversation.

Re:Speedy Sleeve installation advice 10 years 2 months ago #97560

  • Merccooper
  • Merccooper's Avatar Topic Author
  • Offline
  • Senior Boarder
  • Senior Boarder
  • Posts: 180
  • Karma: 6
  • Thank you received: 2
Well, there she be.
Being the first time doing this and being someone who is always on the wrong side of Murphy's Law, I was pretty nervous that something would go wrong (for those in the US, the sleeves are only 20 bucks, but here in Canada they want something like 70!). My only concern is that it isn't seated far enough down. The flange (or bell) wouldn't let it go any further.
I ended up using JB. Also, I used a piece of 3/4 inch Schedule 40 PVC plumbing pipe (the white stuff)to drive the sleeve on. It has to be schedule 40 as it is thicker more ridged. It was the perfect fit. I've got a question about the orientation of the oil seal in the pump housing but I'll post that on another thread.
Thank you very much to everyone who provided input!
Attachments:

Please Log in or Create an account to join the conversation.

  • Page:
  • 1
Time to create page: 0.329 seconds

Donate

Please consider supporting our efforts.

Glassified Ads

TEE NEE TRAILER W/BEE BOAT
( / Boats)

TEE NEE TRAILER W/BEE BOAT
09-11-2024

FG Login

FiberGoogle

Who's Online

We have 6962 guests and no members online