Welcome, Guest
Username: Password: Remember me
  • Page:
  • 1

TOPIC: 1970s? merc 850

1970s? merc 850 9 months 4 weeks ago #148083

I got a project on my hands here. From what I can see off the bat it will need internal wiring to say the least. But I have reason to believe it's been 15+ years since she ran. So I know it will be needing carbs cleaned spark plugs fuel system cleaned. But before putting to much money into it is there a way to check compression without it turning over? If not where would be a good place to source parts for this engine. Thank you all
Attachments:

Please Log in or Create an account to join the conversation.

1970s? merc 850 9 months 4 weeks ago #148086

It looks like you have a 1973 850. You could try to pull it over by hand to check the compression. You need to take off the top and wrap the rope around the top of the flywheel. There should be a rope in a plastic pouch inside the front cover. I have never tried to do it that way, but it is worth a try before you stick too much time and money into it. A good place for parts that I have found is oldmercs.com. Good luck.
Bill

Please Log in or Create an account to join the conversation.

1970s? merc 850 9 months 4 weeks ago #148087

I was wondering if that was a possibility i have done it in the past with lawnmowers so I wasn't sure if i could do that on a boat motor. I will give this a shot this coming weekend and see what happens.

I will take a look at that when time comes to start ordering parts to fix it up Thank you!

Please Log in or Create an account to join the conversation.

1970s? merc 850 9 months 4 weeks ago #148088

Nobody on here would happen to have a wiring diagram for this engine would they. I wanna try my had at just replacing wires instead of buying a harness but the wires are so corroded they are non existing basicly I can kinda piece it together but don't wanna wire something wrong is all. If I have to ill buy a new internal harness but I also am having issues finding a new harness as well.

Please Log in or Create an account to join the conversation.

1970s? merc 850 9 months 4 weeks ago #148089

  • ed-mc
  • Offline
  • Platinum Boarder
  • Platinum Boarder
  • Posts: 1395
  • Karma: 232
  • Thank you received: 114
414-2770 is the CDI Electronics P/N for your harness.

www.cdielectronics.com/cdi-application-search/?cdi_type=Outboard&cdi_brand=Mercury&cdi_year=1973&cdi_attr=85&search_sender=partApplicationSearchForm

Here's some on eBay and Amazon, for the eBay link you'll need to copy, paste into your browser, and remove the spaces. This site parses eBay links.

https://www. eb ay . com/sch/i.html?_from=R40&_trksid=p2334524.m570.l1313&_nkw=414-2770&_sacat=0&LH_TitleDesc=0&_odkw=414-2770&_osacat=0

www.amazon.com/414-2770-Mercury-20-40-50-65-80-85-90-95-100-115-125-135-140-150-Cylinder-1966-1981/dp/B09Q5CBLM6

I didn't see one cheaper than the Amazon harness.

Attached is a wiring diagram for your 850. Hopefully, you'll have spark once you straighten-out all the wiring, but it's very common on these trigger-fired pointless distributors that the trigger is bad. You can get a more reliable CDI Electronics replacement, but it's basically the entire distributor body and requires complete disassembly of the old distributor to transfer the moving parts to build a new one. Not cheap anymore, either.

On your engine compression checking dilemma, you can get a pretty good idea if you have a "dead" hole by roping-over the engine. But you won't get any accurate readings to be able to tell if you have one or more cylinders that are slightly down in compression. You'll need to be cranking-over with the starter motor for that.

You can get "Nasty" and just jump the starter with a healthy set of battery cables. It's gonna make sparks like the 4th of July! With all spark plugs out, it should crank fast enough to get a reading on one cylinder at-a-time. Be sure to spray some light lubricating oil in the cylinders and turn the crankshaft over at least a few revolutions to distribute. It wouldn't hurt to open the throttle butterflys and spray some in there, too.

You can also connect jumper cables to engine ground and to the battery-side of the solenoid, then jump +12V to the yellow wire on the solenoid. A bit safer since you won't get much sparks that way.

If your external harness is intact to where the battery cables are safe to connect to a battery, you may be able to just do it that way.

It looks like the wiring to your solenoid is deteriorated, so you may need to run a ground wire to one of the small terminals on the solenoid, and jump +12V to the other. This will activate the solenoid to turn the starter motor.

Anyway, there's a few options, G'luck on the checkout.............ed

p.s. you can look up parts at www.marineengine.com and you also may find good deals on parts on eBay. Armed with part numbers you can search eBay for those deals.

www.marineengine.com/parts/mercury-outboard-parts/850-4-cyl/3493913-thru-4366801-usa
Attachments:
The following user(s) said Thank You: charestv

Please Log in or Create an account to join the conversation.

1970s? merc 850 9 months 4 weeks ago #148090

  • ed-mc
  • Offline
  • Platinum Boarder
  • Platinum Boarder
  • Posts: 1395
  • Karma: 232
  • Thank you received: 114
Be sure to also replace the impeller before you run it. It will definitely be shot. Check the gear oil for water, if found you likely have bad driveshaft seals.

If you happen to buy parts on eBay, be sure they are in OEM packaging and/or by a reputable dealer. There are tons of "Chinesium" junk on there as well.
The following user(s) said Thank You: charestv

Please Log in or Create an account to join the conversation.

1970s? merc 850 9 months 4 weeks ago #148093

As usual, Thank you for your knowledge and your willingness to pass it on. That is what this site is all about!
Bill
The following user(s) said Thank You: ed-mc, charestv

Please Log in or Create an account to join the conversation.

1970s? merc 850 9 months 4 weeks ago #148098

AND,...Rather than "roping it over" initially, put a 15/16" socket and handle on the flywheel nut.
Remove the spark plugs,
Tilt up the motor,
Turn the steering to one side completely,
Spray engine fogging oil, or Liquid Wrench, in each spark plug hole, pointing the nozzle upwards towards the top of each cylinder.
Turn the motor completely the opposite direction, so the excess oil spray will move to the opposite sides of the cylinder walls,
Then slowly rotate the flywheel with your socket & handle,
Stop and repeat the turning and spraying,
Slowly rotate the flywheel more,
Repeat all the above until you know you have completed at least (2) full flywheel rotations.
Tilt the motor back down,
Rotate the flywheel with a bit more gusto a few times.
NOW your ready to spin the motor with the electric starter, do compressions, etc.
Make sure your yellow stator wires are taped off so they can't short out while spinning the motor.
Without a full harness & control box, be sure the rectifier is disconnected from the stator.
doc
The following user(s) said Thank You: charestv

Please Log in or Create an account to join the conversation.

1970s? merc 850 9 months 4 weeks ago #148100

Thank you everyone!

I might have found a motor on craigslist that is in better condition but has no compression in one cylinder. If i can get it for cheap enough i might just use that motor and mine to Frankenstein together one good (hopefully) motor.

Please Log in or Create an account to join the conversation.

1970s? merc 850 9 months 3 weeks ago #148104

  • ed-mc
  • Offline
  • Platinum Boarder
  • Platinum Boarder
  • Posts: 1395
  • Karma: 232
  • Thank you received: 114
Maybe it'll have a good wiring harness. The ign parts alone might be worth if if they're same as yours, and in working order. Good Luck!

Please Log in or Create an account to join the conversation.

1970s? merc 850 9 months 3 weeks ago #148106

He's got a video of it running so my guess I'd good wiring. It's got the same Cowel on it so same generation. Hopefully it'll be compatible. I'm trading a lawn mower I don't use for it so I won't be out anything if it doesn't work out anyway.

Please Log in or Create an account to join the conversation.

1970s? merc 850 9 months 3 weeks ago #148107

Just went to pick up the other engine and it's also a 1973 in near perfect condition. Other then low compression in one cylinder. So now the main question is do I remove the block from my motor and put it in this one or swap all the electronics from this motor to my motor.


I still need to do compression test on my motor. So worse case I gotta find a way to bore out the cylinder block and sleeve it. Then Frankenstein the 2 together with all the parts I have.

Either way lawn mower for this was a great trade I believe.

Attachments:

Please Log in or Create an account to join the conversation.

1970s? merc 850 9 months 3 weeks ago #148117

  • ed-mc
  • Offline
  • Platinum Boarder
  • Platinum Boarder
  • Posts: 1395
  • Karma: 232
  • Thank you received: 114
If the compression on your 1st 850 checks out good, it'd be far easier to swap any needed electrical.

Then get the thing running, check it out, if it's healthy, then you might consider swapping the running powerhead to the nicer-condition motor. Or mix-n-match the best parts to build one nicer motor.

Note if you need to swap the charging stator under the flywheel, you'll need a flywheel puller. Other than that, the powerhead is pulled and dismantled using normal hand tools, no other special tools required.

Here's an inexpensive puller:

www.amazon.com/Zinger-Outboard-Flywheel-91-849154T1-91-90455-1/dp/B075VLC29Q

This one also comes with a lifting eye, which would come in handy for lifting powerheads.

Please Log in or Create an account to join the conversation.

1970s? merc 850 9 months 3 weeks ago #148125

I somehow managed to find a 1973 powerhead with possibly a new stator and all cylinders with good compression on ebay for only 400 dollars shipped to me. Worth the new stator alone so I pulled the trigger on it and will probably end up just using this powehead and repairing the other 2 on the side. I will need to find a way to sneak it into work to rebore the cylinders.

Please Log in or Create an account to join the conversation.

1970s? merc 850 9 months 3 weeks ago #148126

  • ed-mc
  • Offline
  • Platinum Boarder
  • Platinum Boarder
  • Posts: 1395
  • Karma: 232
  • Thank you received: 114
Good find! And eventually you could end up with 2 good working outboards, even better!

Please Log in or Create an account to join the conversation.

1970s? merc 850 9 months 3 weeks ago #148130

Those were my thoughts exactly If I can get one going good enough to use the boat and work on the other one to make it virtually new I may be able to resell one of them and recoup some of the money I've spent on the boat. Which isn't much at all at this point considering I've got 3 engines a boat and a trailer all for under 1K

Please Log in or Create an account to join the conversation.

1970s? merc 850 2 months 4 weeks ago #148616

finally got around to putting the new wiring harness on the motor now i am working on rewiring the controls. However i am finding that there are a couple issues maybe someone can help me with.

1, the "mercury switch" has no wiring left to rewire and i cant seem to find it anywhere what is this and is it even needed?

2, i am in need of new throttle/shift cables are these universal or do i need to order spasific ones?

3. in the controls box the choke button and tac plug also have nothing to connect to anymore as the wiring is no longer there. where can i sourse these parts? and does anyone have a tac for these old motors they are willing to sell?

Please Log in or Create an account to join the conversation.

1970s? merc 850 2 months 4 weeks ago #148617

  • ed-mc
  • Offline
  • Platinum Boarder
  • Platinum Boarder
  • Posts: 1395
  • Karma: 232
  • Thank you received: 114
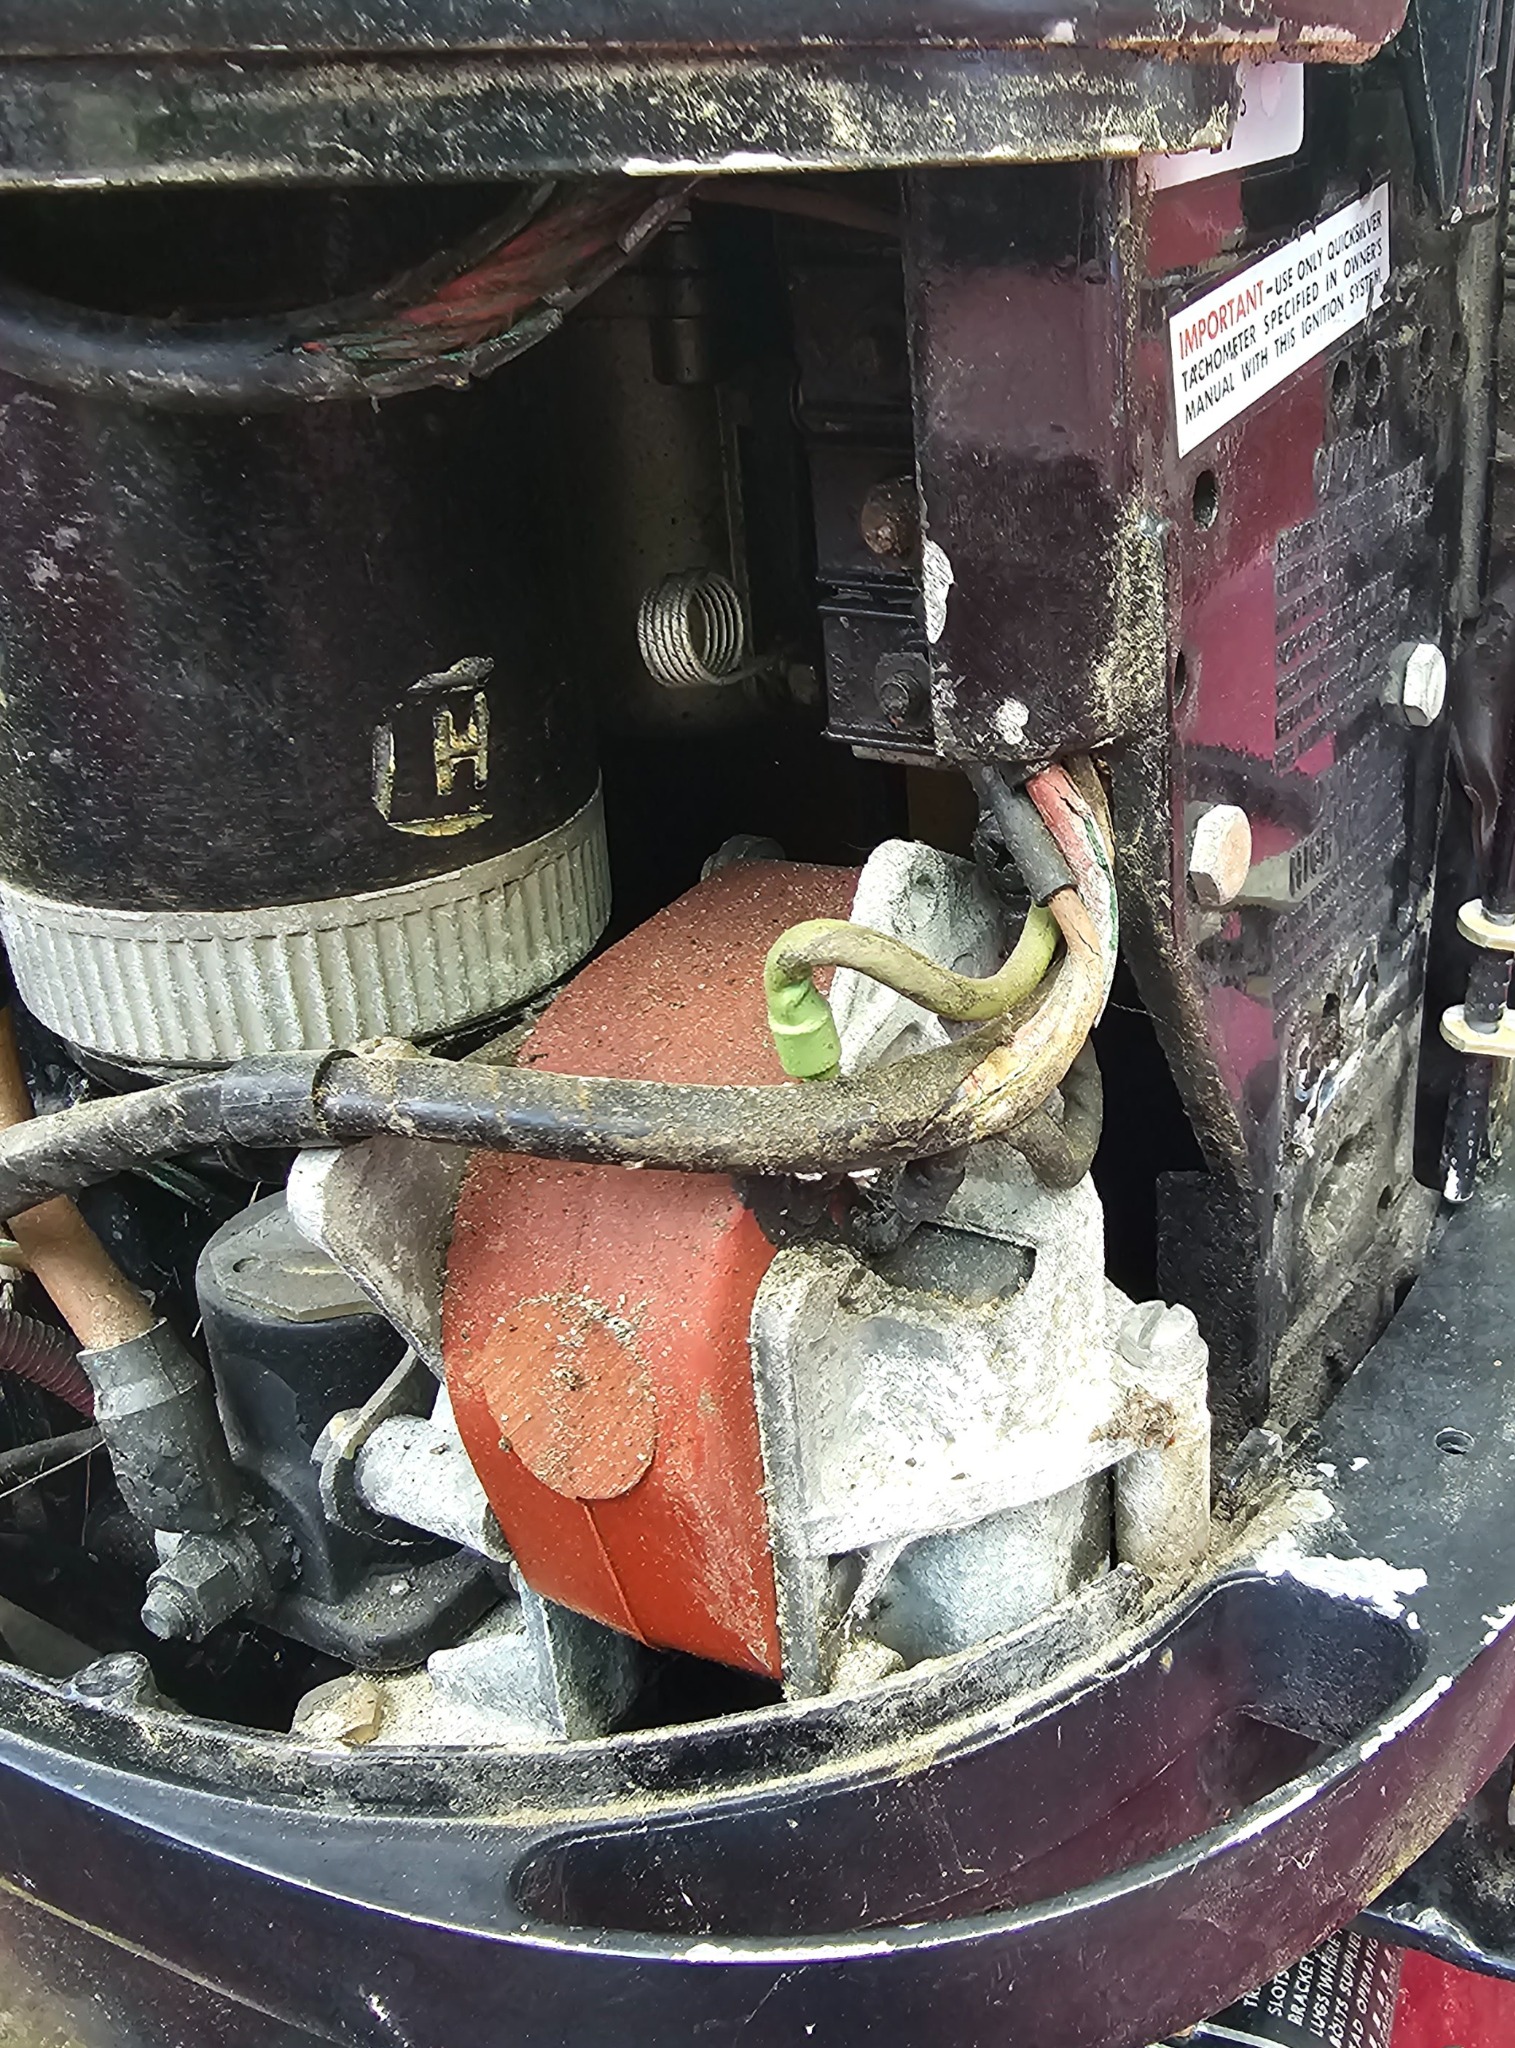
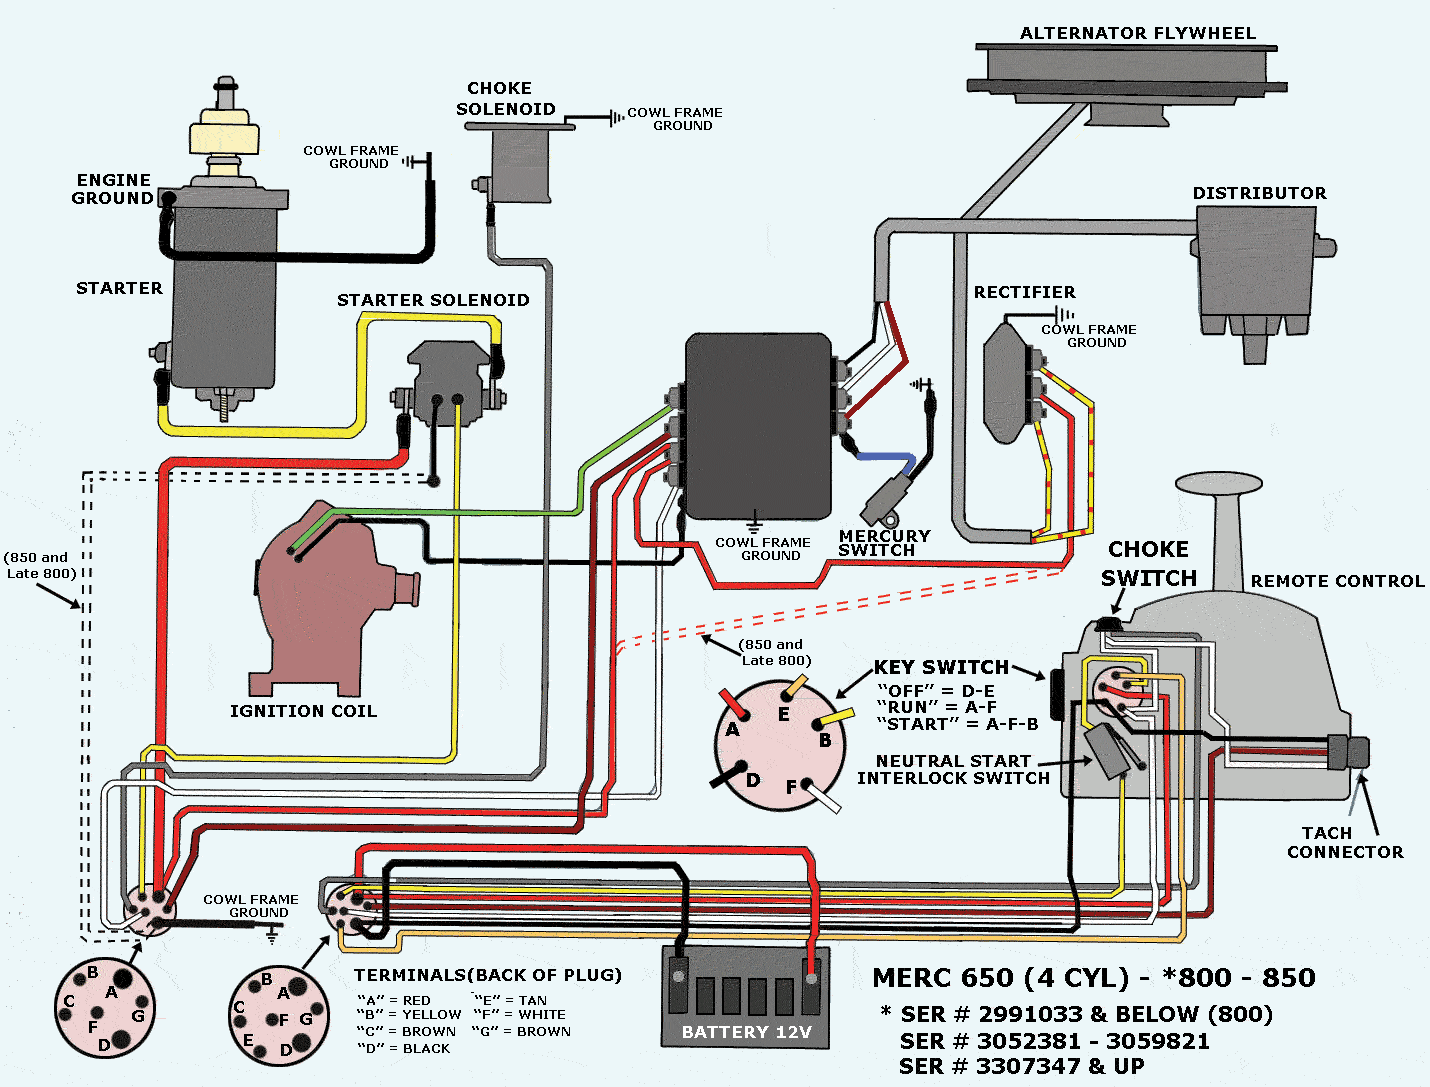
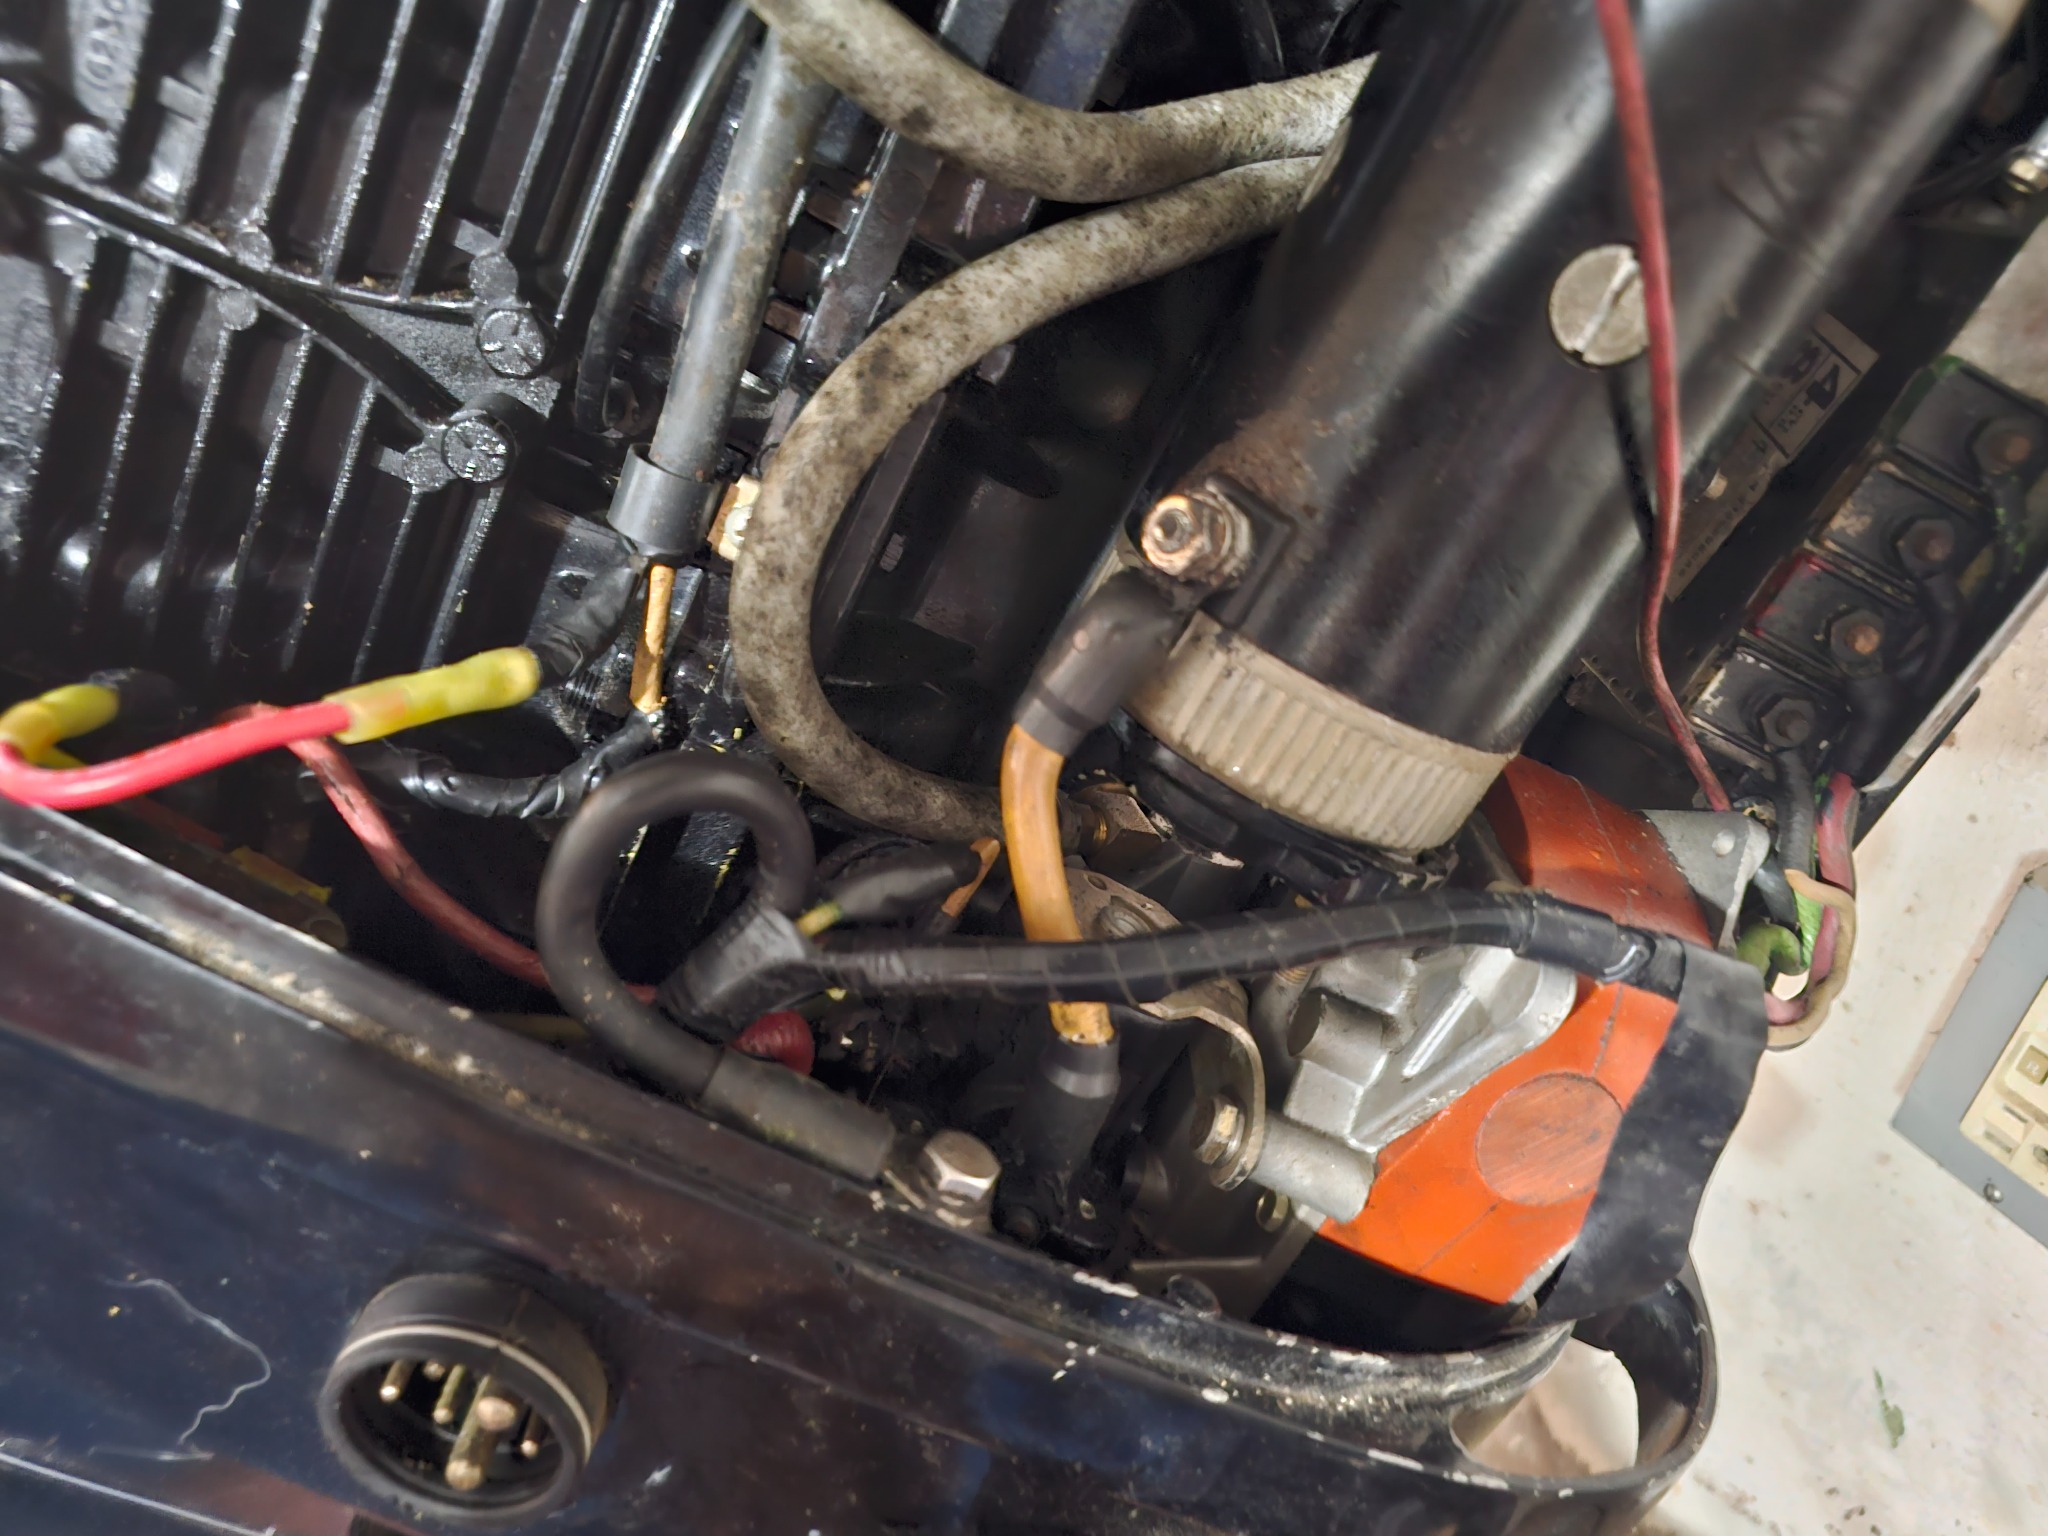
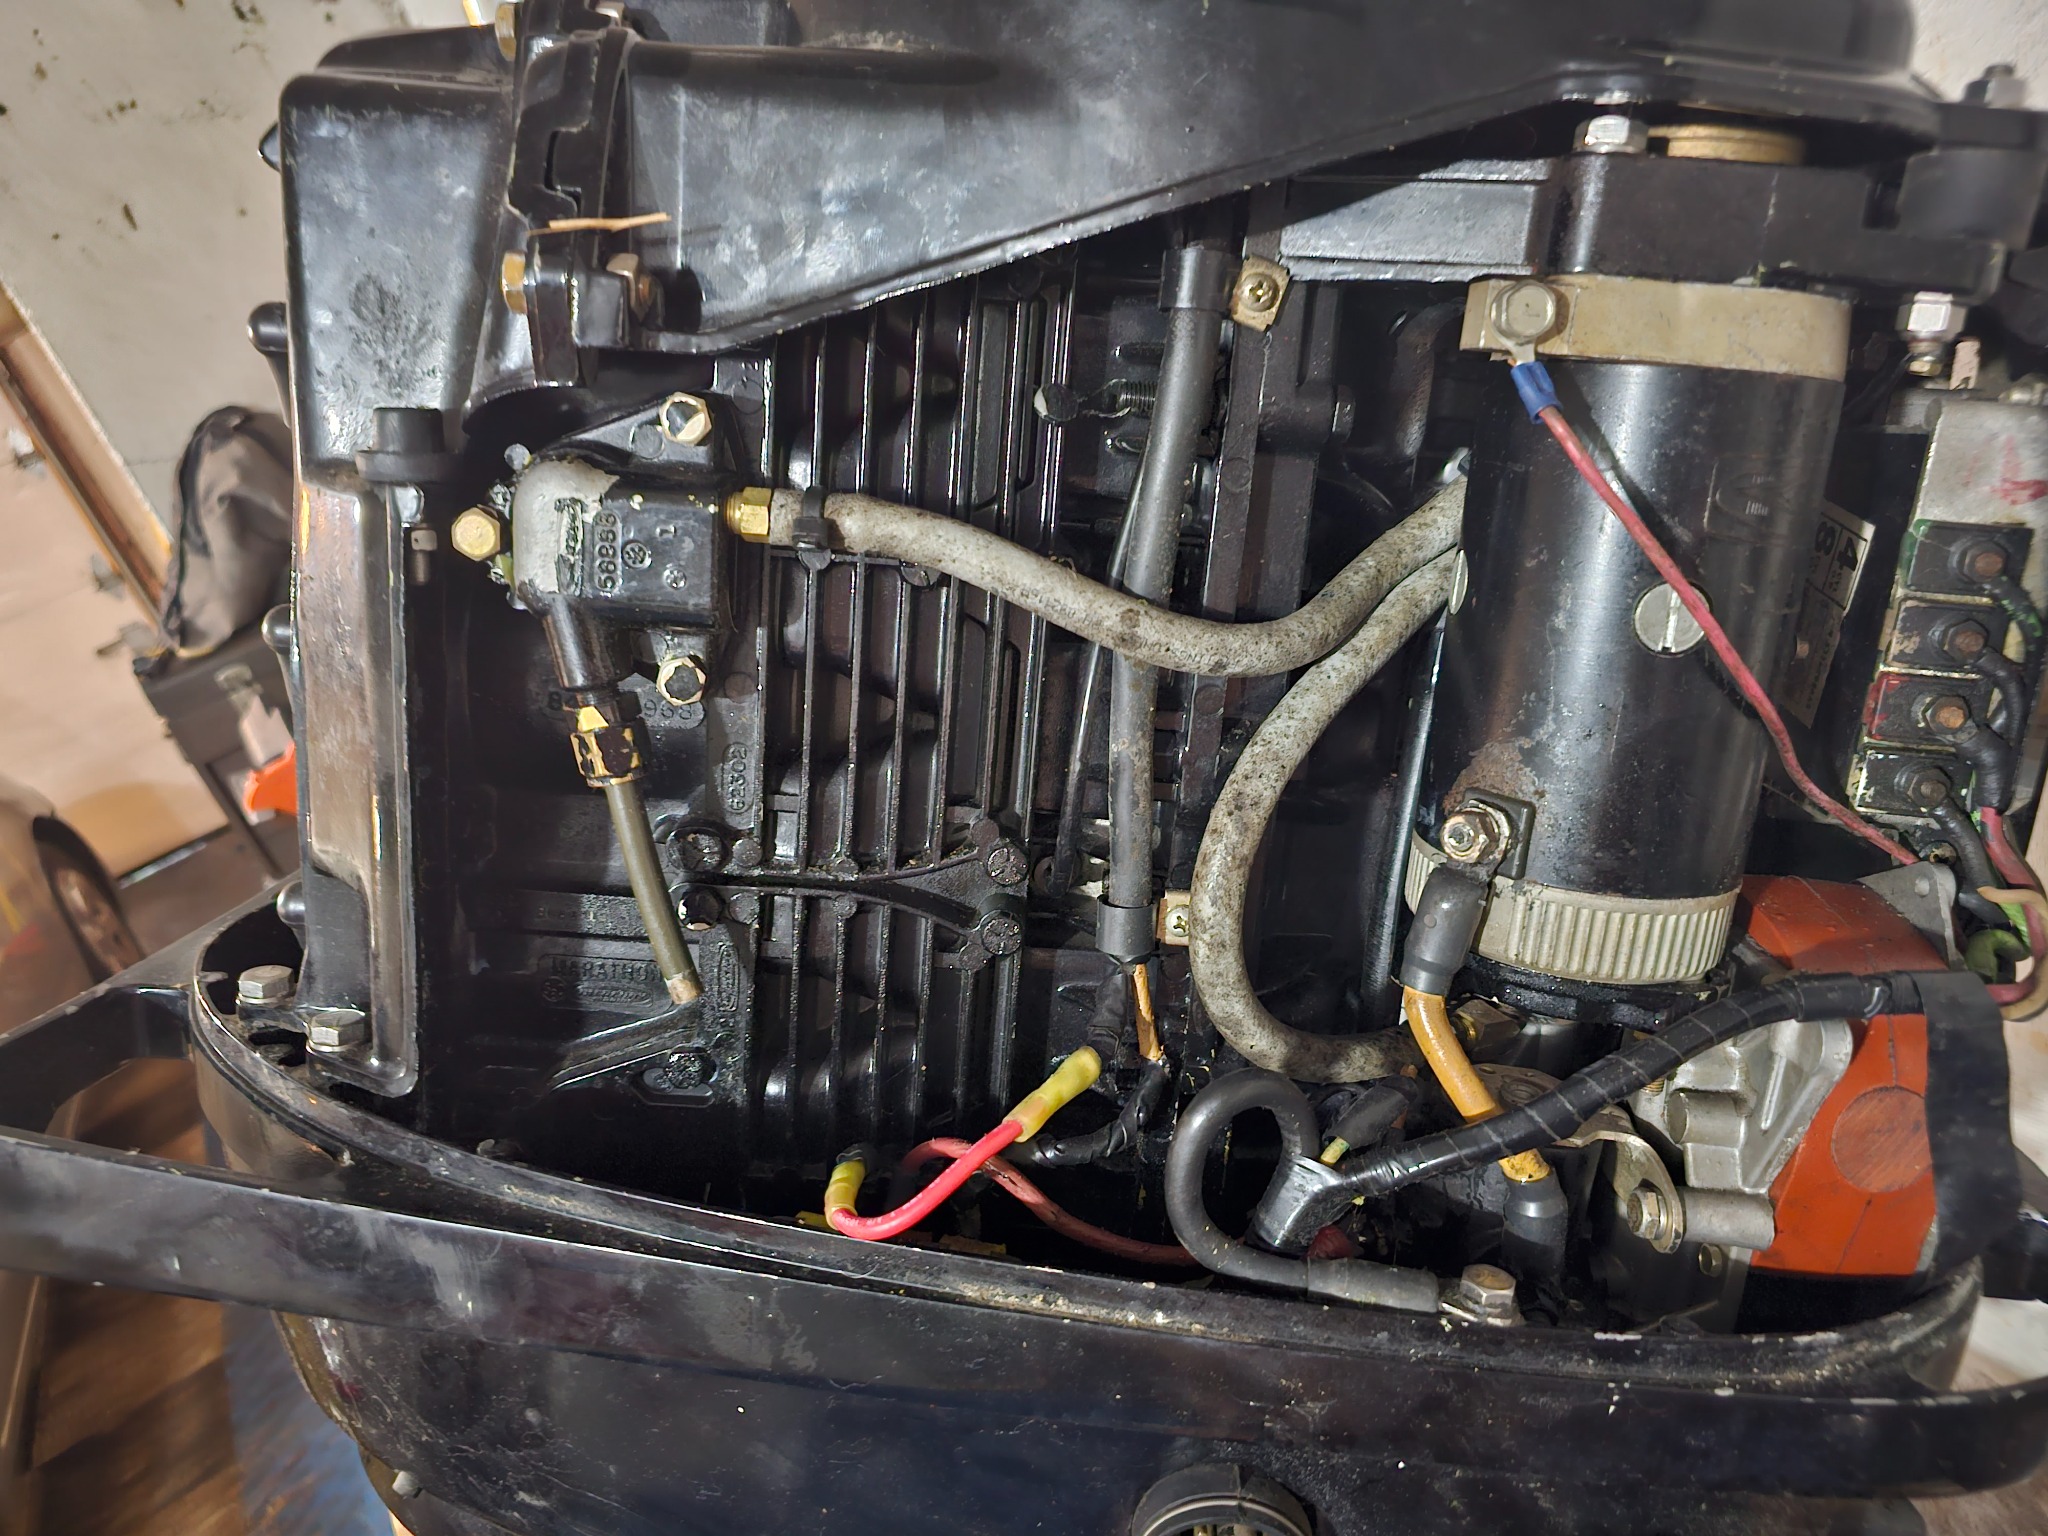
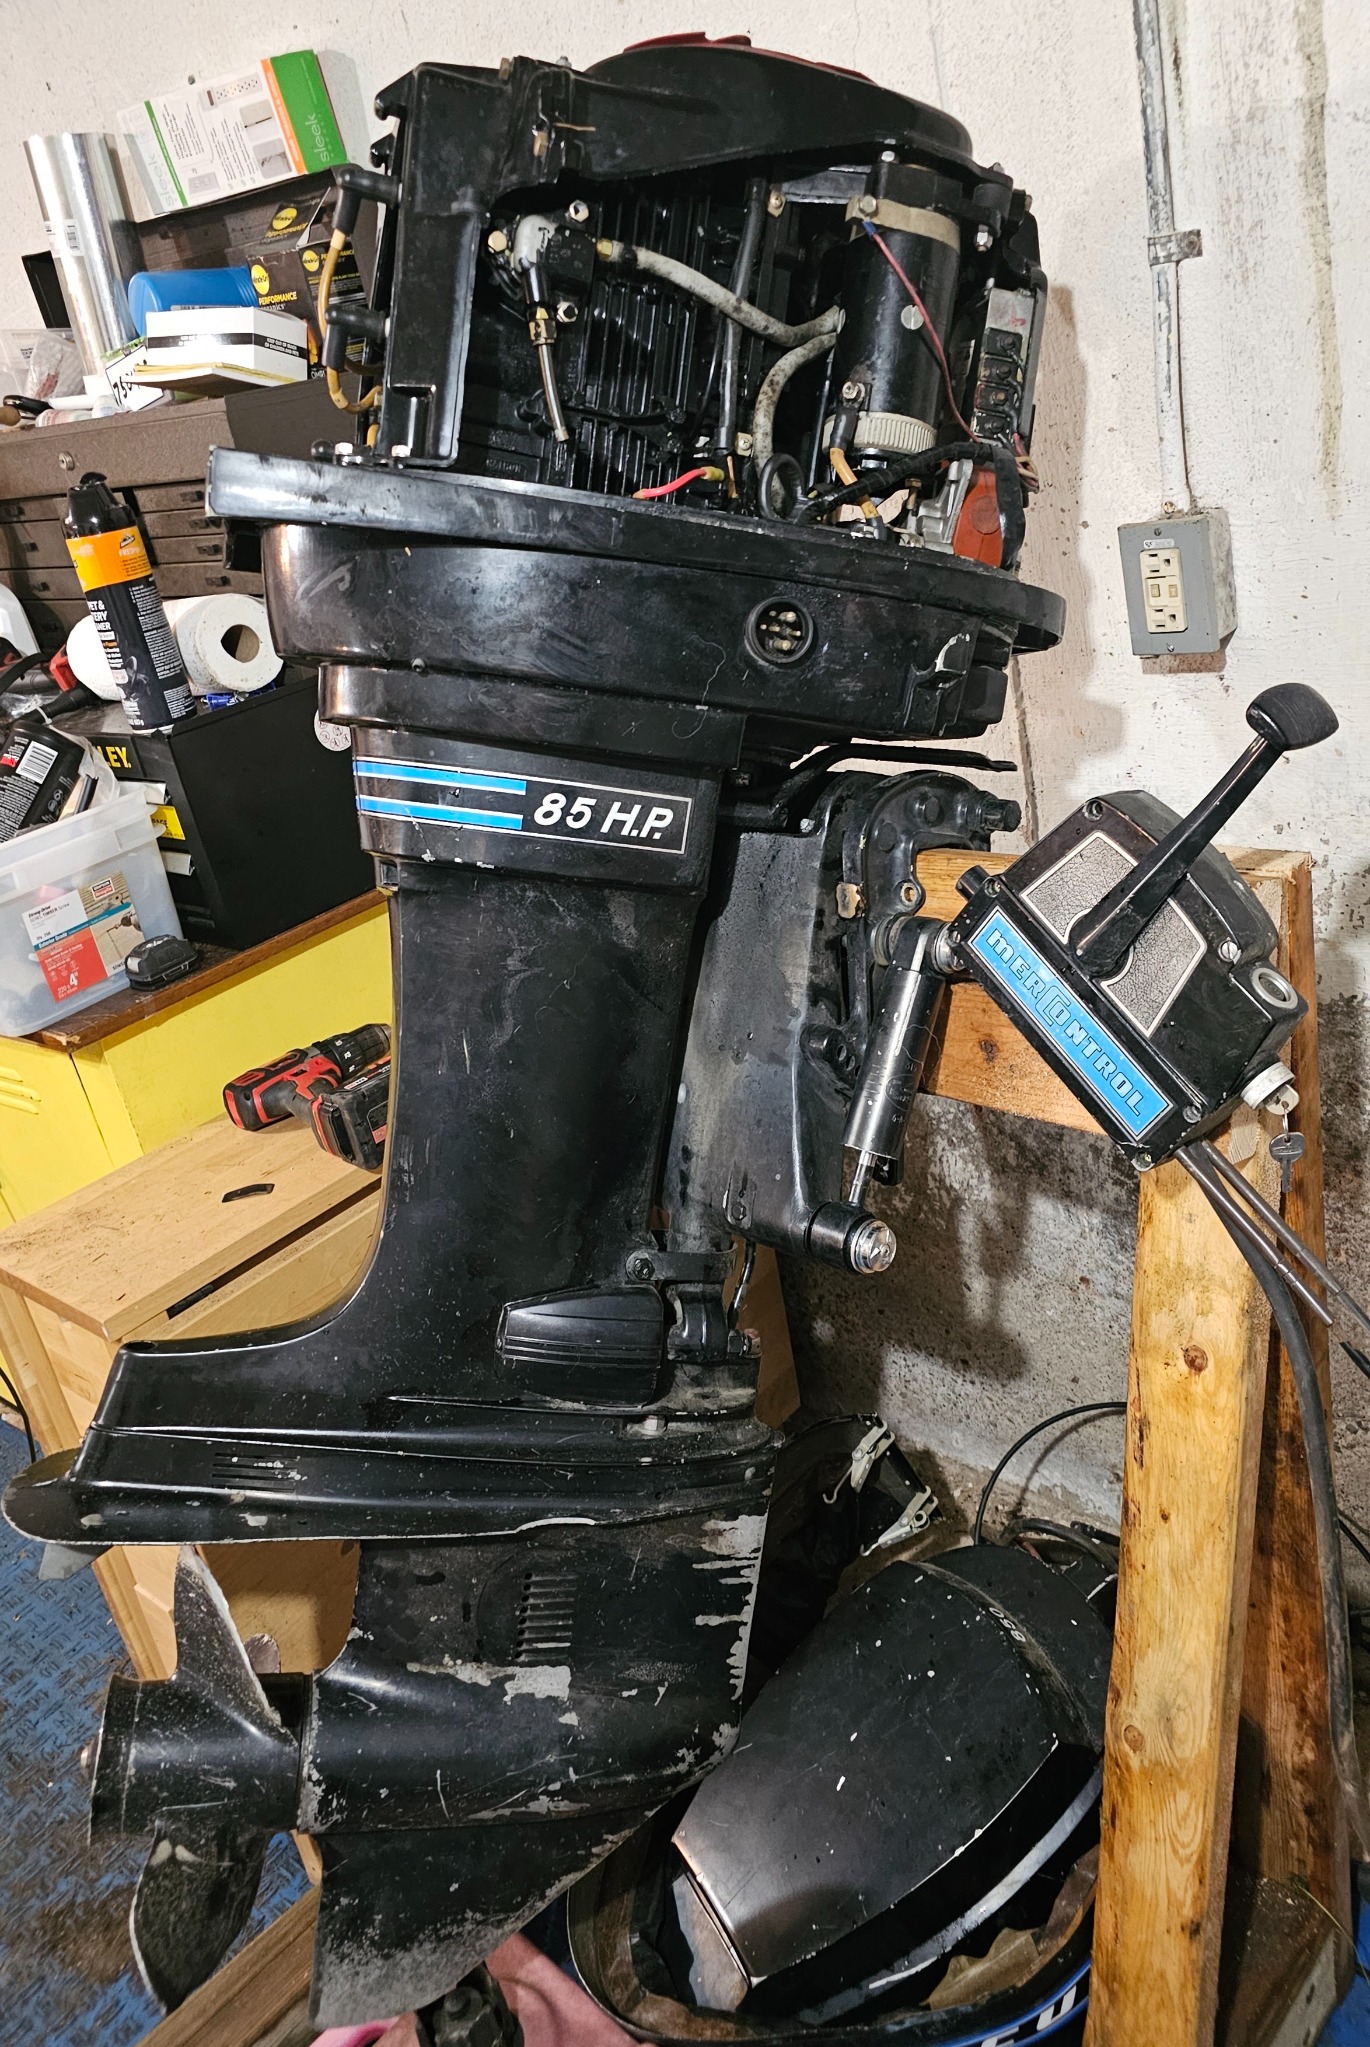
1) The switch is a reed switch with a droplet of mercury (the element, not the brand of outboard) in it. It's positioned such that if the engine hits an obstruction at speed and kicks way up, the droplet of mercury will short out the reed switch, which grounds the ignition and kills it. Otherwise the engine could overspeed with a lot of throttle and full load, not to mention the stress you'd get with a full-rpm engine's prop hitting the water on the way back down. So technically while you can run the engine without it, and there's a very slim chance of the engine popping up like that, it's a good idea to have all the safety systems in place that came from the factory.

The P/N is 58124A 7, "Switch Assembly" and Marineengine.com has 6 in stock. It's NLA from Mercury. $82.50, not cheap!

Here's one for around $70 on eBay: https:// www. ebay .com/itm/375030452964 You'll have to copy that link and take out the spaces, this site won't allow ebay links for some stupid reason. Their censor program will parse a complete ebay link.

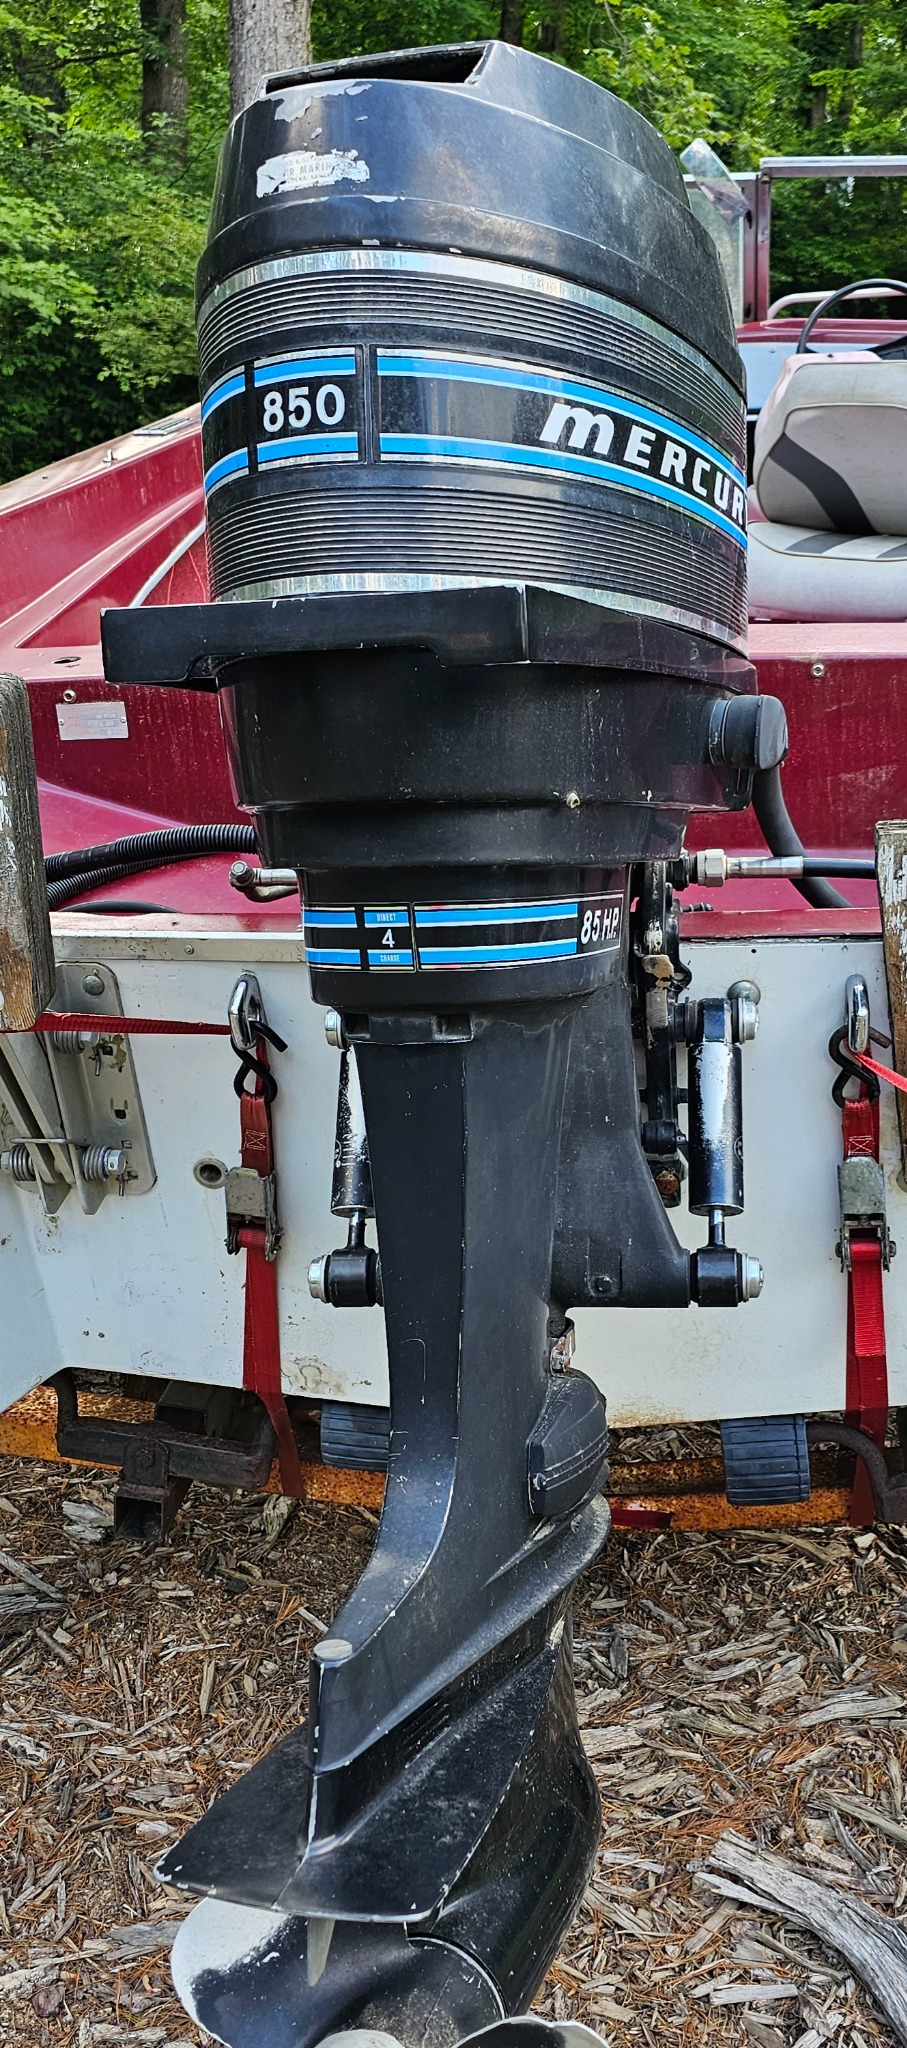
Anyway, I wouldn't spend that much $$$ on one of those switches until you take it out and see if it's even gonna run right. And this switch was present on models from the 50's through late 70's and maybe beyond. If you find a 4 or 6-cyl merc in the scrapyard, it's gonna have one of these. Virtually no demand, either. So used ones aren't really worth much unless someone really needs one. I can't recall ever having a bad one, and I've worked on Hundreds of Merc over the years.

2) You should be able to order just standard throttle cables meant for Mercury outboards, they have the standard motor ends and there should be no difference at the control box end. If you have a West Marine store nearby or other type of marine outlet store, they probably have them in stock. You'll either have to go by the length printed on your existing cables, or measure-out as per the mfr's instructions of the particular brand of cable you're getting.

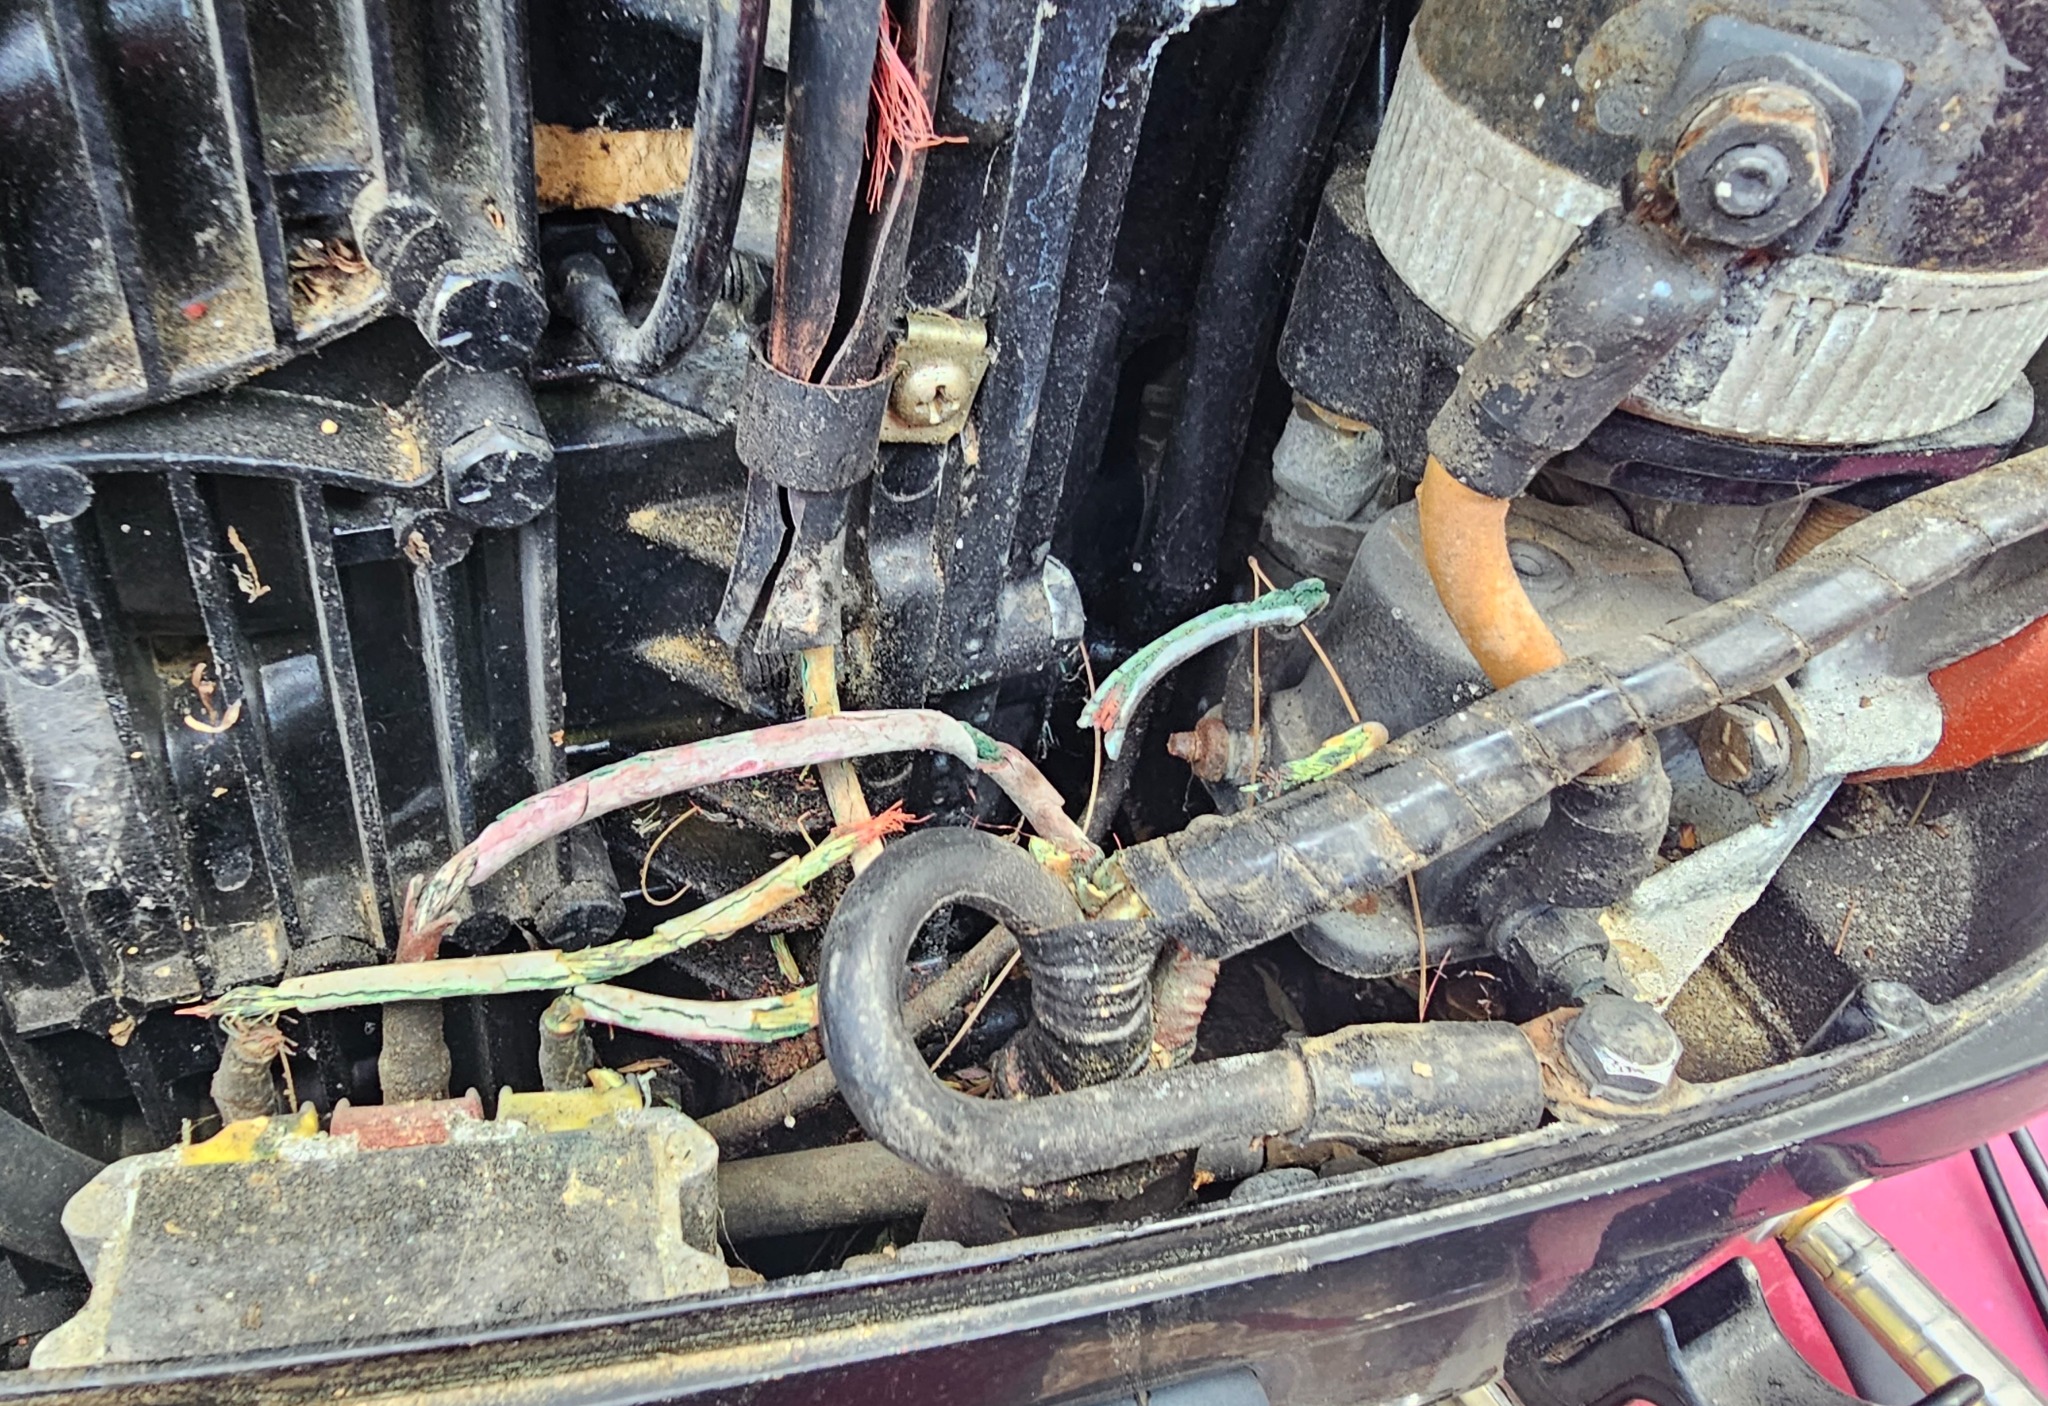
3) You may have to post a picture of the control box. The ignition switch, choke button, and neutral interlock microswitch are all supposed to be wired together. The choke and limit switch have wiring that solders to their particular terminal on the ignition switch. Check back to the wiring diagram I posted eariler. The tach was optional but most boxes were wired for it. The tan wire coming off one of the alternator terminals on the rectifier, is the tach signal. The white wire associated with the tach plus is switched +12V power and the black wire is ground. There's an accessory wiring harness that plugs into the tach, but those may not be so easy to find anymore and ain't gonna be cheap. You can use spade terminals and just plug them into the rubber external tach plug, to run any 12-pole modern outboard tach. They are all set up to take the pulses of the alternator and turn into a tach reading without any further calibration.

Maybe you need to post pictures of the control box end of your harness, and also the 2 control box halves, open so we can see what's in there. Then we can tell if you have all the "guts" you need to get 'er running. BTW if you're missing some pieces, they might be available on eBay and you can look up the part numbers at Marineengine.com:

www.marineengine.com/parts/mercury-outboard-parts/850-4-cyl/3493913-thru-4366801-usa

www.marineengine.com/parts/mercury-marine-accessory-parts/remote-controls-and-components/outboard-1985-and-below
The following user(s) said Thank You: charestv

Please Log in or Create an account to join the conversation.

1970s? merc 850 4 weeks 2 days ago #148706

Thank you for this info i was able to get one motor running this past weekend only to figure out it had no compression in one cylinder like i expected. so i went to work on the other one which fired right up last night. i had a makeshift gas setup on it and the stator still isn't connected due to non existent wires I also had no water running through it as i didn't yet change the water pump however since it was 20 degrees out and i was only running it to see if it would start. however it did idle extremely high could that be because of the combo of fuel setup no water and none of the throttle cable or shift linkage being connected?

Please Log in or Create an account to join the conversation.

1970s? merc 850 3 weeks 6 days ago #148709

  • ed-mc
  • Offline
  • Platinum Boarder
  • Platinum Boarder
  • Posts: 1395
  • Karma: 232
  • Thank you received: 114
I wouldn't even bother running the one with no compression; there's no point, it's gonna have to come apart for a rebuild in any case, if you're ever considering using it.

Do you have one powerhead with good compression? That's the one to concentrate on. And don't run these more than 30 seconds without water in any case, you can overheat the block. Obviously the rubber impeller will be shot and you also stand a chance of overheating the plastic upper pump housing. This can melt plastic which runs right down onto the impeller, then when cooled it hardens up and cuts up the impeller next time you run the engine.

Anyway, if you do have one with good compression, IMHO I'd be working on that one.

Please Log in or Create an account to join the conversation.

1970s? merc 850 3 weeks 6 days ago #148710

There is a listing for running merc's, 800 and an 850 on Craig's list Minneapolis. May be a source of parts for your project.

Please Log in or Create an account to join the conversation.

1970s? merc 850 1 week 3 days ago #148736

After a few months of tinkering with the engines I have and new parts I ordered. I was able to get one motor running after both of them sitting for 20+years with what seems to be all cylinders. Still seems to idle high I think. Only things to button up now are new stator, replace all the fuel lines, and reconnect the new throttle and shift cables I have. Then I should be good to test it. I'll need to be sure to bring a trolling motor with me though as I don't know how much faith I have in myself on how well it will run on the water.

Here's a YouTube short I posted of it running.

youtube.com/shorts/vmEx07pf7M4?si=aW2eT9-CG2Uoqzd9

Thank you everyone for all the help so far if I haven't said it already. I know I don't always respond to everyone but I do read every post and take all the advice I can get.

Please Log in or Create an account to join the conversation.

1970s? merc 850 1 week 3 days ago #148737

  • ed-mc
  • Offline
  • Platinum Boarder
  • Platinum Boarder
  • Posts: 1395
  • Karma: 232
  • Thank you received: 114
Yes, that's a bit of a fast idle. Loosen the locknut on the "Idle Stop" screw only and back out the screw, that'll slow down the idle. Don't move any other screws. You may have to readjust the slack/preload in your throttle cable after making an idle speed adjustment. Sounds good though.

Best idle adjustment is made with the boat in the water, motor fully warmed, in Fwd gear and adjusting one idle mixture screw at a time. Find the rich/lean range by adjusting back and forth. These need to idle a bit "lumpy" because there is no accelerator pump, if you lean them out far as they'll tolerate at idle, then as soon as you mash the throttle it'll die. So leave the idle mixture a bit on the rich side of the adjustment range.

BTW the motor is tilted too far out from the transom, if it's sitting on the adjustment pin, which I'm assuming it is. A good place to start is 2 holes out, and then maybe you'll find the boat wants more bow lift at speed, so move the pin to the 3rd hole and see what happens. With the motor tilted so far out, it's gonna drive the bow way up on takeoff and you probably won't be able to plane the boat. Without power tilt 'n trim, it's a compromise between planing performance and top speed.

Have Fun in the water!
The following user(s) said Thank You: charestv

Please Log in or Create an account to join the conversation.

1970s? merc 850 1 week 3 days ago #148738

I figured it seemed a little high to me. Thank you i am going to register the boat next week and need to do some work on the trailer to be able to register it as "homemade" then hopefully i can get it on the water in a month or 2.

If I understand you correctly sounds like your saying adjust the idle stop to lower the idle and only that screw. which if I am thinking right isn't on the carbs it is the forward screw on the distributor.

Then to also adjust the mixture screws on the carbs themselves but only while it is on the water? this i may be hesitant to do as the engine was running fine when it was stored so any change there might end up creating more problems. seeing as i haven't touched the carbs at all. But this i will see how it runs after it is on the water as it seems to me i am now at the point where i need to do some water testing.

It is sitting on the adjustment pin however i have no idea what hole it is on but i will for sure check now i didn't even think of that thenk you for all the knowledge you have shared with me!

Also i cant seem to find fuel lines in stock anywhere would it be good enough for me to just make my own fuel lines to replace what is there?

Please Log in or Create an account to join the conversation.

1970s? merc 850 1 week 2 days ago #148741

  • ed-mc
  • Offline
  • Platinum Boarder
  • Platinum Boarder
  • Posts: 1395
  • Karma: 232
  • Thank you received: 114
Well, I guess if it idles well enough in the water on your "Maiden" voyage and accelerates properly, you won't need to touch the idle screws. I guess we'll go into more detail if you find it's a cranky idler. It won't do any good to try and adjust them on the flusher.

You could immerse the lower leg of the motor in a big barrel of water, then you can warm up the engine somewhat and adjust the idle mix in gear. Makes a good preliminary adjustment at any rate. A plastic water barrel with the top cut off works well for this. Lacking that, you can still adjust that "Idle Stop" on the distributor and get the speed down to a more reasonable level.

If the motor is idling too fast, it's gonna make for some very hard shifts into gear. Don't want the boat lurching forward! Your idle speed will change in the water (it'll be a bit lower than on a flusher). So bring a few tools and be prepared for some minor adjustments.

Good Luck!

Please Log in or Create an account to join the conversation.

1970s? merc 850 1 week 2 days ago #148742

Oh maybe when I get it all buttoned up I'll just run it in a barrel to see how it does before I go out on the water but yes for sure I plan to bring more then what I need for tools and a kicker motor as well incase so I don't need to row lol.

Thank you. I'll post when I get more done with it however I'm switching to second shift at work soon so this project may be pushed aside for alittle bit.

As far as fuel lines though I found a full set of NOS for 100 bucks is that worth it or should I just attempt to make my own? If I make my own would 3/8 be good?

Please Log in or Create an account to join the conversation.

1970s? merc 850 1 week 2 days ago #148743

  • ed-mc
  • Offline
  • Platinum Boarder
  • Platinum Boarder
  • Posts: 1395
  • Karma: 232
  • Thank you received: 114
As I recall those hoses are more likely to be 5/16" i.d. but you can always take one apart and measure it.

If your hoses are of the crimped-ferrule type, they're a bit more difficult to reproduce. Otherwise you can just get some replacement marine-grade fuel hose, cut some new pieces, and have at it.

Crimped hoses can be done, here's a bunch of info from the Mercury Outpost archives on the ferrules and crimping tools for that:

fiberglassics.com/forum/search.html?query=ferrule&searchdate=all&searchatdate=04/17/2024&childforums=1&catids=17

Here's an inexpensive crimping tool for 1/4" and 5/16" fuel line ferrules, other sizes are available as well:

www.amazon.com/Interstate-Pneumatics-H6-V-Grip-Crimper/dp/B0093JOLCW

The advantage over that NOS set you found, is that the NOS hoses may not be alcohol-resistant. Important nowadays unless you've got a reliable supply of non-alcohol fuel.

Plus once you've bought the crimper and ferrules and any special fittings you need, you're well-equipped to make more fuel lines on any other old Merc. A good investment if you're planning on digging into the hobby further!

Please Log in or Create an account to join the conversation.

1970s? merc 850 1 week 2 days ago #148744

Ah good point I didn't think about how different the gas is now to back when those were made I might just try my hand at making some then. And honestly being a toolmaker I have already made a flywheel puller for this along with a few other odds and ends. so I might attempt to make a crimping tool as well. I'll have to go out at one point to the garage and measure it and figure out the threads before I go ordering fuel lines and fittings.

Also when I prime the bulb never gets hard and fuel starts to come out of the top carb from my little research am I wrong in thinking that it's the diaphragm on the fuel pump that needs to be replaced? Or could that be something else?

Please Log in or Create an account to join the conversation.

1970s? merc 850 1 week 2 days ago #148745

  • ed-mc
  • Offline
  • Platinum Boarder
  • Platinum Boarder
  • Posts: 1395
  • Karma: 232
  • Thank you received: 114
I'm assuming your carbs are like the picture below. Fuel coming out is likely due to the float level incorrectly set, or a bad needle/seat. Sometimes the old foam-material floats become saturated with fuel and sink. The old seats are rubber and can leak.

You can get new parts for these including floats that are alcohol-resistant, and solid seats with a flexible fuel-resistant tip on the needle, which work much better than the old-style.

Note the spring atop the float, it's what pushes on the lever to close the float needle. There's a spec for how much it protrudes from the float. Plus float height and drop adjustments. So, lots you can do with the carbs.

Recommend you pick up a manual, SELOC's line of outboard manuals have pretty good instructions in them. There will be an entire section on carburetors with "Good Words" i.e. practical suggestions to make the work go easier and better.

Seloc 1406 is the one you'll want, it covers your 850 and many more 4-cylinder Mercs.

$53 on Amazon, there's a good usable book on eBay for $16.95 (or best offer!) shipped, another used under $28 shipped, and new for $49.99 shipped.

Just search for "Seloc 1406" and they'll pop right up. I'd post a link but this site would just censor it.

Look up parts at Marineengine.com for your Merc's serial number. Once you have a part number you can check to see if maybe eBay has it cheaper. Marineengine does have decent shipping prices so it's not a bad place to buy parts. Plus all of those handy parts diagrams! An invaluable online reference.

For work on the carbs, you don't need their "repair kit", it's a bit $$pendy. Pick up their "packing kit" instead, it'll have all the little teeny gaskets etc that you need to service a carb. One kit needed per carb.

#39 on this diagram:

www.marineengine.com/parts/mercury-outboard-parts/850-4-cyl/3493913-thru-4366801-usa/carburetor-assembly

Assuming this is your serial # range, be sure to verify with the tag on your transom bracket.

HTH.............ed
Attachments:

Please Log in or Create an account to join the conversation.

1970s? merc 850 1 week 2 days ago #148746

I was concerned you would say that however good news for me i have a whole spare motor that i was able to acquire same year. Which looks to have already rebuilt carbs on it as they look brand new and i was told the guy who owned it previous to me did a lot of work to it then fired it up and it had a bad cylinder. So hopefully i can take the parts out of those carbs and just put them on these without taking these off the motor. just so i can avoid a link and sync after. However if they need to come off i suppose that i will have no option but to cross that bridge when i get to it.

Please Log in or Create an account to join the conversation.

1970s? merc 850 1 week 1 day ago #148749

  • ed-mc
  • Offline
  • Platinum Boarder
  • Platinum Boarder
  • Posts: 1395
  • Karma: 232
  • Thank you received: 114
It's probably easier to swap out carbs than to swap bits n' pieces from one to the other. But it can be done.

Just pull the float chamber cover/needle assembly off the carb, then the float pulls out. Pop the idle screw out along with its spring, and pull the brass main needle hex plug out of the bottom right front (#32 in the diagram).

That opens up the carb body pretty well and you can blast carb cleaner thru all of the accessible orifices, followed by compressed air if you have it. Usually that cleans 'em out pretty well, unless there's a bunch of green Verdigris inside. Then it's a full disassembly including pulling the jets and orifice tubes, and lots of scraping!

Please Log in or Create an account to join the conversation.

1970s? merc 850 1 week 1 day ago #148750

Ah ok well maybe it wouldn't be terrible to learn how to do a link and sync on it if it would be an easier process to just swap carbs.

If I swap all the part from one to the next that link the carbs together. Is there a chance that I don't need to adjust to much on them after installed?

I also just looked and those fuel lines are in tact so I've got a set of fuel lines as well.

I go on second shift may 13th which is when I wanted to have the boat "running" by so I've already achieved that goal if I can find the time to swap carbs and fuel lines and instal the stator there might even be a test run done before then. Fingers crossed that is. Then it's just a matter of cosmetics and I'll be able to take the kids out with me in the mornings before work.

Please Log in or Create an account to join the conversation.

1970s? merc 850 1 week 1 day ago #148751

  • ed-mc
  • Offline
  • Platinum Boarder
  • Platinum Boarder
  • Posts: 1395
  • Karma: 232
  • Thank you received: 114
Synching the carbs ain't very complicated on this model. You might have to tweak the "Throttle Stop" a bit, that's the one that keeps the butterfly from jamming into the carb throat at full throttle. Just needs a wee bit of clearance there to work well.

Just don't touch the "Spark Stop" screw unless you're actually intending on adjusting the base timing. Mess with that too much and it could advance the max timing too far and burn some pistons and/or rings. The manual contains the proper procedure for checking spark advance.

Have Fun! Days are getting a lot nicer here in the PNW and it's very pleasant working outside.

Please Log in or Create an account to join the conversation.

1970s? merc 850 1 week 20 hours ago #148752

So that will be the plan then just take them off the one motor and put them on the other motor without touching anything other then the carbs themselves.

I am also in need of swapping the stator from one to the other am i correct in thinking as long as i keep the motor at TDC and dont move the anything when replacing it that it will not mess with the timing?

Then after those two items are done i will be ready to put the motor in a barrel of water to warm it up and see how it runs.

Please Log in or Create an account to join the conversation.

1970s? merc 850 1 week 8 hours ago #148753

  • ed-mc
  • Offline
  • Platinum Boarder
  • Platinum Boarder
  • Posts: 1395
  • Karma: 232
  • Thank you received: 114
Check the belt timing before disassembly. If it's off, plan on aligning it correctly upon reassembly and that change would affect idle speed and your maximum spark advance adjustment.

If the belt timing is initially correct, then you're right nothing should be affected by the stator swapout.

Please Log in or Create an account to join the conversation.

  • Page:
  • 1
Time to create page: 0.305 seconds

Donate

Please consider supporting our efforts.

FG Login

Glassified Ads

Gator 9" wheels Wanted
( / Wanted)

noimage
04-24-2024

1969 Stern Craft Boat 19'
( / Boats)

1969 Stern Craft Boat 19'
04-08-2024

‘62 Dorsett Catalina
( / Boats)

‘62 Dorsett Catalina
04-08-2024

FiberGoogle

Who's Online

We have 8421 guests and no members online