Welcome, Guest
Username: Password: Remember me

TOPIC: 1959 Lake N' Sea Restoration

1959 Lake N' Sea Restoration 13 years 1 month ago #46731

  • Andgott
  • Andgott's Avatar Topic Author
  • Offline
  • Contributing Member
  • Contributing Member
  • Posts: 1243
  • Karma: 72
  • Thank you received: 0
The 'downtime' waiting for epoxy to cure on my current transom replacement is driving me nuts... So I decided to start on my NEXT project! I'll keep them both going- So I can keep myself busy, and out of trouble :)

I have the luxury of having 2 workshops- So both projects will be completely separate from each other- One on the main floor, one in the basement.

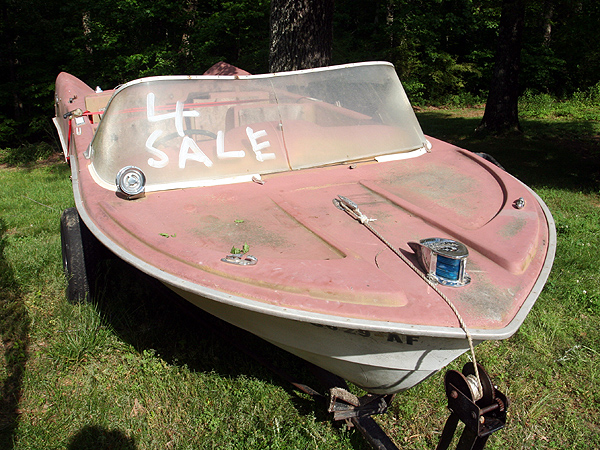
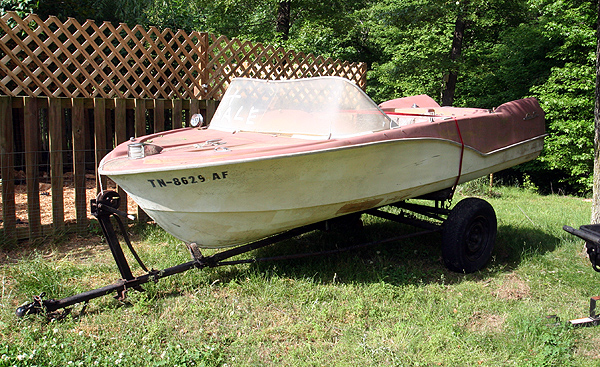
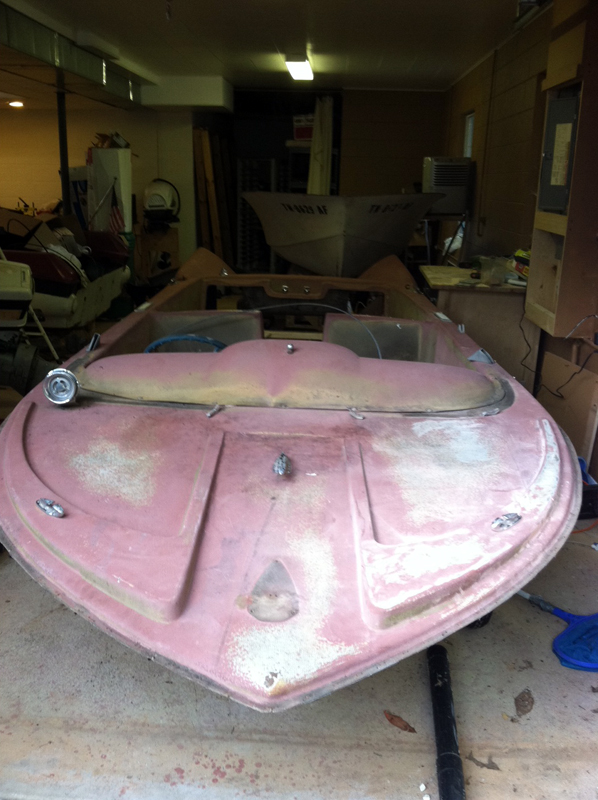
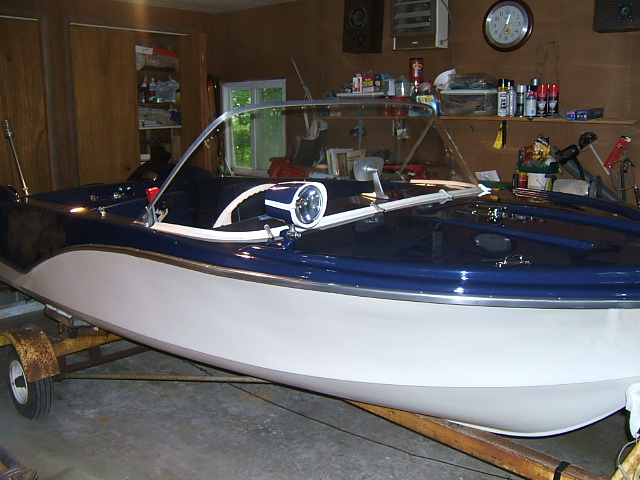
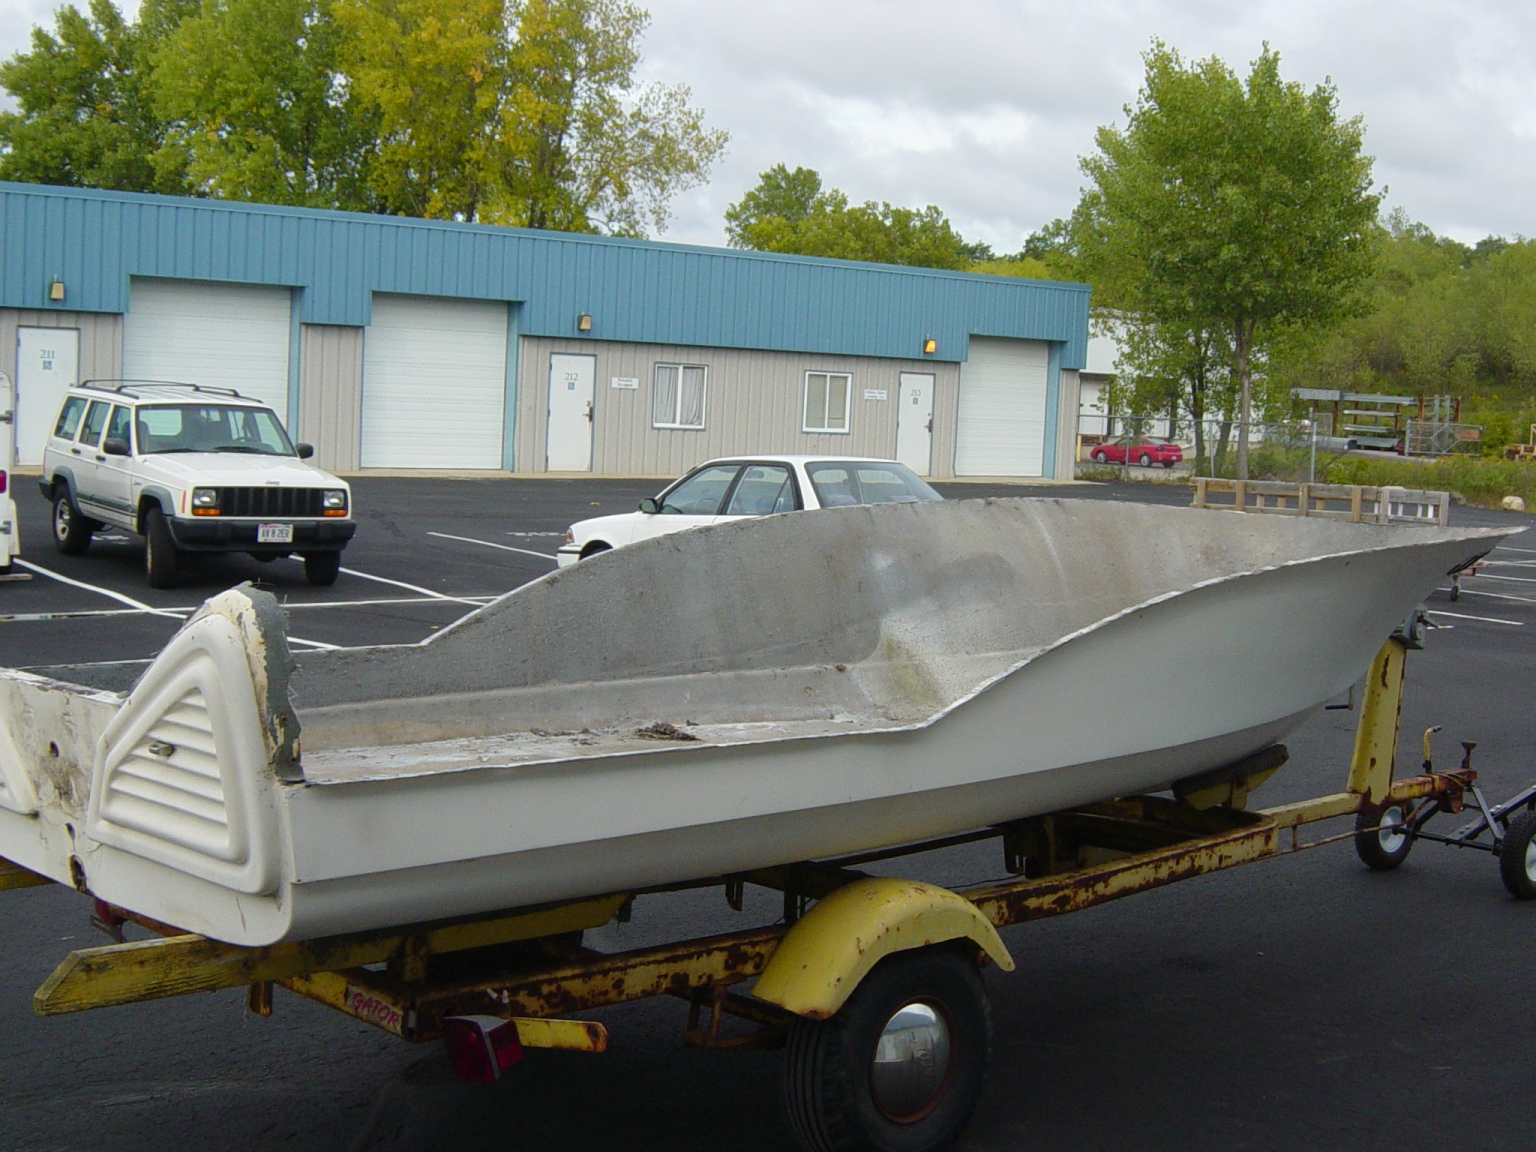
I picked up the Lake N Sea a while back- I think it was almost 2 years ago. She's been patiently waiting for attention in a corner of my basement. Here's how she looked when I got it-


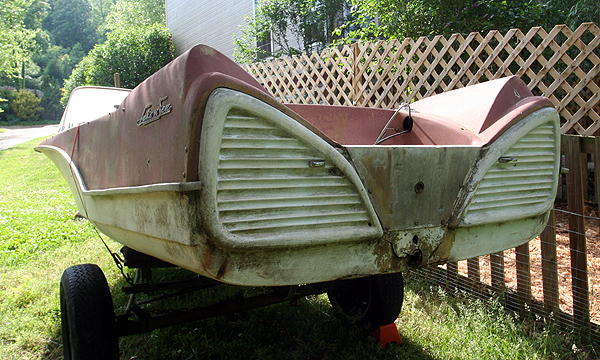
Pretty rough, But mostly intact. I've always loved Lake N Seas- They are just wild looking boats... I went to school in Traverse City, MI, too- Where they were built. I saw one of them up there once, and fell in love with it. Imagine my surprise when I found one for sale by the side of the road only a few miles from where I live!

I have collected all the 'parts' over the past year or so- The only really big thing that I was missing was the cool cast metal nameplate from the center of the dash... Thanks to a fellow FiberGlassics member with a sharp eye, I was able to find one! Now, I've got everything I need.

I have also acquired a 1959 Tee Nee trailer (with teardrop fenders, of course!), and a PAIR of 1959 Evinrude Lark outbords to power it. It should be a pretty neat package when done. As for color- I think I am going to go all out. One of the original colors from the factory was PINK. This boat has some serious late 50's styling to it- And what says 50's more than pink??

Ok, So now it's time to dig in....

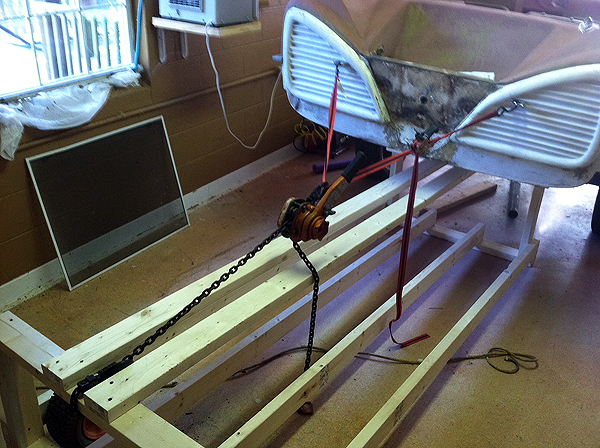
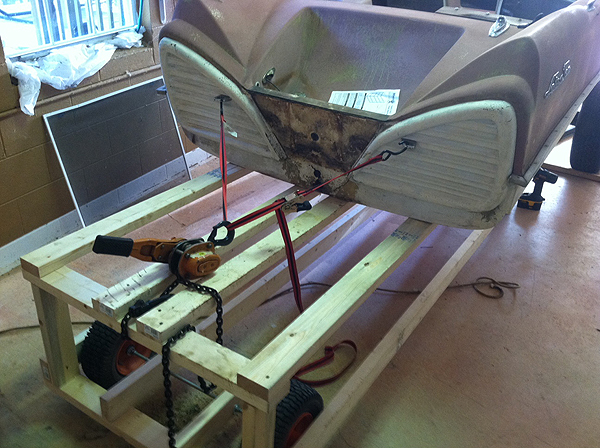
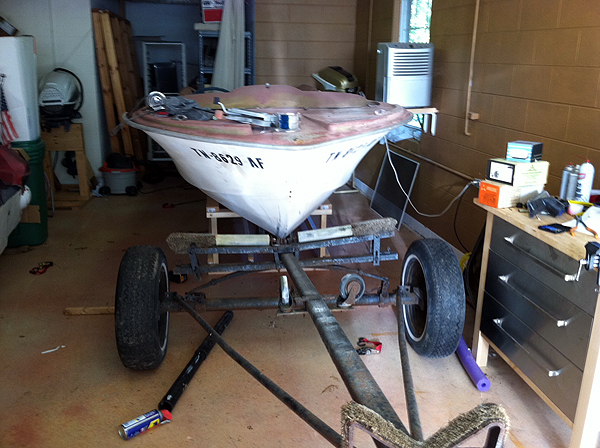
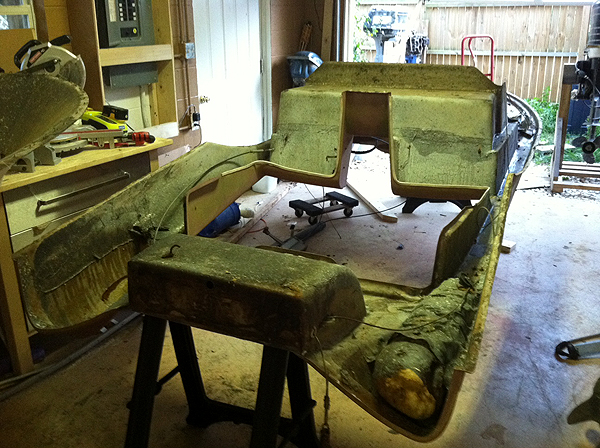
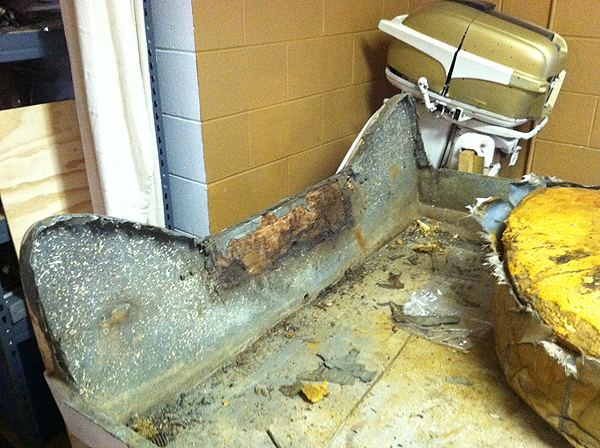
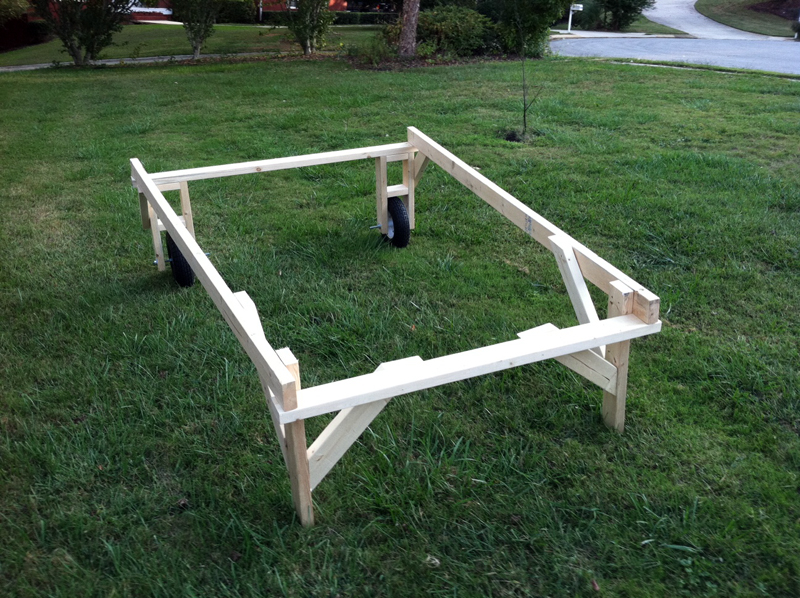
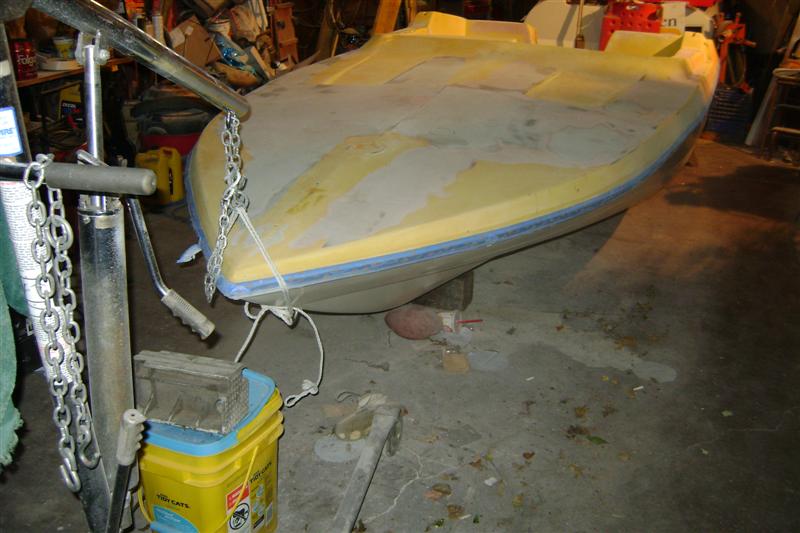
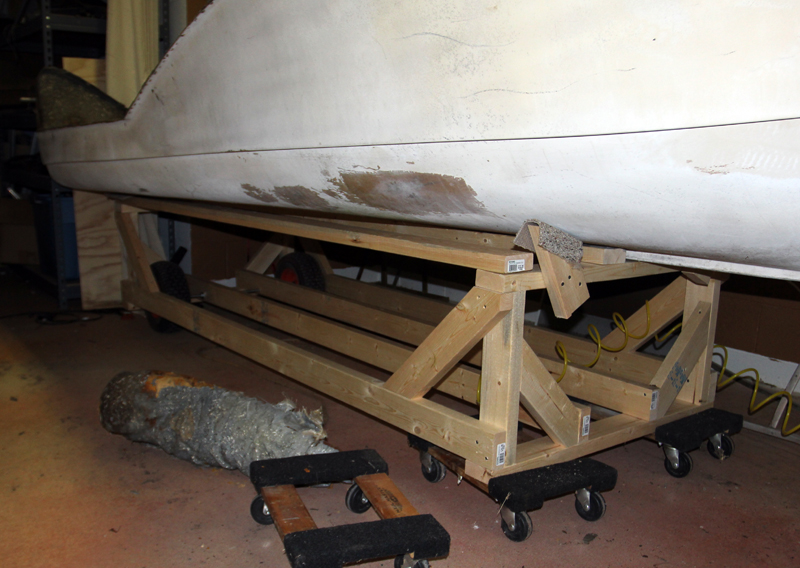
First- I need to get it off the trailer it's on. The trailer is in really bad shape, and is basically unusable... I want the boat to be much better supported. So, I built a stand for it. Another issue that I have is that I need to be able to move the boat easily, both inside AND outside my shop. So, I installed some wheels on the stand that will allow me to do just that. Getting it off the trailer was easy-

Sorry about the bad pics, I had my cell phone, and didn't want to take the time to get my real camera :)


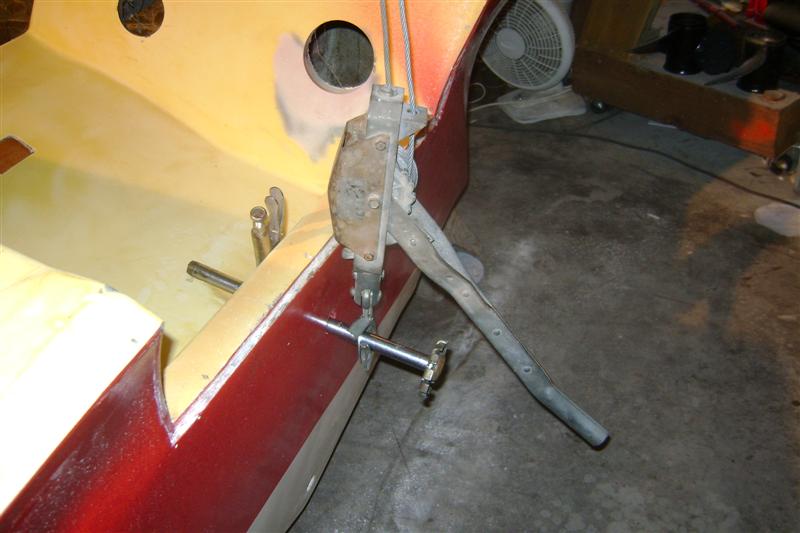
I winched her off with my chainfall... Slid right off. I wasn't too worried about the bottom- No damage was done- But I'm going to have to redo it all anyway. I'd probably want carpet if I had a nice, freshly painted bottom!


I was able to get it the last little bit by just shoving it off the trailer. You can see the trailer in this photo- And why I am taking the boat off should be pretty obvious. You've got to love those caster wheels on there!

Now, Its time to pop the deck off... Should be FUN.

Please Log in or Create an account to join the conversation.

Re:1959 Lake N' Sea Restoration 13 years 1 month ago #46732

  • Andgott
  • Andgott's Avatar Topic Author
  • Offline
  • Contributing Member
  • Contributing Member
  • Posts: 1243
  • Karma: 72
  • Thank you received: 0
The deck and hull joint is covered with an aluminum rub rail, and the joint itself is stapled about every 3 inches, as well as bonded with poly resin. Luckily, the resin is REALLY brittle, and isn't holding well. In addition, the staples are pretty much rusted away.

By CAREFULLY driving a flat screw driver into the joint, I was able to separate the hull and deck without too much problem... It actually went a lot smoother than I though it would! I didn't take photos, though- I was too busy, and didn't think to.

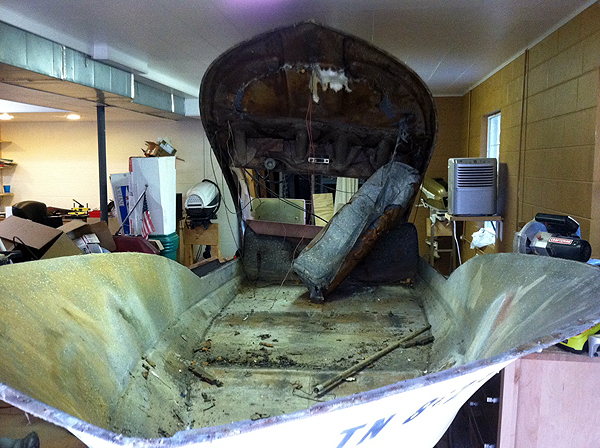
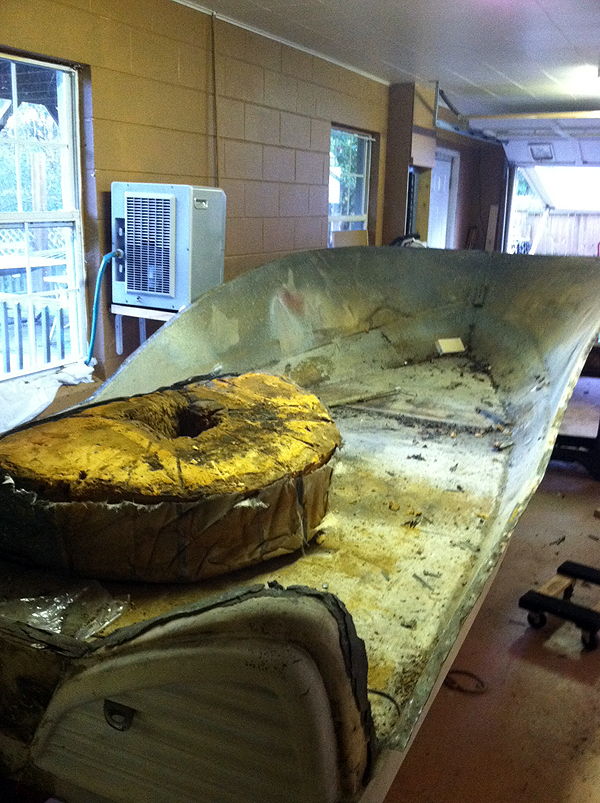
But- it's it two pieces now-


And, The fun can begin....


That cool looking transom... I can tell it's going to create some real issues with the restoration. Oh well- I love a challenge!!

Next step is to do some exploratory drilling to find out exactly how much I need to do. The floor is solid fiberglass- And feels VERY solid- But I know that there are wood stringers under it. I am going to check them for rot- I would LOVE it if I didn't have to cut all the floor out, but I'm not going to hold my breath.

The transom is shot, for sure. There is some major damage to the outer skin, so I know water has gotten in there. I'm fairly certain it'll be a total replacement.

Let's just hope THIS one doesn't take 2 years ;)

-Andrew
Attachments:

Please Log in or Create an account to join the conversation.

Re:1959 Lake N' Sea Restoration 13 years 1 month ago #46763

  • MarkS
  • MarkS's Avatar
  • Offline
  • Moderator
  • Moderator
  • Posts: 5348
  • Karma: 118
  • Thank you received: 5
Really looking forward to watching this project Andrew, thanks for sharing. Twin Larks!? The novice in me is asking "how's he gonna fit twins on that (narrow mounting space) transom?" I'll just sit back and watch, and enjoy the show. :P

Please Log in or Create an account to join the conversation.

Mark

Re:1959 Lake N' Sea Restoration 13 years 1 month ago #46764

  • Andgott
  • Andgott's Avatar Topic Author
  • Offline
  • Contributing Member
  • Contributing Member
  • Posts: 1243
  • Karma: 72
  • Thank you received: 0
MarkS wrote:

Really looking forward to watching this project Andrew, thanks for sharing. Twin Larks!? The novice in me is asking "how's he gonna fit twins on that (narrow mounting space) transom?" I'll just sit back and watch, and enjoy the show. :P


The larks will go on there one at a time- I've just got two of them, so hopefully at any given time, ONE will be running :)

Please Log in or Create an account to join the conversation.

Re:1959 Lake N' Sea Restoration 13 years 1 month ago #46789

You have bitten off alot there. Can't wait to see the process and end product. I am working on a 59 Cutter now, still cleaning. Good luck.

Please Log in or Create an account to join the conversation.

Re:1959 Lake N' Sea Restoration 13 years 1 month ago #46798

  • Andgott
  • Andgott's Avatar Topic Author
  • Offline
  • Contributing Member
  • Contributing Member
  • Posts: 1243
  • Karma: 72
  • Thank you received: 0
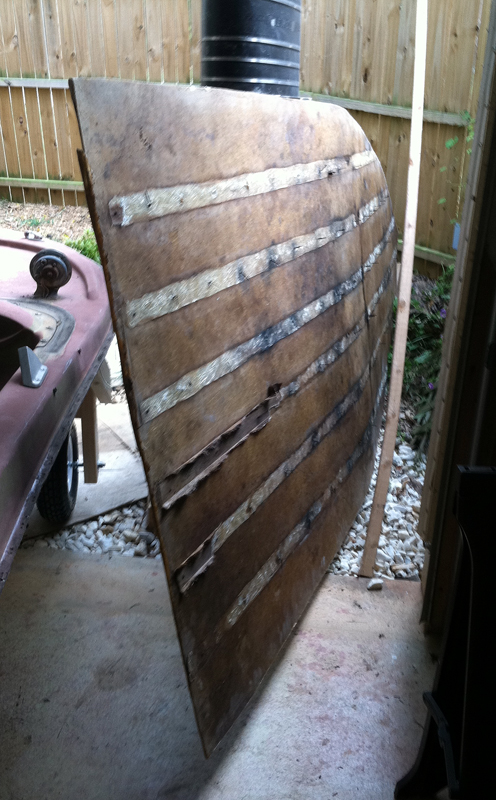
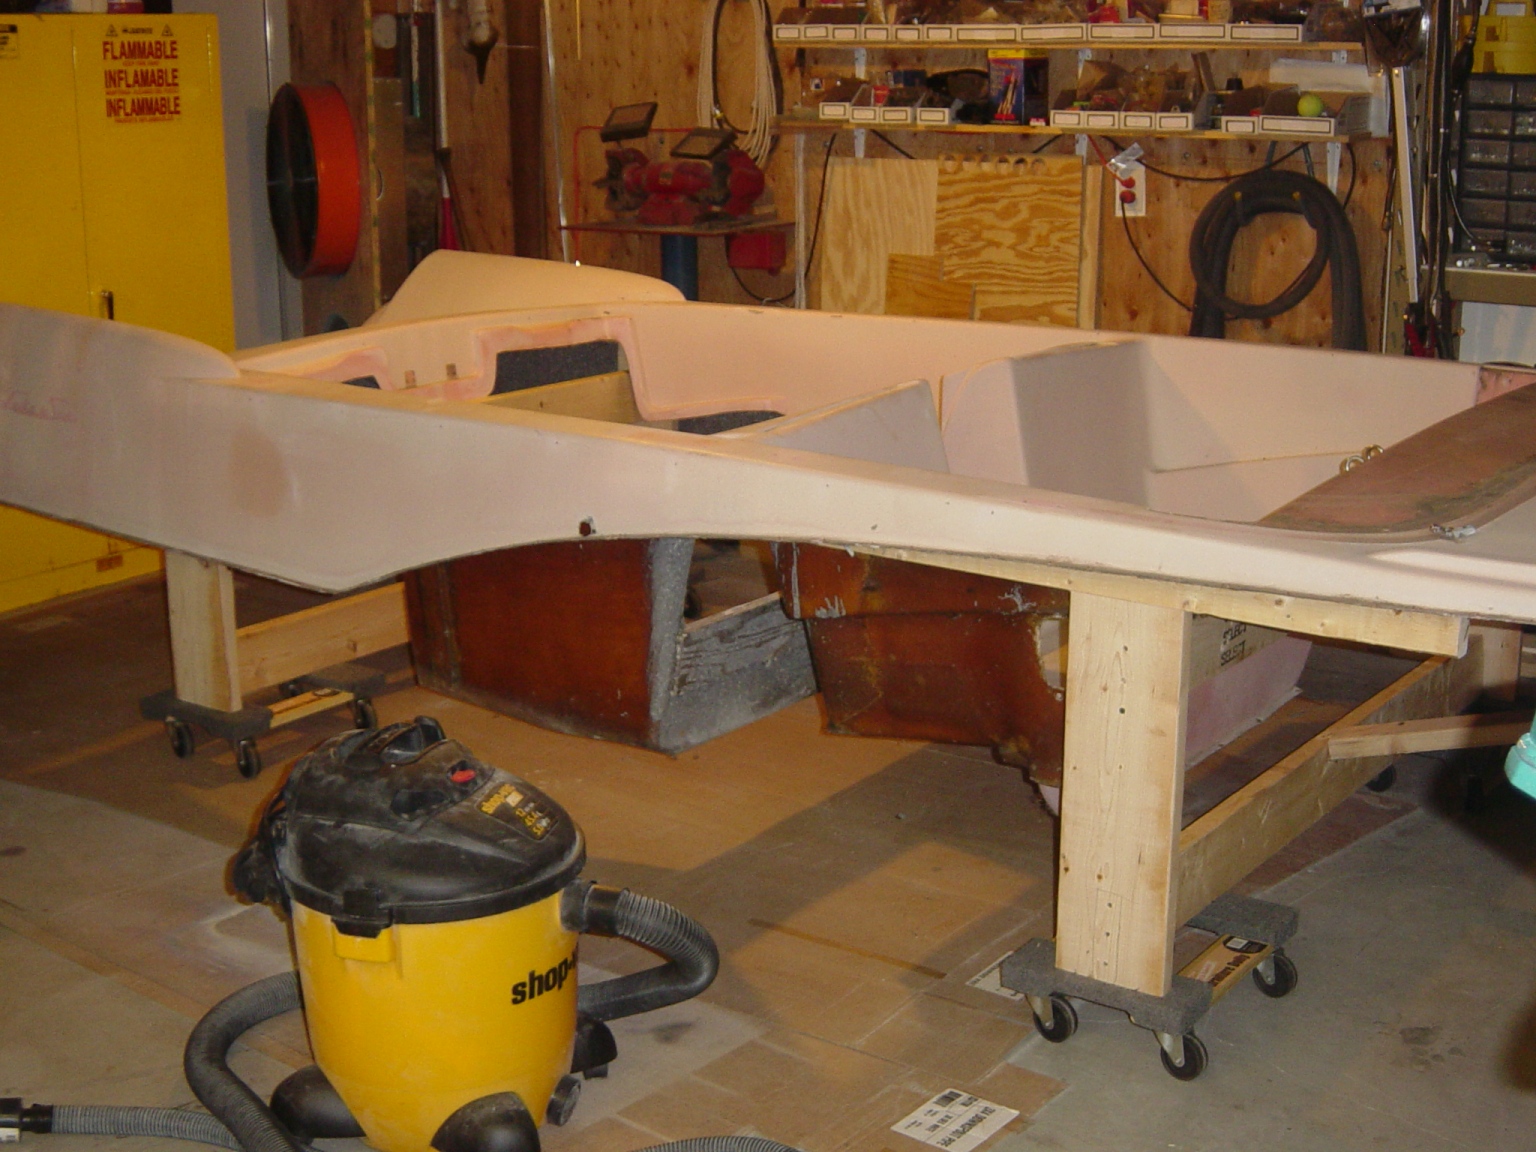
No work on the actual boat today, since I was working on the other project, but I DID get the stand ready for the deck-


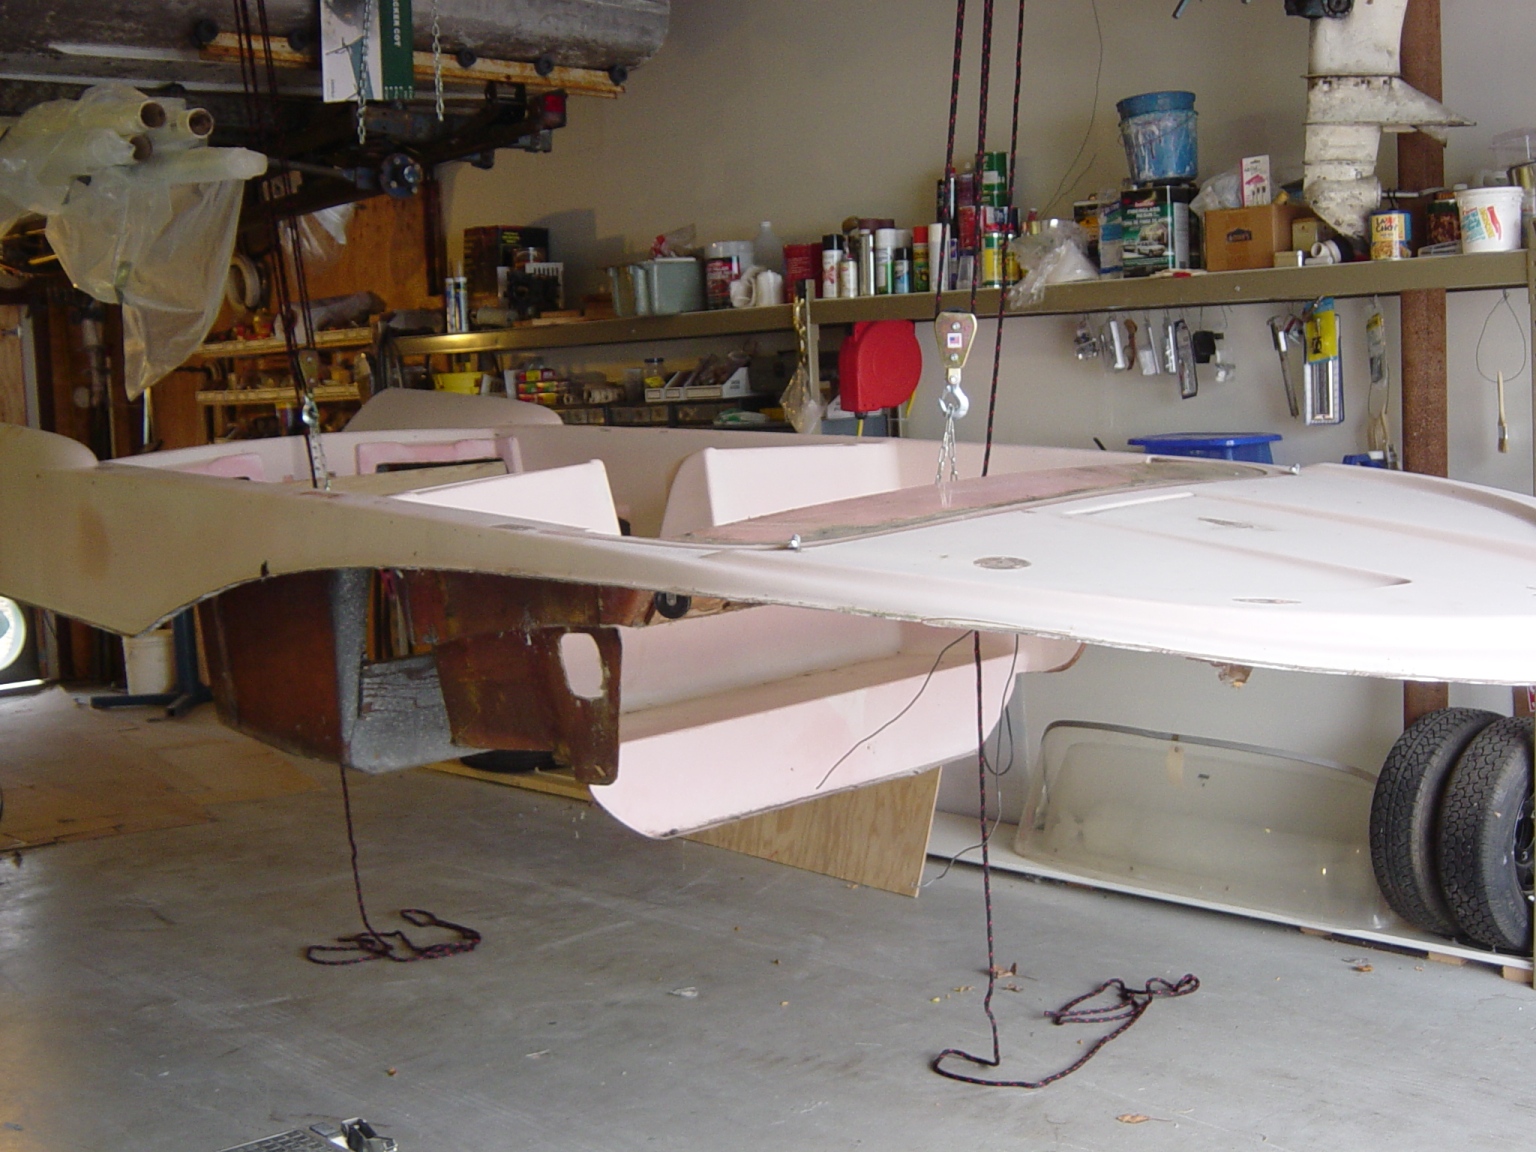
It allows me to roll it out of the way so I can work on the hull- Or just wheel it outside so I can sand it without getting dust all over the workshop... Notice those nice, big "off road' tires on there ;)

The hull is on a similar stand, which also has wheels, allowing me to move it as I need to.

I flipped the deck on to it-


No small feat when you're working alone!!

-Andrew
Attachments:

Please Log in or Create an account to join the conversation.

Re:1959 Lake N' Sea Restoration 13 years 1 month ago #46820

  • Todd
  • Offline
  • Senior Boarder
  • Senior Boarder
  • Posts: 218
  • Karma: 8
  • Thank you received: 0
Cool stand, Andrew. I was thinking of taking two engine stands with a piece of box steel between them and making a rotisserie so I can rotate the deck as I need to. The top portion of your rig is like the one I imagined. As you ahve done a lot more of this than I have, what are your thoughts on my idea?

Please Log in or Create an account to join the conversation.

Re:1959 Lake N' Sea Restoration 13 years 1 month ago #46825

Andgott,nice to see what the
Lake&Sea looks like from the
inside out.Good luck with the
resto!
Attachments:

Please Log in or Create an account to join the conversation.

Re:1959 Lake N' Sea Restoration 13 years 1 month ago #46848

  • Andgott
  • Andgott's Avatar Topic Author
  • Offline
  • Contributing Member
  • Contributing Member
  • Posts: 1243
  • Karma: 72
  • Thank you received: 0
I've thought about various ideas for a rotisserie- But most have proven too costly or complicated... I'll get more photos of the 'rig' I have under the hull- as it was designed specifically to support the hull as it is now (upright), and then to hold it once flipped as well. At the present time, the plan is to rebuild the structure, including the transom, then use the bolt holes in the transom (for the tow eyes) to support the transom, then flip the whole thing so I can do work on the bottom.

I'd LOVE to have one of those big rotisserie rigs like they use in auto restoration shops- That would make this almost fun ;)

Please Log in or Create an account to join the conversation.

Re:1959 Lake N' Sea Restoration 13 years 1 month ago #46862

  • MarkS
  • MarkS's Avatar
  • Offline
  • Moderator
  • Moderator
  • Posts: 5348
  • Karma: 118
  • Thank you received: 5
I'm scheming right now on a way to flip my project (the GT) Andrew. (Kinda want to get the hull worked over and painted before the cold weather sets it.) I saw one of the gang in MN do it with a shaft (He used a coffin jack, but a 6" long 1/2" drive extension looks like it would work.) thru the motorwell drain hole, supported by an engine hoist. He ran a rope thru the bow eye, lifted both ends and rolled it over. Kind of a makeshift rotisserie. It's tough trying to figure out how to do these things yourself sometimes, huh!?
Attachments:

Please Log in or Create an account to join the conversation.

Mark

Re:1959 Lake N' Sea Restoration 13 years 1 month ago #46866

  • Andgott
  • Andgott's Avatar Topic Author
  • Offline
  • Contributing Member
  • Contributing Member
  • Posts: 1243
  • Karma: 72
  • Thank you received: 0
This is what I have the hull on now-


It is designed to support the hull while I'm working on it- And when it is time to work on the bottom, I should be able to hold it upside down on the same stand.

The 'attack plan' is to rebuild the structure of the boat- transom, stringers (if required), and floor, Then when I flip the boat over, support it by the floor so I can sand the bottom down, do some repair, and re-paint it. Once that's done, I'll flip it back over and reassemble it on the same stand.

I forgot about the drain plus holes in the transom- That will be a MUCH better place to secure something to allow me to flip the boat-

There are two holes, both right on the center line... I suspect that the one that's closest to the floor is pretty close to the center of gravity, which would make the flip pretty easy! I think I'd use the engine stand on the transom, and the engine hoist on the bow. SOUNDS like it would work :)

-Andrew
Attachments:

Please Log in or Create an account to join the conversation.

Re:1959 Lake N' Sea Restoration 13 years 1 month ago #47084

  • Andgott
  • Andgott's Avatar Topic Author
  • Offline
  • Contributing Member
  • Contributing Member
  • Posts: 1243
  • Karma: 72
  • Thank you received: 0
It is Columbus Day- So I decided to do a little exploration :)

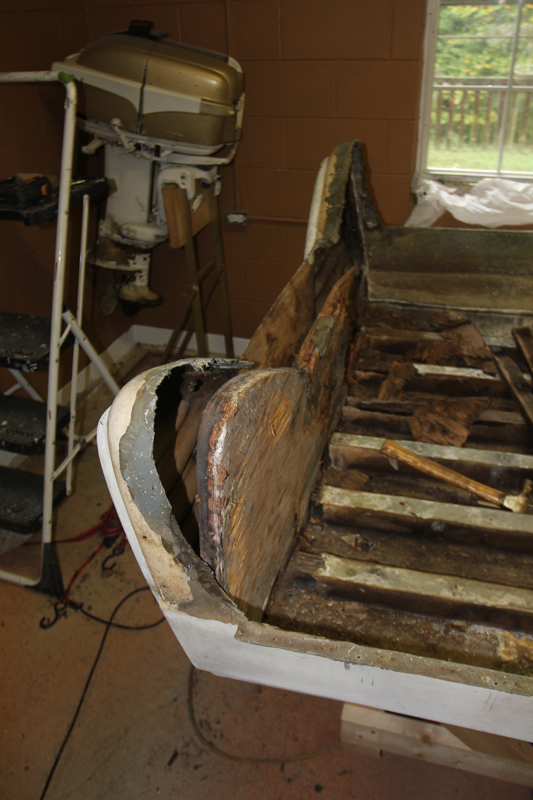
I had hoped that, by some stroke of luck, my stringers might not need to be replaced. The floor was rock solid- Not a hint of flex in it anywhere... I knew that most of the transom was pretty well shot. So, I decided to do some drilling into the stringers, through the floor, to see what I would find.

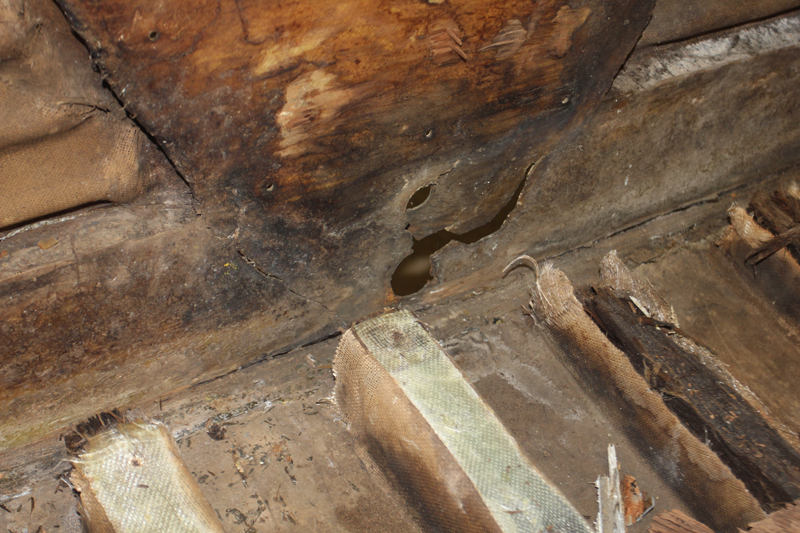
I drilled 4 random holes, in different stringers at different locations. Each 'core sample' came back BLACK and DAMP. Not good news- But, It's really what I expected. The floor has to come out, and the stringers need to be replaced.

I did some 'knock' tests on the transom... I knew that the center area was shot, but I thought that there might be some solid areas in the fin area... But, it's mostly bad-


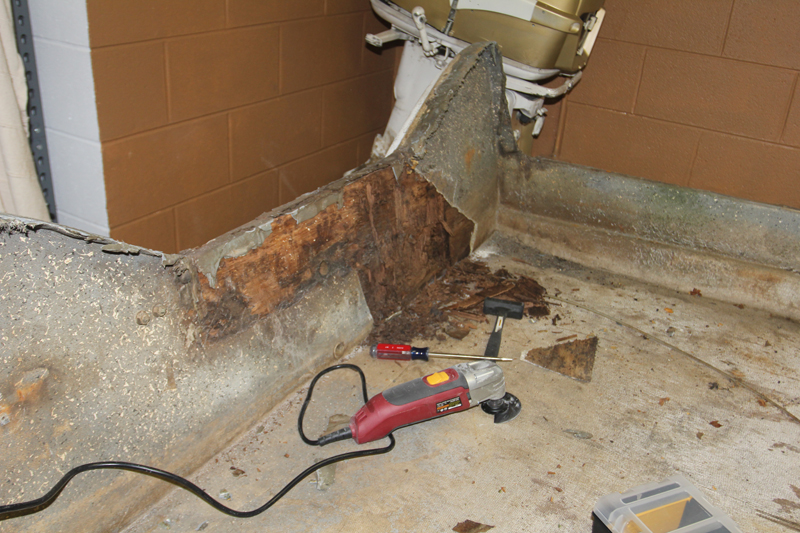
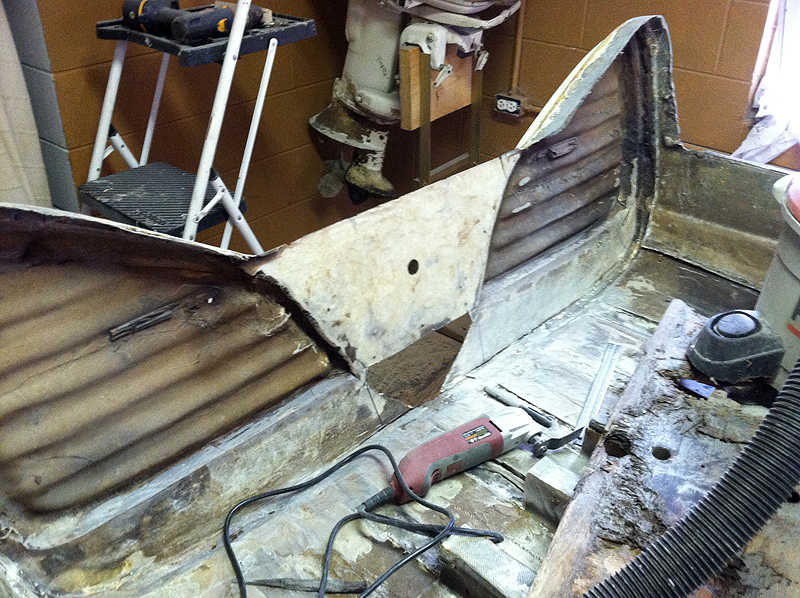
I started cutting it out, Using my Harbor Freight Oscillating tool... I don't know HOW I got by before I had this thing- It makes a job like this SO easy! I finally picked one up yesterday since they were on sale for $17.99- I should have bought a couple!

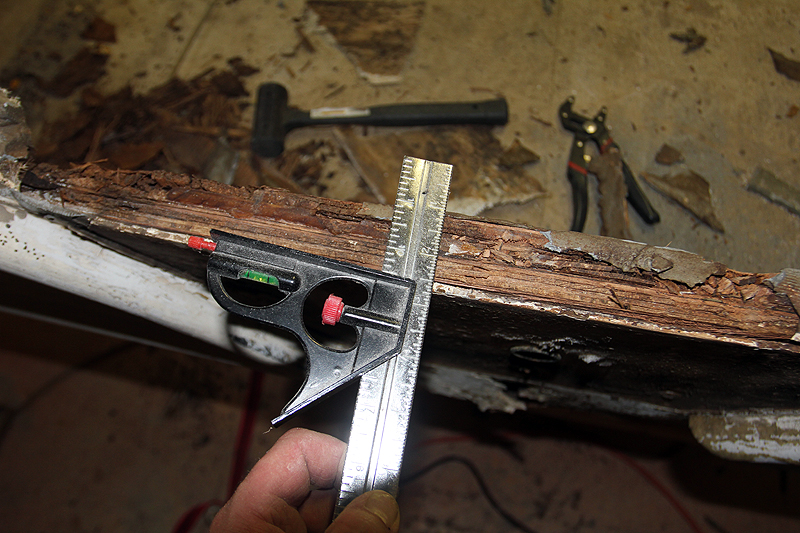
Whenever I'm doing a major teardown like this, I try to take lots of photos so I can get it all back together again... I make sure I get measurements, too-


It's easy for me to remember NOW that there is 1 1/2" of ply in the transom- But will I remember that 6 months from now? Hopefully it won't take me THAT long to get it replaced, but who knows...

One thing that is nice about Lake N Seas, and RARE for a boat of this vintage, is that the floor is SOLID FIBERGLASS, not plywood. I wanted to cut the floor out carefully, so I could re-use it after replacing the stringers. The multi tool made a quick, and CLEAN, job of it-


It took about 1/2 hour or so to cut all the way around the perimeter of the floor, leaving about 3/8" or so of the floor attached to the hull so I'd have something to tab it on to when I replace it. It's a little scary making the cut- If you go too deep, you go right through the hull! You just want to make sure you measure, cut slow, and remember that you can fix ANYTHING

Now that it's cut all the way around, It's time to pry the floor up... At this point, I have NO idea how its attached... Luckily, with some tugging, pulling, and persuasion, it started to come up. I started in one of the back corners-


And worked all the way around, and then towards the bow-


It turns out that they bonded a 1/4" thick fiberglass panel to the stringers with resin, and nailed it about every 6" or so to hold it in place. Then, they glassed over the top of the whole thing, embedding the nail heads. The nails came out easily, since they were rusted away to nothing and the stringers were mush...

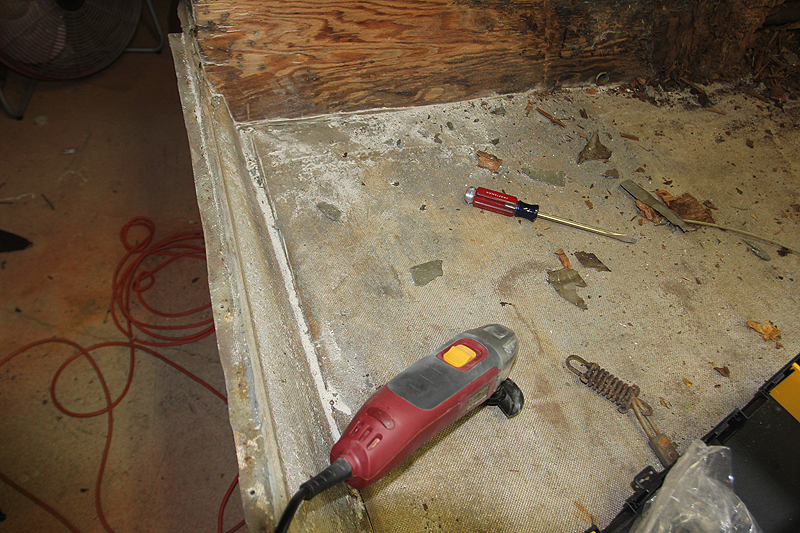
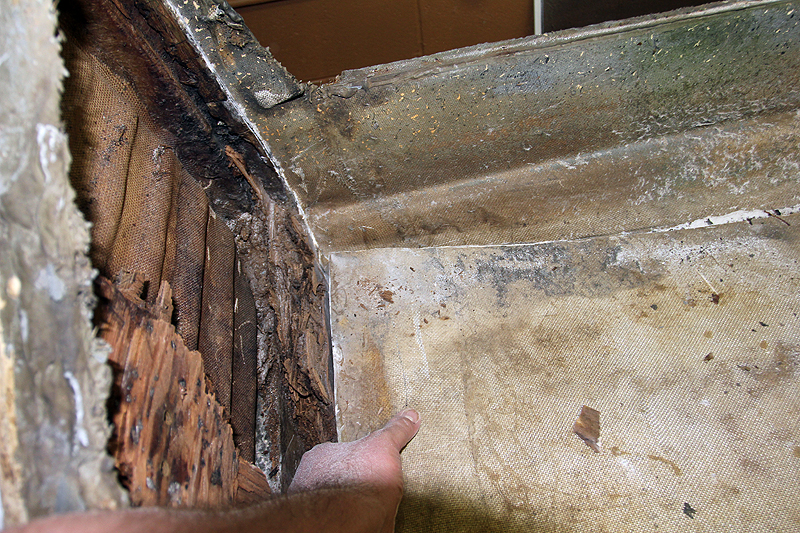
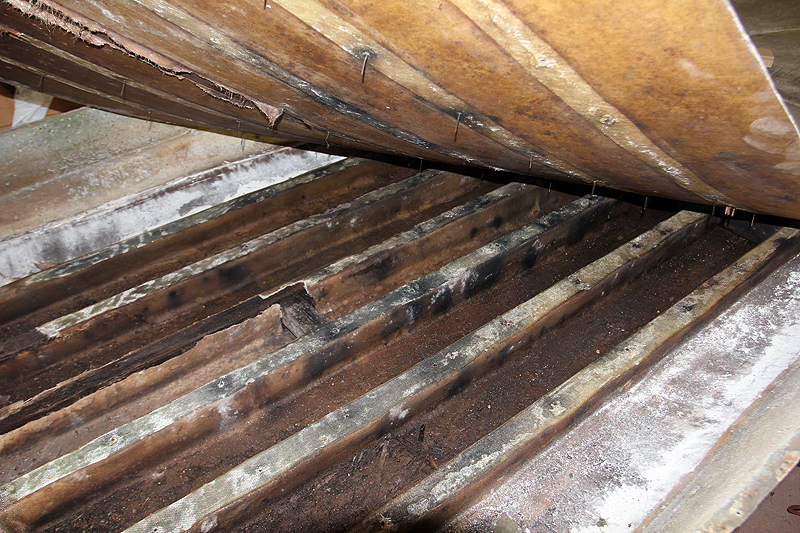
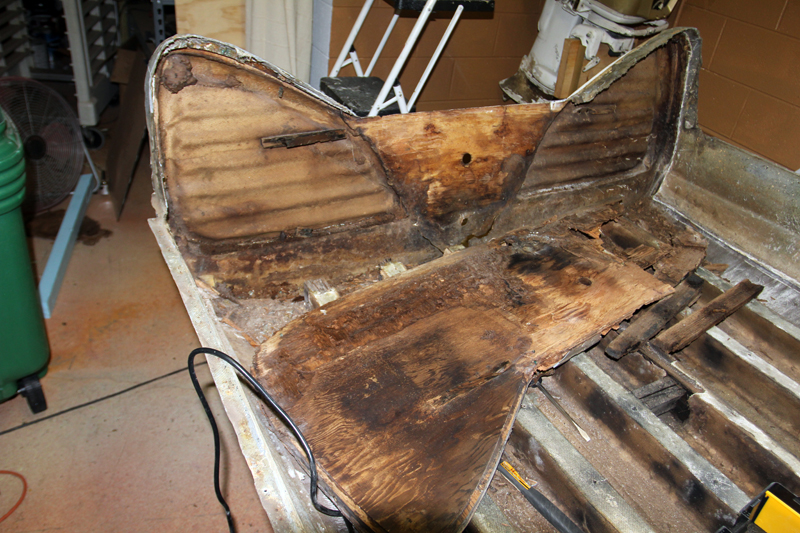
Once the floor was out, I could easily see the stringers. They are BAD, Soaked and rotten-


No wonder the hull was so heavy- They are pretty beefy to begin with, and filled with water, even heavier!

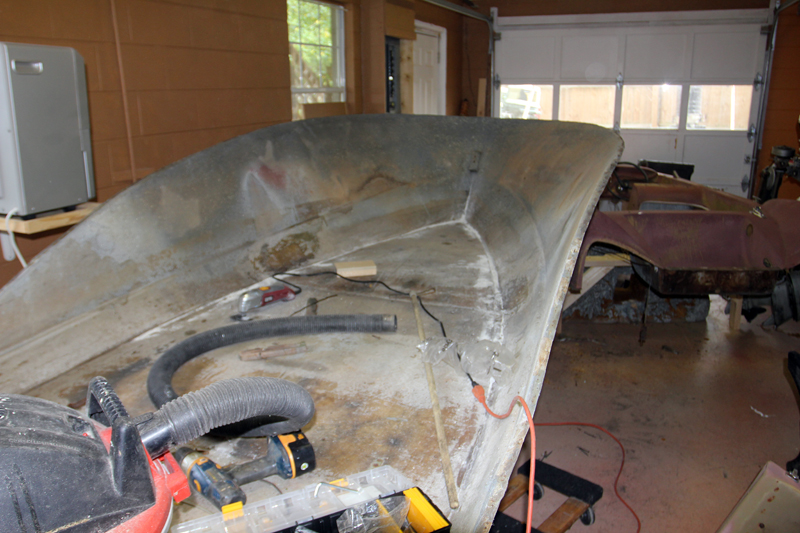
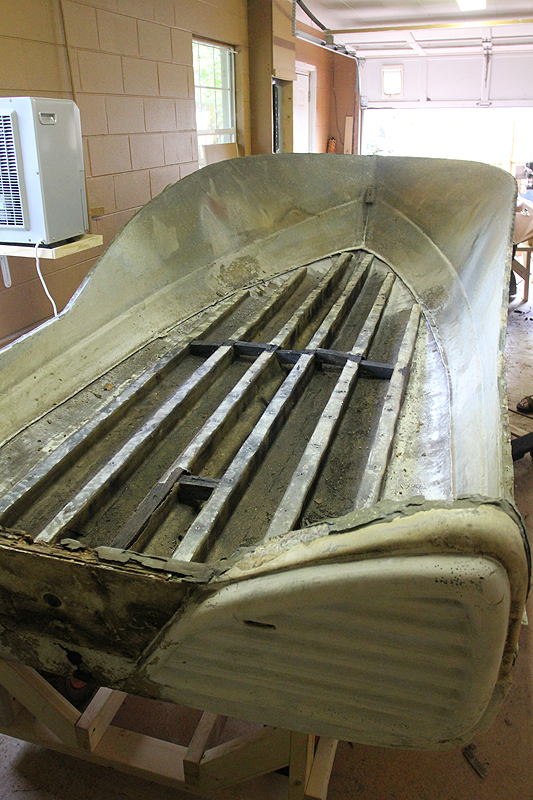
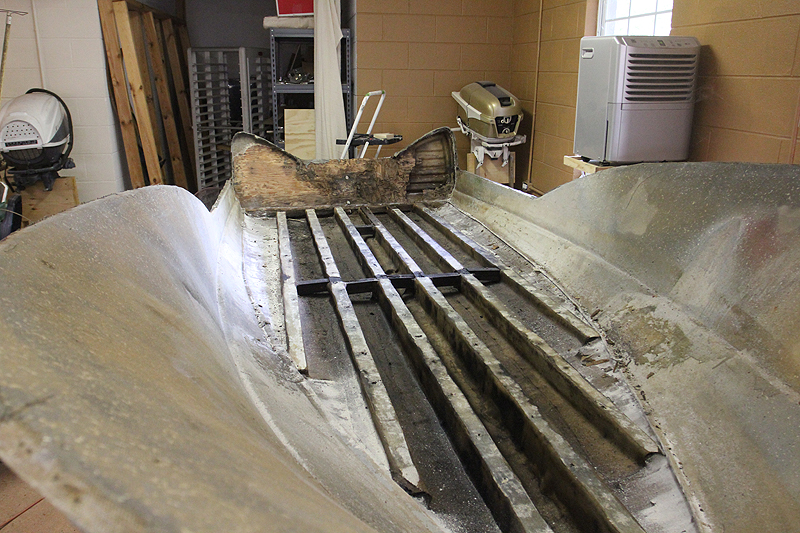
The floor came out nicely, in one piece, and will be reused-


Since I have to rip the stringers out anyway, I think I might use an alternative to wood- So I never have to worry about rot down there again.

So much for an easy project :)

-Andrew

Please Log in or Create an account to join the conversation.

Re:1959 Lake N' Sea Restoration 13 years 1 month ago #47097

  • Todd
  • Offline
  • Senior Boarder
  • Senior Boarder
  • Posts: 218
  • Karma: 8
  • Thank you received: 0
Hi Andrew,

Sorry to hear the floor had to come out. You're right - that HF multi-tool is a real gem! You did an excellent job getting that floor out, too.

As far as an alternative to wood for the stingers, what material are you thinking of using? Too bad there's not a dimensional lumber size product of a Trex-like material or something else that will never rot. You've peaked my interest now. Good luck!

Please Log in or Create an account to join the conversation.

Re:1959 Lake N' Sea Restoration 13 years 1 month ago #47100

  • Andgott
  • Andgott's Avatar Topic Author
  • Offline
  • Contributing Member
  • Contributing Member
  • Posts: 1243
  • Karma: 72
  • Thank you received: 0
I was thinking about something along these lines-

www.preforms.com

But I'm wondering if I could do it myself, using foam blocks, and glassing over it... Essentially, the foam wouldn't really be a part of the structure, it would serve as a form for the fiberglass... I've done this before with other boat parts, but not stringers.

-Andrew

Please Log in or Create an account to join the conversation.

Re:1959 Lake N' Sea Restoration 13 years 1 month ago #47111

  • Andgott
  • Andgott's Avatar Topic Author
  • Offline
  • Contributing Member
  • Contributing Member
  • Posts: 1243
  • Karma: 72
  • Thank you received: 0
Wow- Just found some pricing. That would cost a LOT to use the pre-made stuff... And, it would be kind of tough to get it to fit... I was thinking about doing something like this-


The blue is foam, with 'glass over the top (red), which would be glassed in to the hull (green)... The foam would only be a form, the strength would come from the glass... Seems like it would work as long as I used enough 'glass....

-Andrew

Please Log in or Create an account to join the conversation.

Re:1959 Lake N' Sea Restoration 13 years 1 month ago #47123

  • MarkS
  • MarkS's Avatar
  • Offline
  • Moderator
  • Moderator
  • Posts: 5348
  • Karma: 118
  • Thank you received: 5
Some time ago Ray (69Fabuglas) was talking about using Seacast/Nidabond for stringers, just cutting the tops of the existing glass off, cleaning out and pouring in the mix I believe. Any thoughts on that Andrew?
I had checked out the Preforms sight and another like it, but decided against it for the same reason, plus my "questionable rookie" glassing skills. :P

Please Log in or Create an account to join the conversation.

Mark

Re:1959 Lake N' Sea Restoration 13 years 1 month ago #47131

  • Split
  • Split's Avatar
  • Offline
  • Gold Boarder
  • Gold Boarder
  • Posts: 864
  • Karma: 32
  • Thank you received: 1
GLASPAR 1962 & up , at least on the SEDANs had glass stringers..
NOT a square pattern,,, shorter across top ,, maybe a 60 degree angle on sides..!!
...................

not sure how it was formed iniitally.

. Andrew,, I have some pieces of white plastic rectangle PORCH RAILINGS , that I bet would sort of work to form the glass,, then Pull it forward towards bow to remove,, even short lengths , joined by a rope, would ease removal, before fully hard .? ..
or do a three foot section each day & then move forward.

Please Log in or Create an account to join the conversation.

Re:1959 Lake N' Sea Restoration 13 years 1 month ago #47190

  • Andgott
  • Andgott's Avatar Topic Author
  • Offline
  • Contributing Member
  • Contributing Member
  • Posts: 1243
  • Karma: 72
  • Thank you received: 0
MarkS wrote:

Some time ago Ray (69Fabuglas) was talking about using Seacast/Nidabond for stringers, just cutting the tops of the existing glass off, cleaning out and pouring in the mix I believe. Any thoughts on that Andrew?
I had checked out the Preforms sight and another like it, but decided against it for the same reason, plus my "questionable rookie" glassing skills. :P


I'm not a huge fan of Seacast in general... I think it would add a LOT of weight, plus cost a pretty penny... Also, I don't think that the majority of people that I see using it on other forums really do the prep right- It seems to me that things would have to be VERY clean for the stuff to bond and function properly...

I think if I do it, I'll do it by laminating glass over foam forms. The foam will just stay there- It won't hurt anything. I've done some research, and asked some people who've done it before. Of course, I'd have to build up more layers of 'glass than if there was wood down there- But a good 2 or three would be as strong or stronger than wood, and rot would never be an issue.

Please Log in or Create an account to join the conversation.

Re:1959 Lake N' Sea Restoration 13 years 1 month ago #47191

  • Andgott
  • Andgott's Avatar Topic Author
  • Offline
  • Contributing Member
  • Contributing Member
  • Posts: 1243
  • Karma: 72
  • Thank you received: 0
Well, FiberGlassics being down for a while meant I had nothing better to do than work on boats!

The transom is OUT

I cut all around the edge, then pried it out... It came out pretty easily. The whole port side was pretty rotten, and it more or less crumbled. The starboard side was far more solid, but a little prying and persuasion and it popped right out-


It's in pretty rough shape- BUT enough of it is there to make a template from for the new one... It's a pretty odd shape, So I had hoped that it would come out intact so I could use it as a pattern. It'll save a LOT of work! Since it's a flat transom, It'll be a breeze compared to the last couple I've done that were curved.

Now, I have a clear picture of the damage to the fiberglass skin-

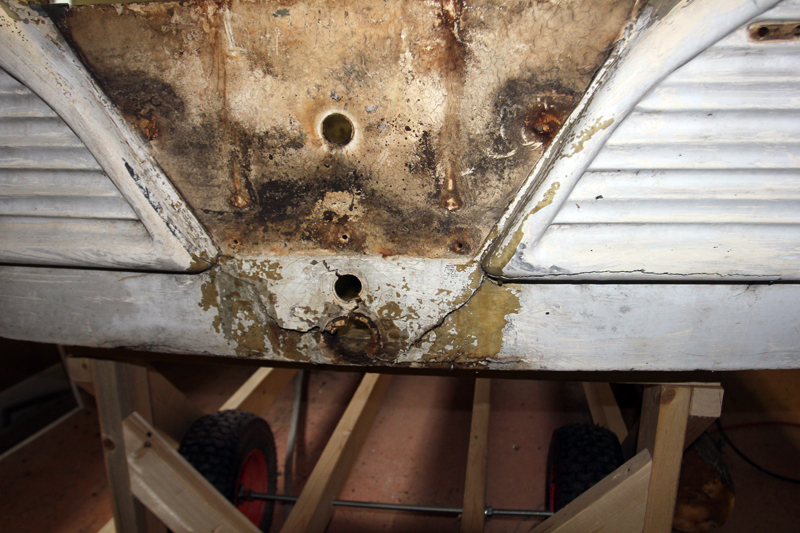
The transom is separated right where it meets the bottom-


Cracked around the drain holes-


You can see where a previous owner tried to patch it up from the outside with some resin... Obviously didn't work.

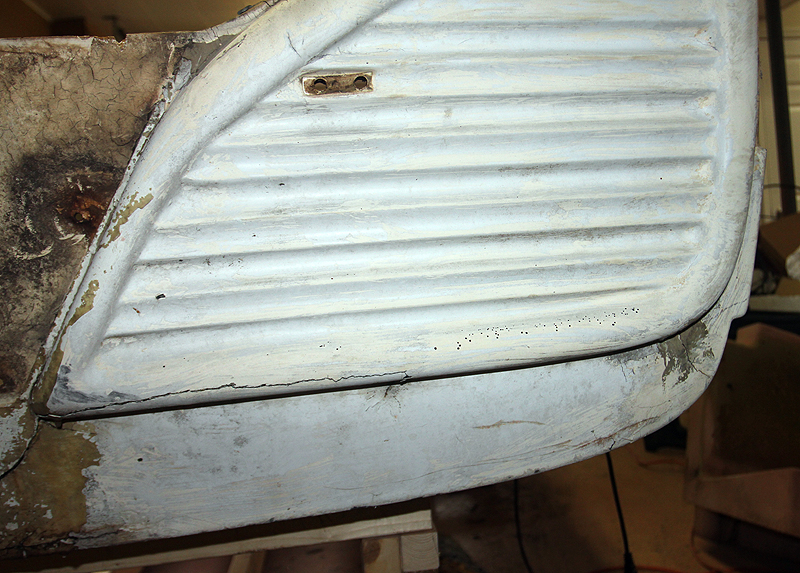
And, Along the bottom of the Louvers...


The very thing that makes this transom cool makes it kind of weak. There is really not any structure back here- It's all for looks- The strength came from the plywood. The cracks allowed water to get in to the voids between the ply and the louvers, and the plywood rotted out.

Some of the damage will be cut out, and new fiberglass put in it's place. Everything will be strengthened and reinforced, then sealed up... Then, the plywood will get laminated in place, and glassed in. Once it's done- It should be a LOT stronger than before, and ready to last another 50 years!


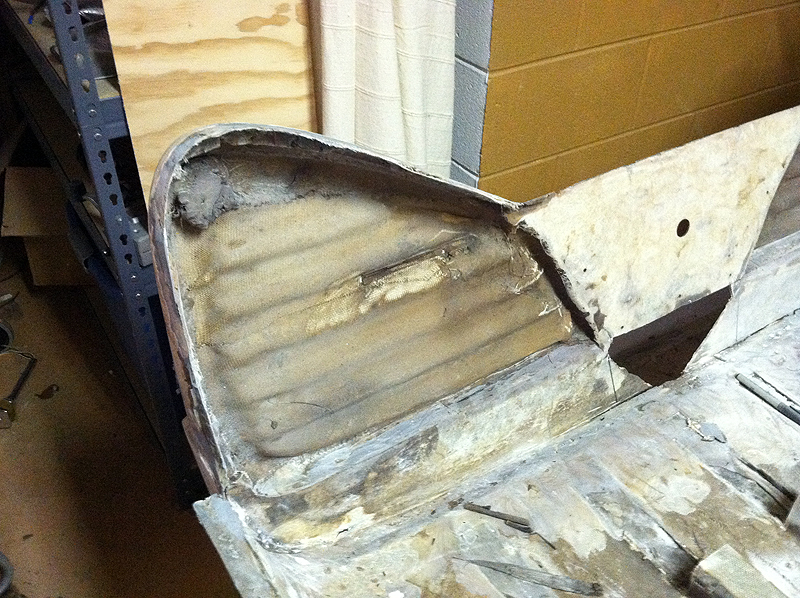
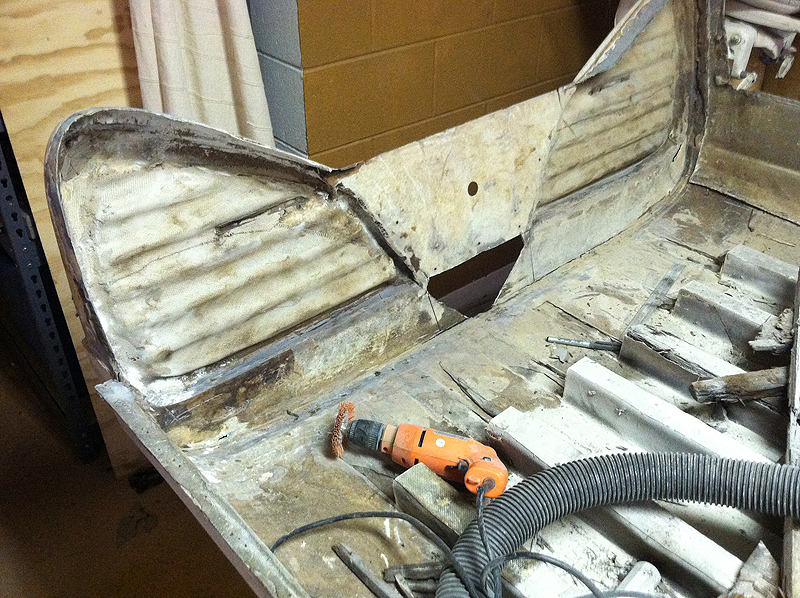
Then I got the transom cleaned up. I cut the stringers back a little, so I'd have access to them. They will eventually come all the way out, but for now I need them there, so I've got something to clamp the transom to when it goes in. I ground down the areas all around the base of the transom, the bottom of the boat, and the inside of the louvered areas. There were some cracks- Many of them I ground down from the inside so I could fill them, in other areas, like the center of the transom, had more damage, so I just cut them out. I'll reglass this area from the inside, and you'll never even know.


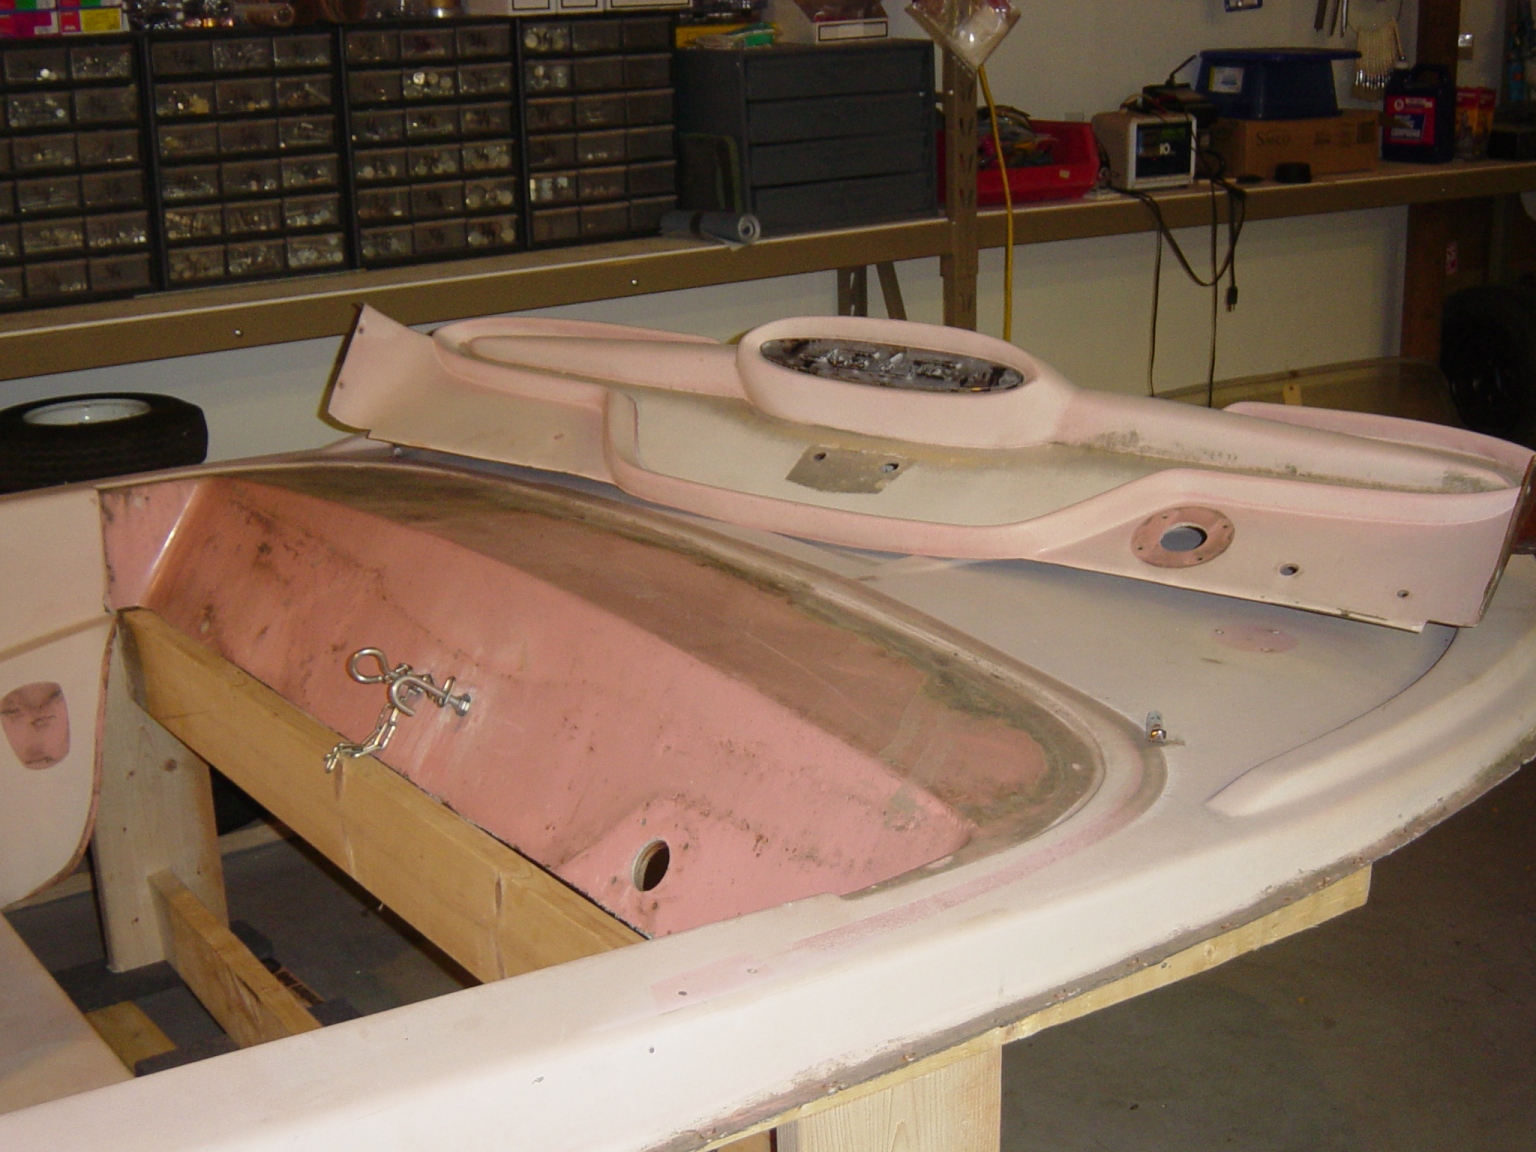
I also FINALLY got the dash panel off- It was held on by about 12 bolts, with badly rusted nuts. It didn't help that they were in a very awkward place, I had to bend over and reach under the deck with one arm, and try to turn the screw with the other... Then I had to remove the steering bezel, which was held on by 4 MORE rusty bolts, which I ended up just cutting off.

Underneath it all was Gel Coat that hadn't been touched or seen in 52 years- So I know EXACTLY what color it was when it left the factory...


There was also a 1962 penny under the dash... I wonder how in the world it got in there? I hoped it was a '59 that someone dropped in while they were building it.

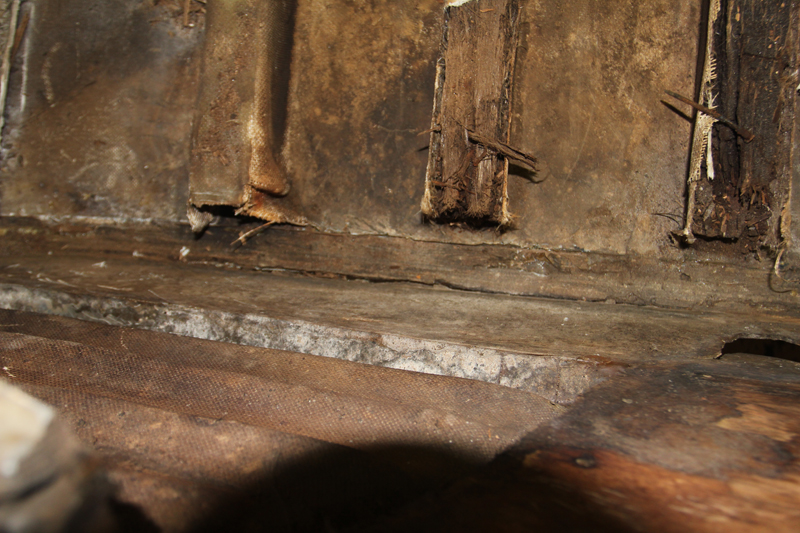
After I got all the old wood out, I started doing some reinforcing work. First, I had to get it CLEAN... The area between the transom and the louvers was a 'void'- It was supposed to be sealed off, but water had gotten in there over time. There was a lot of dirt and discoloration-


I wanted it good and clean before I tried to get any epoxy in there. I use a nylon abrasive brush on a drill- It's really handy for getting in to tight spots like this. It looks much better after some work-


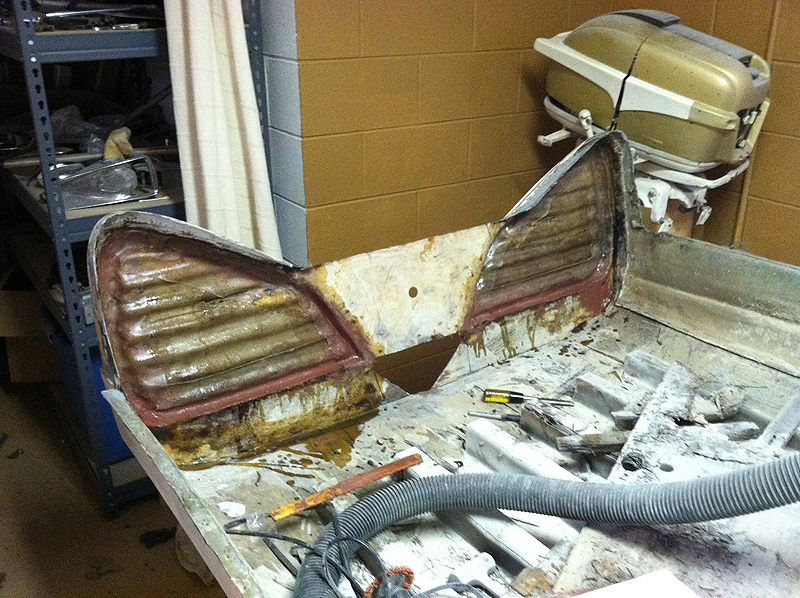
The plan is to reinforce the weak spots inside the louvers. This is not a structural area- it is purely decorative- so it wasn't built that heavily to begin with. Some areas have cracked a bit, and the cracks will be filled from the inside. Then, I'll use glass tape to provide strength all around the edges. In areas where the joints are 'extereme'- as in a 90 degree angle, I'll use a fillet to 'ease' the edge a bit. The whole bottom of the louver has a 90 degree joint, and it has proven to be a weak point- It cracked on one side.

After a bit of work with some epoxy & microballoon filler, then some 3" glass tape-


This will be MUCH stronger than it was originally. This is probably all overkill, but I don't want to EVER have to do this again!

I may fill the void area using some expanding foam, though I don't think I really need to. It's only about 1/2" deep back there.

Next up will be repairing the damaged areas of the transom. Since some of the outer skin is missing, I'll have to build a form on the outside, and laminate new skin on. The form will also hold the correct shape of the transom, and keep everything in place as I lay the new glass on the inside to fix the cracks.

-Andrew

Please Log in or Create an account to join the conversation.

Re:1959 Lake N' Sea Restoration 13 years 1 month ago #47205

  • MarkS
  • MarkS's Avatar
  • Offline
  • Moderator
  • Moderator
  • Posts: 5348
  • Karma: 118
  • Thank you received: 5
Andgott wrote:

I'm not a huge fan of Seacast in general... I think it would add a LOT of weight, plus cost a pretty penny.......

I think if I do it, I'll do it by laminating glass over foam forms. The foam will just stay there- It won't hurt anything. I've done some research, and asked some people who've done it before. Of course, I'd have to build up more layers of 'glass than if there was wood down there- But a good 2 or three would be as strong or stronger than wood, and rot would never be an issue.


Gotcha, just wondered what your thoughts were on that method. Thank you for taking the time to explain, sorry about "sidetracking" the thread.

Please Log in or Create an account to join the conversation.

Mark

Re:1959 Lake N' Sea Restoration 13 years 1 month ago #47230

  • bhamrick
  • bhamrick's Avatar
  • Offline
  • Contributing Member
  • Contributing Member
  • Posts: 224
  • Karma: 31
  • Thank you received: 0
Great pictures - I like it when you can watch the transformation from old boat to fun boat ! Nice work and keep the pictures coming. That's going to be a "Finned " beauty .

Please Log in or Create an account to join the conversation.

Re:1959 Lake N' Sea Restoration 13 years 1 month ago #47243

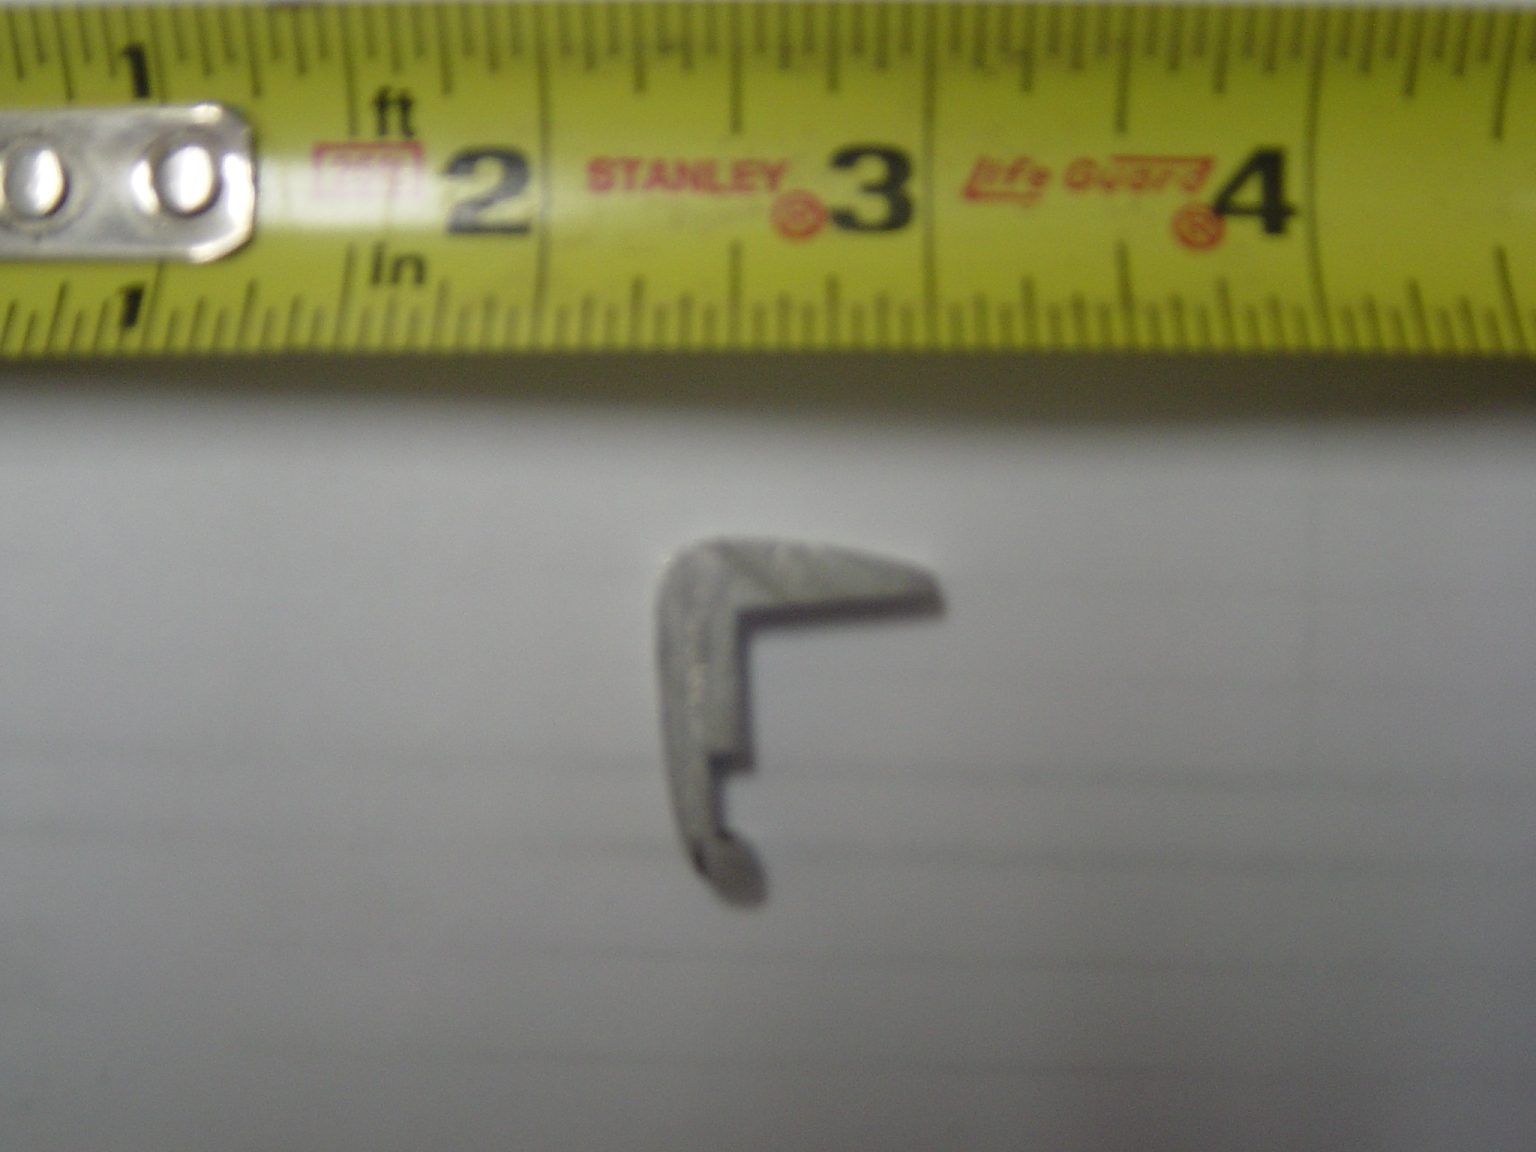
Almost in the same place. I to have started the same 59 Lake & Sea. Even the same color. I think I might go with a poured transom and poured stringers. I want the louvers to become part of the structural component of the transom. Would like to replace the transom 1/4 to 1/2" thicker to accommodate up to a 90 HP motor but don't think we have the room between the transom and the back of splash well. Will replace the floor with plywood rather than use the original fiberglass floor. I have a few soft spots in the fiberglass floor panel. My original aluminum rub rail is in poor shape and I have found no outlet for replacement as of yet.

Thanks for all the photos, it shows what I might encounter.

Greg Anderson
Wisconsin
Rub Rail Profile

Please Log in or Create an account to join the conversation.

Re:1959 Lake N' Sea Restoration 13 years 1 month ago #47260

  • Andgott
  • Andgott's Avatar Topic Author
  • Offline
  • Contributing Member
  • Contributing Member
  • Posts: 1243
  • Karma: 72
  • Thank you received: 0
Greg- Looks GREAT so far... I think that makes 3 '59 Lake N Seas being restored on this site... So much for the 'rare' thing ;)

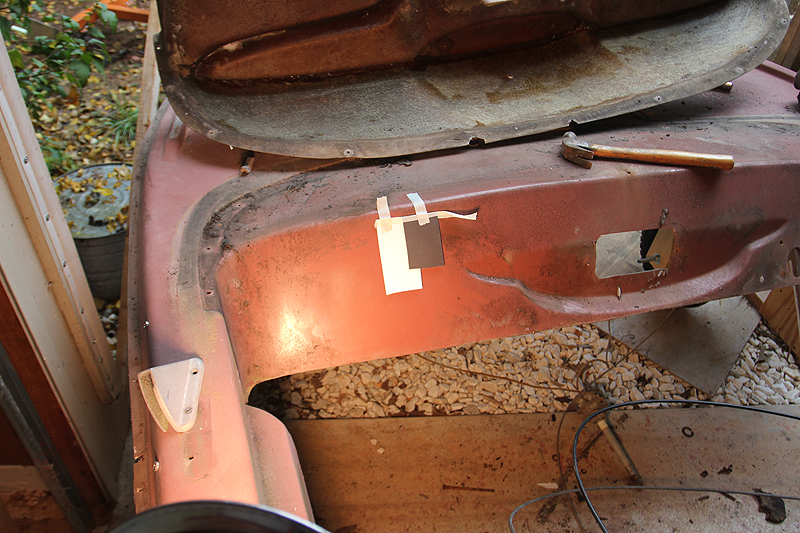
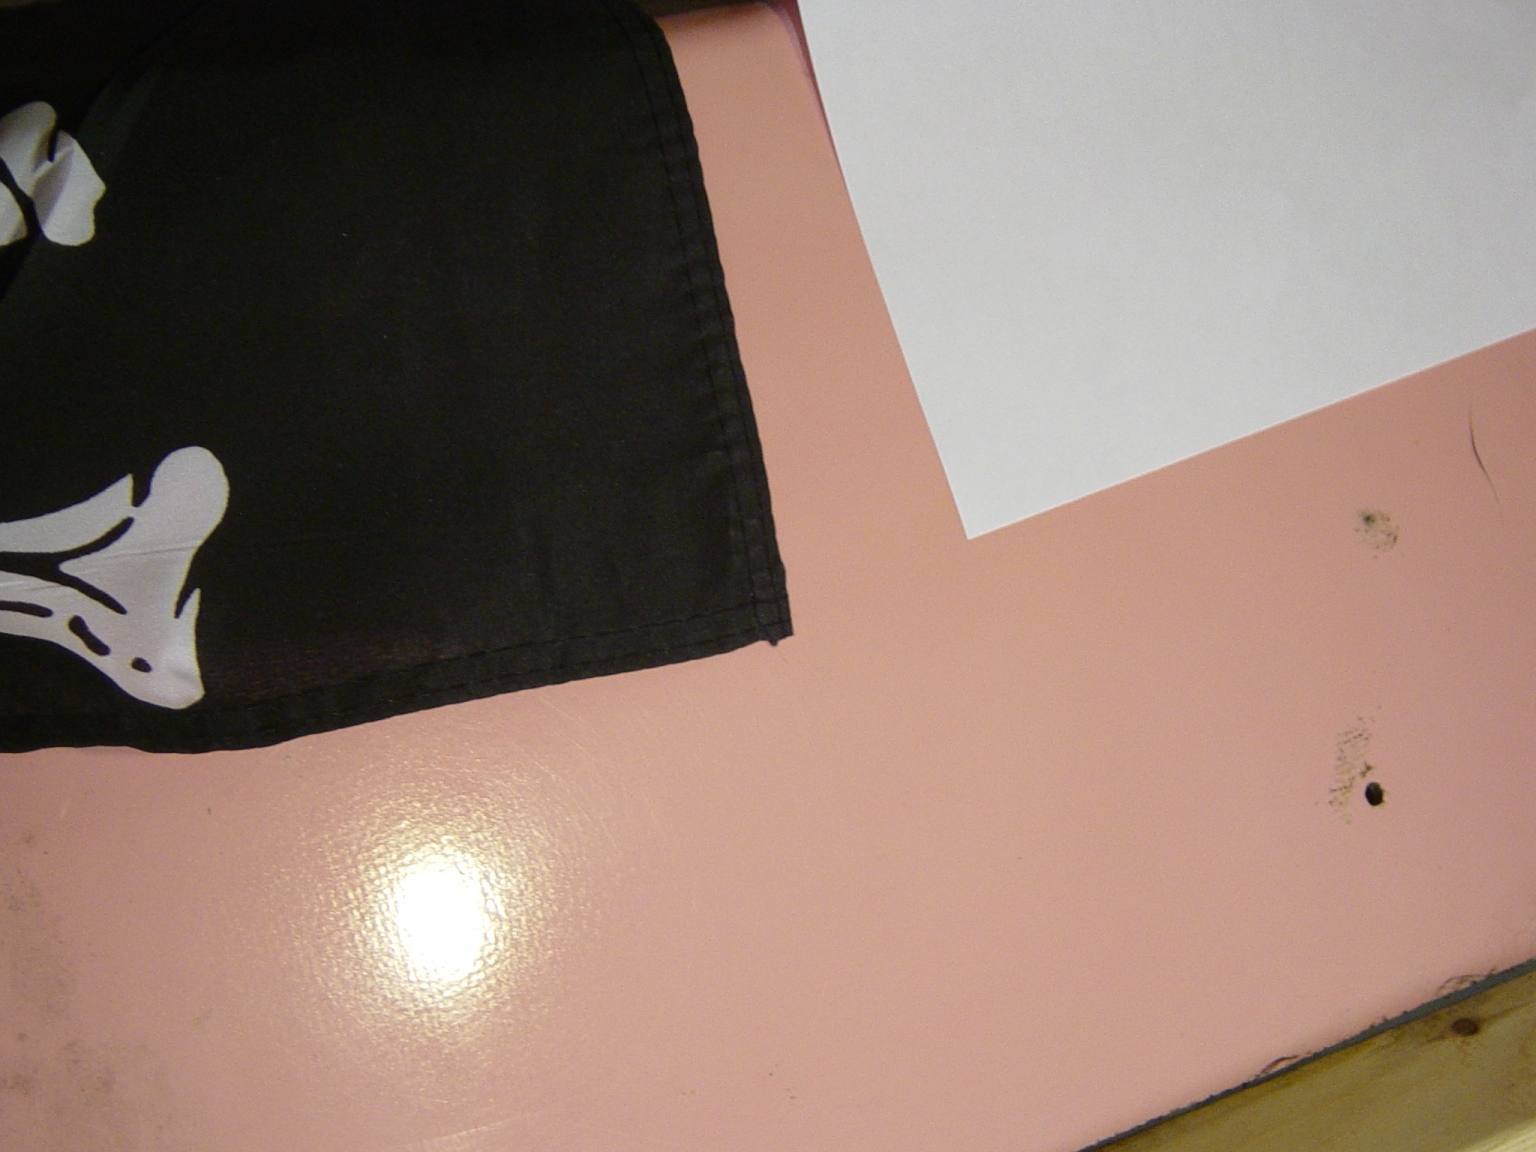
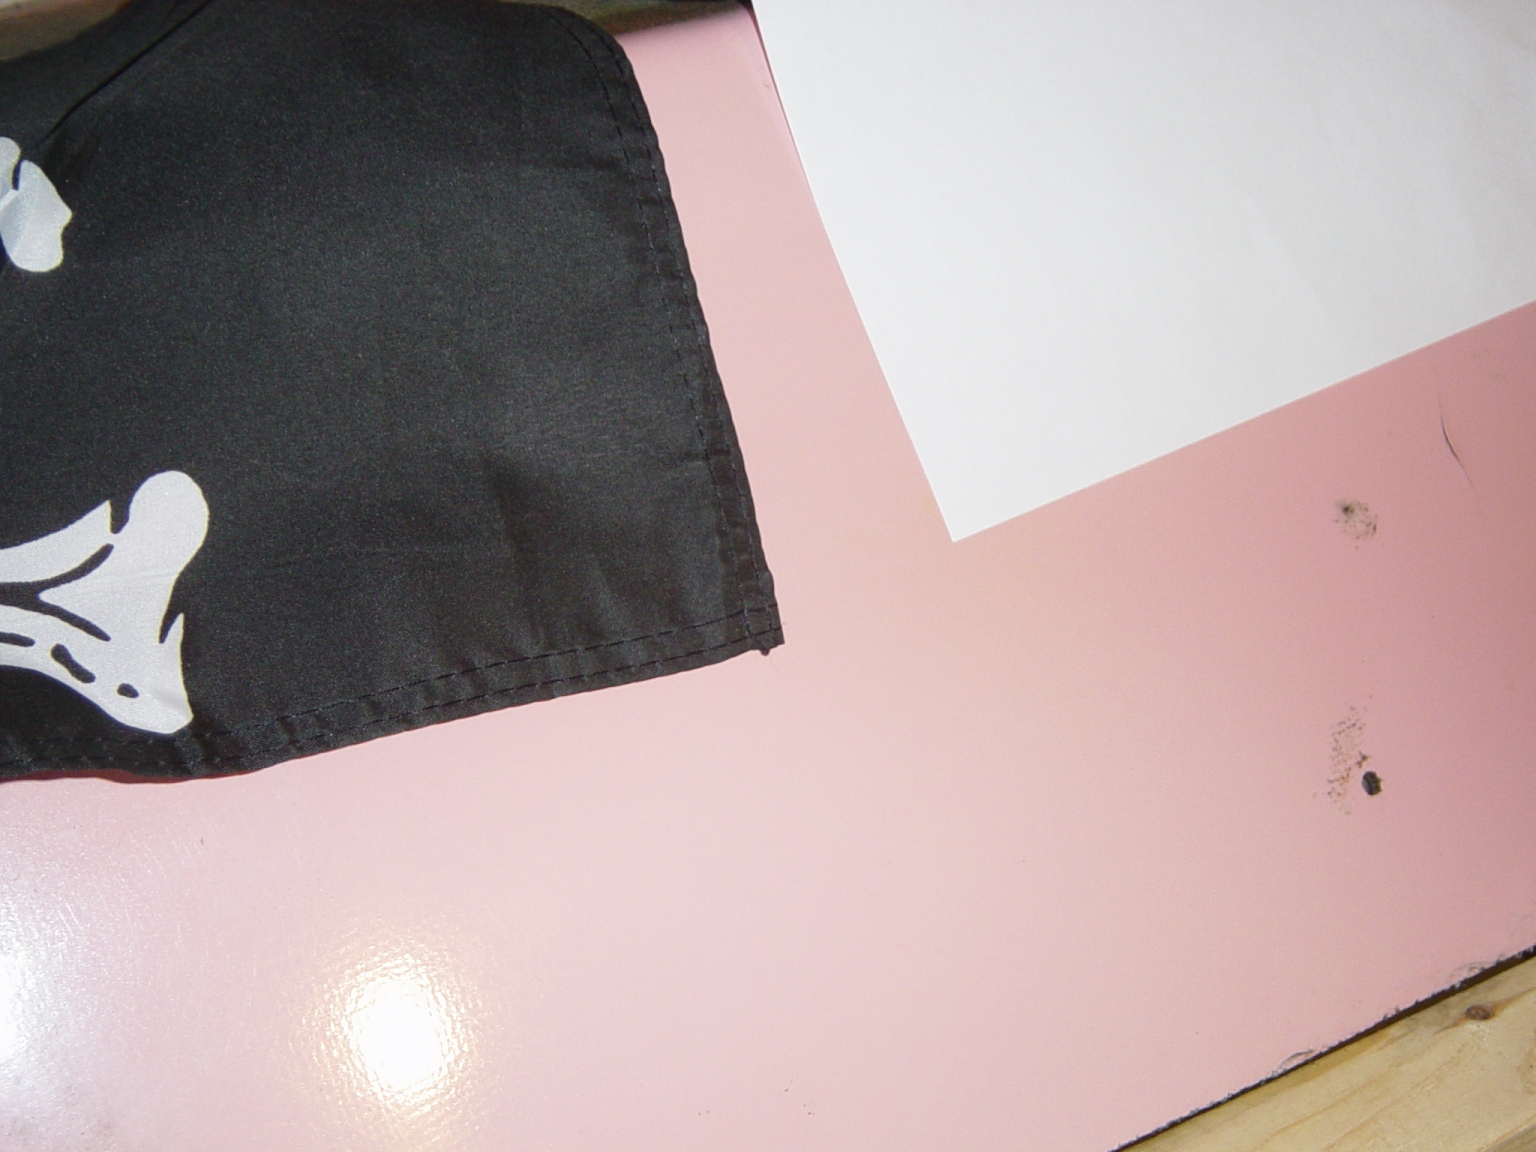
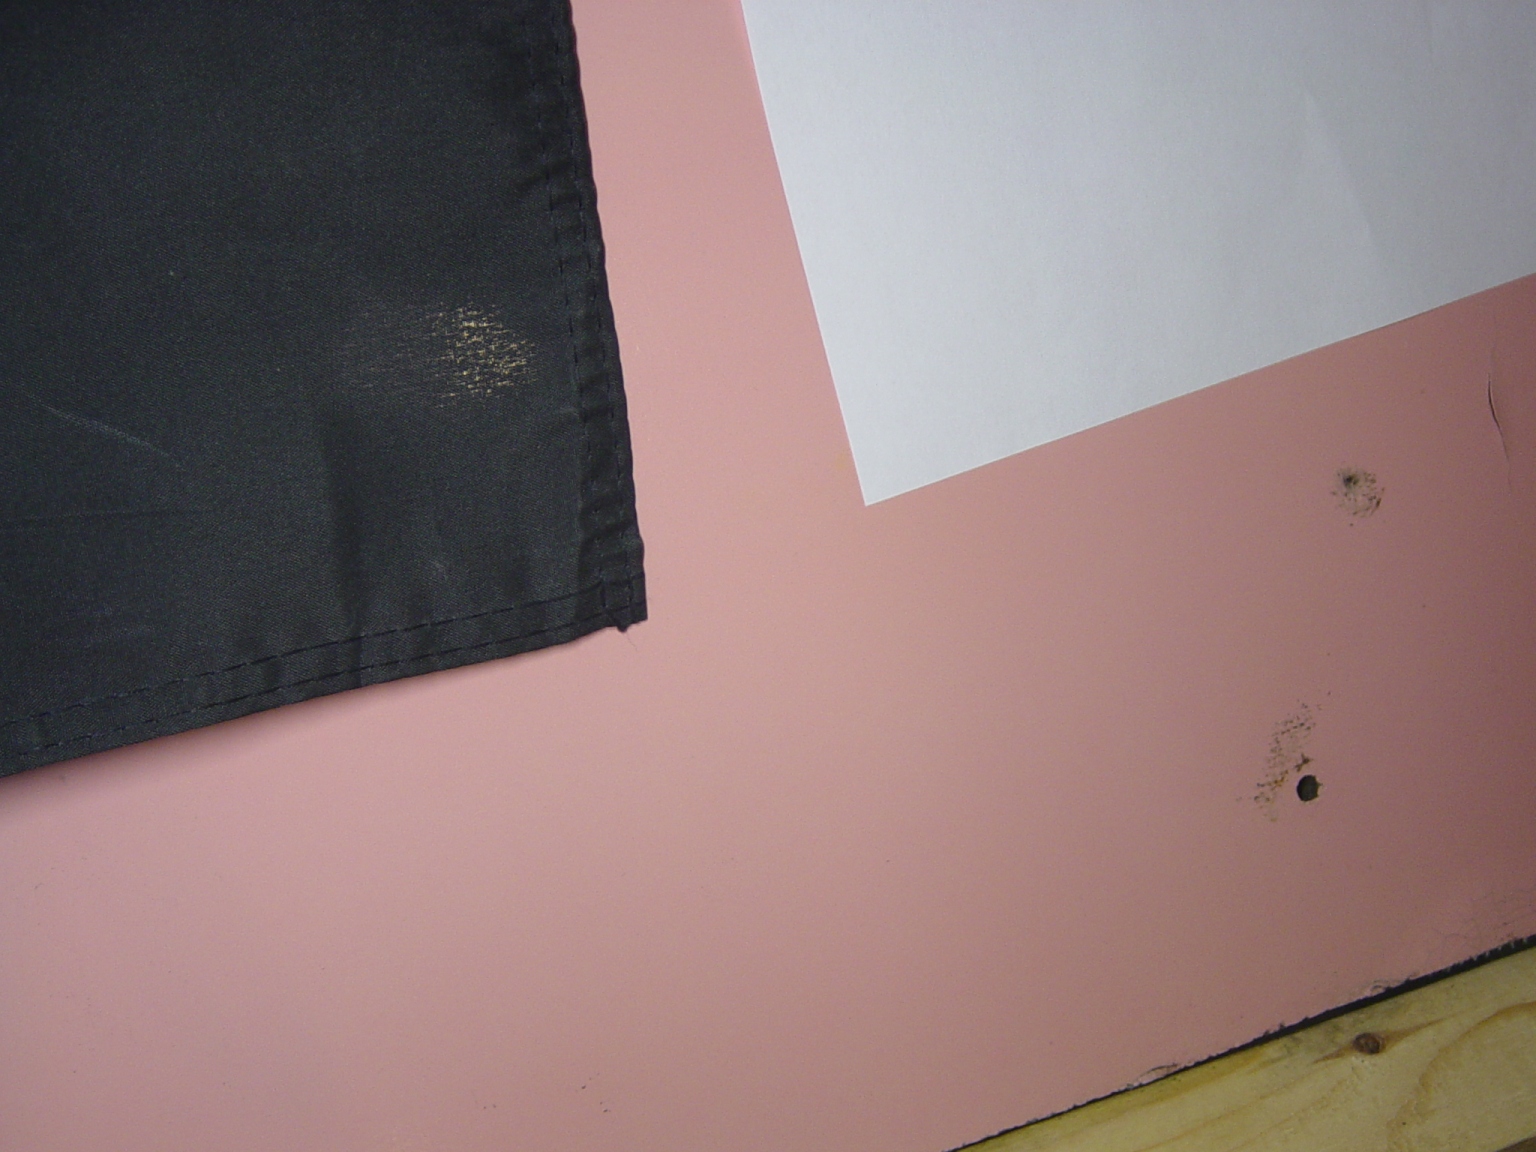
I see that yours was once coral pink! I think I'm going back to that color... Could you do me a HUGE favor? Could you get a picture of the unfaded area under the dash, in good light? When you take the picture- try to put a piece of WHITE and BLACK paper, or something similar in the shot with it, Like this-


So I can correct the color-


Then, 'extract' the color-


This is, of course, the 'Tropical suntan' color that mine was gelcoated in- But I want to get the pink 'right'. Once I get the color, I'll send it off to my paint people to get it mixed!

Please Log in or Create an account to join the conversation.

Re:1959 Lake N' Sea Restoration 13 years 1 month ago #47271

  • Andgott
  • Andgott's Avatar Topic Author
  • Offline
  • Contributing Member
  • Contributing Member
  • Posts: 1243
  • Karma: 72
  • Thank you received: 0
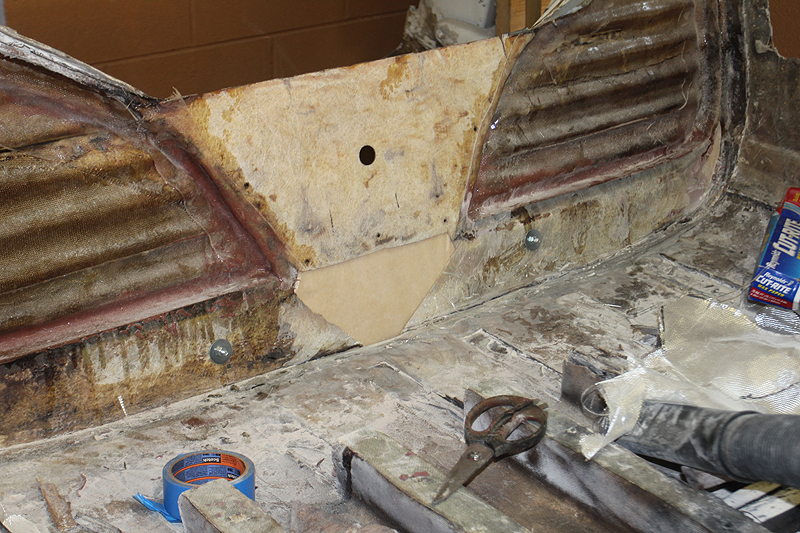
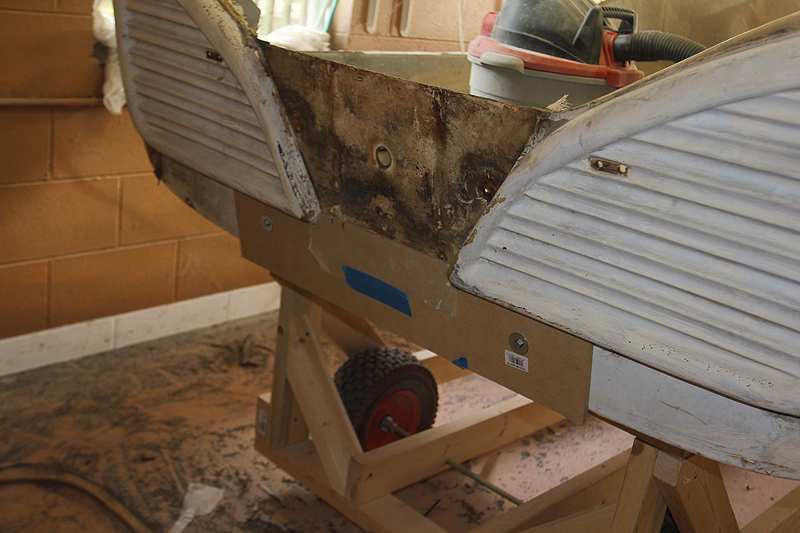
I got the area that I had to cut out of the transom repaired today. First, though, I needed something outside the hull to support the fiberglass when I lay it inside the boat... I used a piece of MDF- I drilled two holes in the transom, and used through bolts to hold the mold in place-


I taped waxed paper to the MDF so the epoxy wouldn't stick. Once it was in place, I taped the waxed paper to the bottom of the boat, to catch anything that drips through.

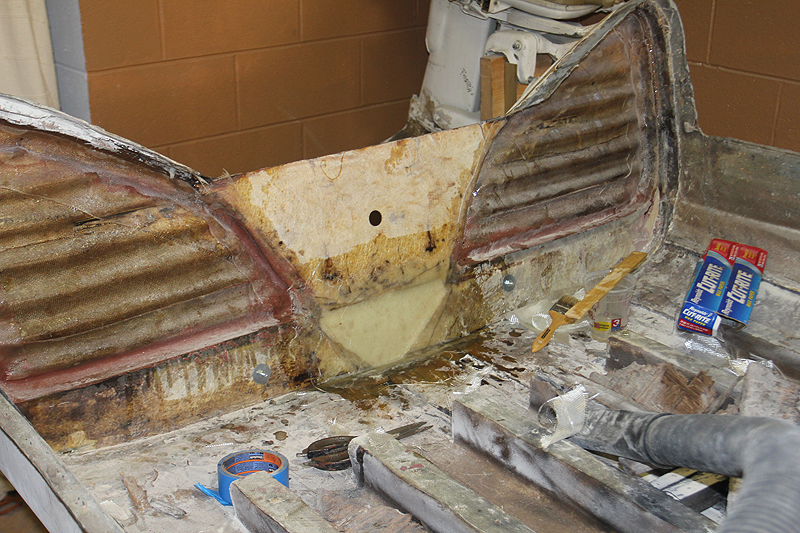
Then, I added a couple layers of cloth-


I am trying to build up thickness here, so this area is about the same thickness as the existing glass on the transom. I 'feathered' the edges of the existing glass, and overlapped the layers of new glass, until it was close. I'll probably have to grind it down a bit. After this cures, I'll be putting a layer of 1708 Biaxial cloth across the entire transom, to tie it all together and add some strength.

I MIGHT just get some wood in there before the weekend ;)

-Andrew
Attachments:

Please Log in or Create an account to join the conversation.

Re:1959 Lake N' Sea Restoration 13 years 1 month ago #47281

  • Todd
  • Offline
  • Senior Boarder
  • Senior Boarder
  • Posts: 218
  • Karma: 8
  • Thank you received: 0
Hey Andrew,

Great work and super fast, too. I look forward to seeing your work every day when I log onto the site. Keep up the terrific job!

BTW - remember that biaxal cloth won't work with epoxy.....sorry, I just had to say it!! Just kidding!

Please Log in or Create an account to join the conversation.

Re:1959 Lake N' Sea Restoration 13 years 1 month ago #47284

  • Andgott
  • Andgott's Avatar Topic Author
  • Offline
  • Contributing Member
  • Contributing Member
  • Posts: 1243
  • Karma: 72
  • Thank you received: 0
Todd wrote:

BTW - remember that biaxal cloth won't work with epoxy.....sorry, I just had to say it!! Just kidding!


:ohmy:

No wonder all my boats sink!!

Please Log in or Create an account to join the conversation.

Re:1959 Lake N' Sea Restoration 13 years 1 month ago #47312

Great job on the transom. I am following this thread so that when I do my boat this winter I should be able to fly right through it. I am glad that I now know about the biaxal cloth now.Keep up the great work, Skip.

Please Log in or Create an account to join the conversation.

Re:1959 Lake N' Sea Restoration 13 years 1 month ago #47316

do you guys remember these people, they sed to advertise on here.
or do they just make the rubber part of the rub rail

wefcorubber.com/

woosterken

Please Log in or Create an account to join the conversation.

Re:1959 Lake N' Sea Restoration 13 years 1 month ago #47329

  • Todd
  • Offline
  • Senior Boarder
  • Senior Boarder
  • Posts: 218
  • Karma: 8
  • Thank you received: 0
Morning Andrew,

I believe you know I was joking with my previous comment. I appreciate the work you do and the fact that you're willing to share both the narrative and pics of it all.

It was just one of those situations that was too good to pass up. Kinds like when you were kids and one kid had a really bad bruise and the other kids pushed on it to see if it hurt. Yep, there's nothing like good friends.

Have a great day and keep up the terrific work!

Please Log in or Create an account to join the conversation.

Re:1959 Lake N' Sea Restoration 13 years 1 month ago #47330

  • Todd
  • Offline
  • Senior Boarder
  • Senior Boarder
  • Posts: 218
  • Karma: 8
  • Thank you received: 0
Morning Woosterken,

Great link. That is one heck of a site, too. Has anyone ever used them? If you have, what was your experience with them as far as product and customer service. I need to replace the rubrail on my Redfish and they seem like a viable option.

Please Log in or Create an account to join the conversation.

Re:1959 Lake N' Sea Restoration 13 years 1 month ago #47335

todd we used wefco for the white rubrail on the sunray,good company,there is also taco marine for rubrail.
andrew its looking great,and fast too,i wish i was in the shape your in,im pretty slow now,lol.
the detail your going into is great,thanks.
by the way i wonder what happened to the other andy's lake and sea resto?it would be good to it too.john

Please Log in or Create an account to join the conversation.

\"too soon old,too late smart\" my pap

Twenty years from now you will be more disappointed by the things that you didn’t do than by the ones you did do. So throw off the bowlines. Sail away from the safe harbor. Catch the trade winds in your sails. Explore. Dream. Discover.“

---Mark Twain

Re:1959 Lake N' Sea Restoration 13 years 1 month ago #47365

  • Todd
  • Offline
  • Senior Boarder
  • Senior Boarder
  • Posts: 218
  • Karma: 8
  • Thank you received: 0
Thanks, John. Being a newbie to boats, I value the opinion and experience of those like you with the experience. I have saved the link to Wefco and will see if they have waht I need when the time comes.

This semester ends on Sunday and I get a break, except for one class, until the middle of January. That will be Todd's boat building time. I can tell you for a fact that there will be some burning of the midnight oil at my place! The RFSC will be reborn during that time, as much as possible. Now if I could only hit the lottery, too...

Working on things in my shop is time to relax and enjoy myself.

Please Log in or Create an account to join the conversation.

Re:1959 Lake N' Sea Restoration 13 years 1 month ago #47370

  • Andgott
  • Andgott's Avatar Topic Author
  • Offline
  • Contributing Member
  • Contributing Member
  • Posts: 1243
  • Karma: 72
  • Thank you received: 0
Todd-

I have not ordered from Wefco, but know a lot of people who have had great deailings with them. They only sell the rubber mouldings, though- And Lake N Sea rubrails are aluminum!

-Andrew

Please Log in or Create an account to join the conversation.

Re:1959 Lake N' Sea Restoration 13 years 1 month ago #47607

Photos as requested. If possible please provide color match numbers after analyst.

Thank You
Greg Anderson
Wisconsin
Attachments:

Please Log in or Create an account to join the conversation.

Re:1959 Lake N' Sea Restoration 13 years 1 month ago #47665

  • Andgott
  • Andgott's Avatar Topic Author
  • Offline
  • Contributing Member
  • Contributing Member
  • Posts: 1243
  • Karma: 72
  • Thank you received: 0
Thanks! That's just what I needed.

I came up with these-


Probably fairly close- I think that the first is probably closest. What I'll do next is to print a copy on a good printer- So I can actually SEE the color. Then I'll forward it to the people who make my paint, and they can match it... I am not sure if they can match it to a 'code' for other suppliers, but I will find out for you! They have a couple of pink colors that are standard- But it's hard to tell from the paint chip exactly what shade they are...
Attachments:

Please Log in or Create an account to join the conversation.

Re:1959 Lake N' Sea Restoration 13 years 1 month ago #47666

  • Andgott
  • Andgott's Avatar Topic Author
  • Offline
  • Contributing Member
  • Contributing Member
  • Posts: 1243
  • Karma: 72
  • Thank you received: 0
Not a whole lot more done- But a little! I have been concentrating on the G-3 so I can get it out of the garage :)

I was thinking about filling the louvered area of the transom all the way- but decided against it. Instead, I filled the areas that had cracked before with thickened epoxy, figuring that they are probably the weak spots. I also filed the area where the transom eyes go through, to provide some extra 'beef' there.

Then, I put a layer of 1708 over the transom, in the area that will contact the transom once it's installed. It's tabbed into the hull as well. It's MUCH stronger than it was before!


Next I'll cut the transom... Should be easy compared to the last two, since it's flat :)

-Andrew

Please Log in or Create an account to join the conversation.

Re:1959 Lake N' Sea Restoration 13 years 1 month ago #48044

  • Andgott
  • Andgott's Avatar Topic Author
  • Offline
  • Contributing Member
  • Contributing Member
  • Posts: 1243
  • Karma: 72
  • Thank you received: 0
Finally got some work done today- Between bad weather, a little cold spell, and other things, I've been a little slow...

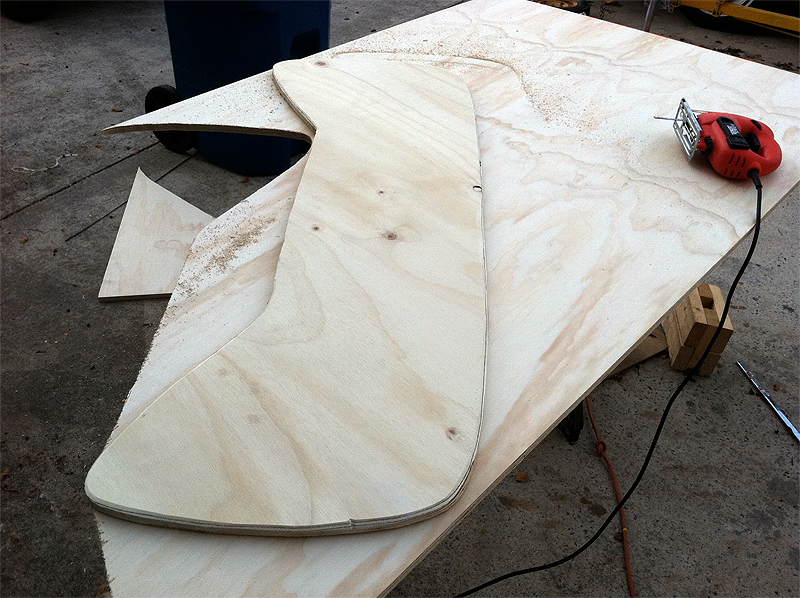
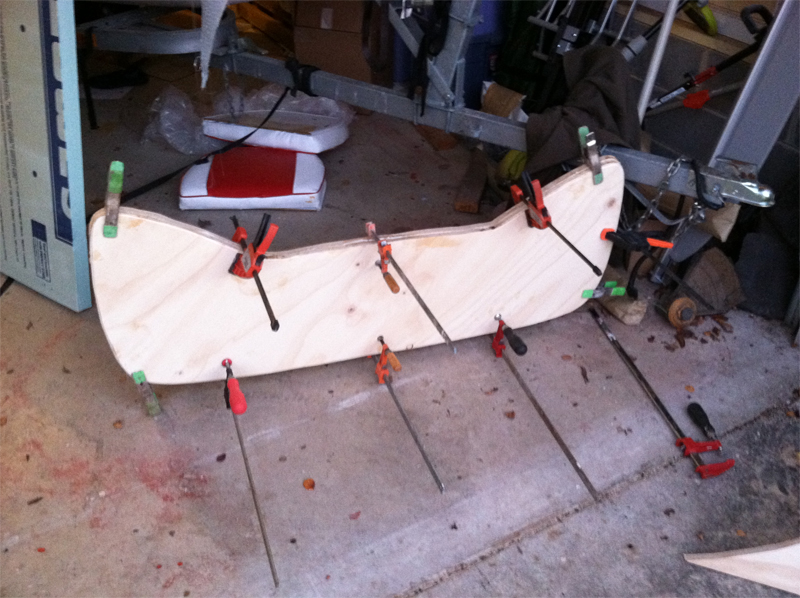
I cut the transom to shape-


I used my template to get it close, then used a grinder to fine tune it a bit. It's a pretty complicated fit, since it goes into a recess that's moulded in to the transom. Once I got the fit right, I cut the other piece, and glued 'em together with thickened epoxy-


Once it has cured, I'll grind it to it's final shape, seal it all off with epoxy, then install it.

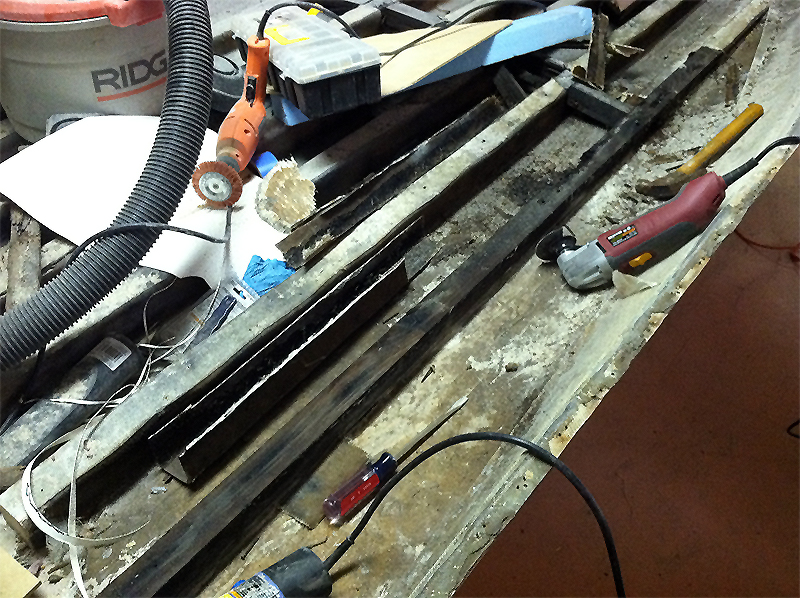
I started to cut the fiberglass off the stringers, and I discovered something great- The wood is NOT as bad as I though- In fact, the stringers are mostly intact. They appear to be Mahogany or some other hard wood. When I cut the ends off of them to get to the stringers, I noticed that the area that I cut through was SOLID. The last 6" or so had some surface rot, but I cut that all away. There is some localized rot in the areas that screws penetrated the wood, such as where the seat hinges mounted, but it's going to be repairable.


This will save me a LOT of time- I plan to remove the glass covering from them, make sure that they are good and dry, then sand them down, and epoxy/glass them again. Any rotten areas will be removed, and replaced either by sistering in new pieces of wood, or just some filler, depending on how large they are.

Hopefully, I'll get the transom in tomorrow!

-Andrew
Attachments:

Please Log in or Create an account to join the conversation.

Re:1959 Lake N' Sea Restoration 13 years 1 month ago #48074

  • MarkS
  • MarkS's Avatar
  • Offline
  • Moderator
  • Moderator
  • Posts: 5348
  • Karma: 118
  • Thank you received: 5
That IS great news about the stringers Andrew, glad to hear it. Does the cooler temps have the same effect on epoxy like it does poly resin? (Slows cure time considerably!) More good news - it's supposed to be back up in the low 70's by Sunday. ;)

Please Log in or Create an account to join the conversation.

Mark

Re:1959 Lake N' Sea Restoration 13 years 1 month ago #48076

wow,nice work andrew,im happy the stringers are repairable,i like overkill,(in my book there is no such thing,just underkill,lol)i would replace the rest of the bad stringers and then sister both sides,but like i said before i take after my dad,lol,just look at my porch/room in nbr.lol
either way you do it it will be strong,john

Please Log in or Create an account to join the conversation.

\"too soon old,too late smart\" my pap

Twenty years from now you will be more disappointed by the things that you didn’t do than by the ones you did do. So throw off the bowlines. Sail away from the safe harbor. Catch the trade winds in your sails. Explore. Dream. Discover.“

---Mark Twain

Re:1959 Lake N' Sea Restoration 13 years 1 month ago #48081

  • Steve G
  • Steve G's Avatar
  • Offline
  • Contributing Member
  • Contributing Member
  • Posts: 39
  • Karma: 2
  • Thank you received: 0
Andgott,what kind of lumber should be used for stringers,and is there a reason nobody uses pressure treated lumber?Thanks

Please Log in or Create an account to join the conversation.

Time to create page: 0.642 seconds

Donate

Please consider supporting our efforts.

Glassified Ads

1967 23 ft powercat flybridge
( / Boats)

noimage
11-17-2024

Mercury outboard
( / Engines)

noimage
11-03-2024

Classic Mercury Outboard Motors
( / Engines)

Classic Mercury Outboard Motors
10-18-2024

FG Login

FiberGoogle

Who's Online

We have 8930 guests and no members online