Welcome, Guest
Username: Password: Remember me
  • Page:
  • 1

TOPIC: reinstall 1964 Evinrude 60hp Lower Unit

reinstall 1964 Evinrude 60hp Lower Unit 9 months 3 weeks ago #148601

I am really struggling getting the lower unit back on. There are 4 things to connect/insert. I think the order that I need to connect them is: 1-drive shaft, 2-gear shifter 3&4 copper water tubes. Is this the correct order? Any words of wisdom would be appreciated.

Please Log in or Create an account to join the conversation.

reinstall 1964 Evinrude 60hp Lower Unit 9 months 3 weeks ago #148607

  • ed-mc
  • Offline
  • Platinum Boarder
  • Platinum Boarder
  • Posts: 1408
  • Karma: 232
  • Thank you received: 115
Yeah, the driveshaft will usually engage first. You either have to turn the flywheel while stabbing-up the L/U, or turn the propeller with the L/U in gear. You can get a bit more room in the shift shaft engagement by pushing down on the L/U shift shaft past Neutral, to put the L/U in gear.

Then turn the driveshaft clockwise and you'll see the prop turn. Turn the prop same direction, be it Fwd or Rev so the driveshaft (and water pump) turn, and its splines engage the crankshaft, while you're pushing upwards on the L/U.

The water tubes may or may not come next, you may find they need to start first. You need to have the L/U going straight-in, so as to engage the driveshaft in the crank. The extension tubes (if you have those installed) should be installed on the water tubes sticking downwards in the middle section (i.e. exhaust tower, mid-section).

This way you'll be able to better guide the 2 tubes into the water pump grommets. Be sure to have a little waterproof grease on the ends of the tubes where they'll engage the grommets. Or grease up the i.d.'s of the grommets. Oh, yeah, be sure the driveshaft splines are greased as well, but wipe off any grease on the very end of the driveshaft.

Anyway, you've got that symphony of water tubes and driveshaft going into crankshaft.

Recall we pushed the L/U shift shaft down; now you can also move the gearshift lever to raise the upper shift shaft a bit. This gives you some room to where it's a bit easier to get the lower shift shaft coupler engaged with the upper shift shaft.

Be sure that the curved, machined-out portion of the end of the lower shift shaft is positioned exactly in line with the bottom hole of the shift shaft brass coupler, when you look thru that bolt hole. That part of the shaft is curved to fit the side of the coupler bolt, and this helps to lock the shift shaft in the coupler.

If this is not lined-up right, you can strip out the bolt or the holes in the coupler, trying to force the bolt-in. The shift shaft will interfere unless it's in there perfectly, so shine a light a make sure it's all lined-up right.

One last tip, if you use a big flat-bladed screwdriver and open up the top of the brass coupler just a bit, the upper shift shaft will slide right in no problem. The coupler of course gets squeezed when the bolt is tightened, being brass it's somewhat malleable. Hence the need to pry it open a bit.

Anyway, hope that helps or maybe you've figured it all out by now! Good Luck regardless..............ed
The following user(s) said Thank You: JEShore66

Please Log in or Create an account to join the conversation.

reinstall 1964 Evinrude 60hp Lower Unit 9 months 3 weeks ago #148611

Thanks Ed,
I did better this try but I don't think the drive shaft is actually in right. I got the copper tubes in, the gear shift still about 1/2 inch away but I can't get the L/U to go up anymore. The drive shaft is the only thing I can think of that is preventing it moving up at this point.
One thing that I have used that is really handy is a LED strip light. I can shove this up the engine a bit and get light where I need it, it also can stay until the last second since it is about 1/4 thick. I also had a USB snake camera so between the two I can see in pretty well, it is just juggling all of the pieces and parts that proves challenging. Well, gotta get back to my next attempt!

Please Log in or Create an account to join the conversation.

reinstall 1964 Evinrude 60hp Lower Unit 9 months 3 weeks ago #148615

  • ed-mc
  • Offline
  • Platinum Boarder
  • Platinum Boarder
  • Posts: 1408
  • Karma: 232
  • Thank you received: 115
Well, turn the prop and if the driveshaft still moves and the flywheel don't, it ain't in there yet! Like I was saying before, the L/U has to be very straight going in, so the driveshaft will join up with the crankshaft.

Pull the L/U and shine a light up there, you can see right where the driveshaft has to go. Visualize that as you're "stabbing" in the L/U and maybe it'll help.

Turn the prop as you're pushing the L/U up and you'll feel when the driveshaft engages with the crankshaft splines.

Please Log in or Create an account to join the conversation.

reinstall 1964 Evinrude 60hp Lower Unit 8 months 3 weeks ago #148665

2 part Shift Rod? I can't find any drawings in my reference materials (Seloc Manual, Marine Engine.com parts breakouts, etc. that cover the entire Shift Rod for this motor. It is a two part, with the lower unit attaching via part 303794 on the port side of the L/U via an access port. The brass part was worn and I have replaced that part, but the trouble I am having is that the upper part of the shift rod is no longer engaged. Okay, so I forced it and now it is loose. I think I can just re-attach it and go on but I can't find any reference document that covers this upper part of the shift rod. It was next to impossible to shift the gear (even with the L/U removed) so something is preventing the free movement of the shift rod. Before I dig in again I at least want to have some idea of what is in that area and how to make this shifter work properly. Any idea where to look?

Please Log in or Create an account to join the conversation.

reinstall 1964 Evinrude 60hp Lower Unit 8 months 3 weeks ago #148666

  • ed-mc
  • Offline
  • Platinum Boarder
  • Platinum Boarder
  • Posts: 1408
  • Karma: 232
  • Thank you received: 115
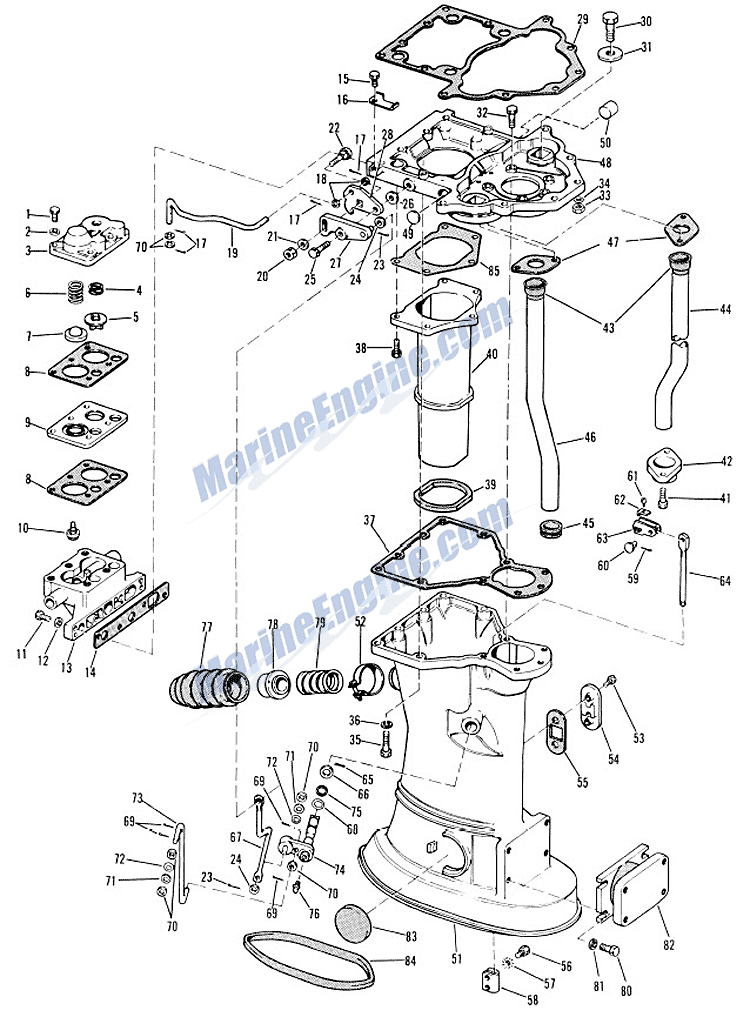
This is the diagram you need:

www.marineengine.com/parts/evinrude-johnson-parts-diagrams/EVINRUDE/278545-EXHAUST-TUBE-GROUP.gif

I'll also attach a copy here. Note that while the "window" for the shift coupler is on the port side, there is a complex series of linkages on the other side, which operate the shift "Shaft and Arm" Assembly, P/N 74 in the diagram.

The Upper Shift Rod (64) along with parts 59 thru 63, attaches to the end of the Shaft and Arm, thus translating the rotary action of the Shaft and Arm to the up-and-down motion of the shift rod.

(61) is the screw that holds the whole shift rod assy to the Shaft and Arm, and that screw is called the Bellcrank screw because technically that's what the Shaft and Arm is, a bellcrank.

Note the linkage on the outside of the exhaust tube; if any piece of that is stuck/seized then the shifter handle can't move. You may have to check it all out and maybe lube it up real good to see if that helps.

Keep in mind this engine also has a shift interlock assy that keeps you from advancing the throttle too far in Neutral. This convoluted setup has a linkage that goes over to the shift detent assembly at the base of the powerhead.

A jammed linkage or sticky interlock lever/linkage could cause shifting problems. You can wiggle all the parts to see if they all have free movement. If you find something stuck, take it apart, clean, lube and reassemble.

Use care if any screws or bolts seem stuck, don't force them, they'll break. Use heat and penetrant to get them to break free.

Now, I'm not sure what you mean by the upper shift rod being "no longer engaged" or "loose". Is it just moving up and down with a lot of slack when you try to move it? If so, that can only mean the bellcrank screw is loose and there's a ton of lost motion between the Shaft and Arm, & the shift rod.

The only way to fix a loose or undone upper shift rod is to pull the powerhead. With the powerhead removed, you can get at the upper shift rod and the bellcrank. If that is your issue, I'd recommend cleaning up the screw and the screw hole in the bellcrank, and using some hi-temp Loctite Red on the screw threads. Then it will never come loose.

BTW I've seen 'em where the bellcrank (Shaft and Arm), gets stuck in the center section (exhaust tube) because of salt buildup. You have to heat up the area where it penetrates the exhaust tube, then spray penetrating oil in there, and work the bellcrank back and forth. In your case if the upper shift rod is loose on the bellcrank, then you'll have to pull the powerhead to fix, and at that time you can pull the bellcrank out to the side and grease it up real good.

Last note, you're gonna need to pull the rear cowling off the center section, to gain better access to all the shift linkages that live down inside the area between the exhaust tube and the outer cowling/cover.

HTH..............ed
Attachments:

Please Log in or Create an account to join the conversation.

reinstall 1964 Evinrude 60hp Lower Unit 7 months 5 days ago #148731

The boat and I needed a break from each other. I am back working on it now. I replaced the broken "link to shaft lever" part #377728 and well, I ended up breaking the new one. They seem to be made of lead and apparently are very fragile. I was trying to move the gear shift to the forward position and my new part broke. I really didn't even use that much force. New one on order.
Now, the next problem is lubrication. Since the entire shift rod system was so difficult to move I thought that lubrication all associated parts would be good. I located the lubrication point behind a pop off cover on the starboard side of the lower unit cover. When I attached the lub gun and pumped some grease in. When trying to remove the lub gun from the nipple, it wouldn't come off. I had watched several youtube videos and it seemed to have attached correctly, but it wouldn't come off. Finally after struggling with it the gun came off, but with the nipple still in the gun socket. I was able to separate the nipple from the socket, cleaned it and popped it back in the lower unit, I tapped it into place and it seems to fit but I am not sure if it is tight. I of course tried to lub it again, same result, nipple came off with the lub gun. Cleaned it, replaced it and stopped. I tried a couple of other lub points with the gun and it worked perfectly. How much trouble am I in now with the lub point that came off? I haven't removed the front cover of the lower unit, just the rear cover but I can if I need to. I can't seem to find that lub point on any of the drawings but I am probably just not seeing it. I am really hoping there is a way to fix it without taking more things apart...I am just making negative progress at this point.

Please Log in or Create an account to join the conversation.

reinstall 1964 Evinrude 60hp Lower Unit 7 months 1 day ago #148739

I have order a grease zerk Part #307256 to replace the one that pulled out. I noticed that newer versions have treads but this one does not. Is there a trick to getting this in securely?

Please Log in or Create an account to join the conversation.

reinstall 1964 Evinrude 60hp Lower Unit 7 months 1 day ago #148740

  • ed-mc
  • Offline
  • Platinum Boarder
  • Platinum Boarder
  • Posts: 1408
  • Karma: 232
  • Thank you received: 115
You're breaking that shift lever link because it is taking too much force to operate the shifting linkage. It's likely to break again until you get to the root of the problem.

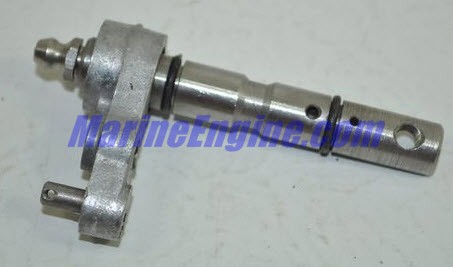
The part you're trying to lubricate is #74 in the "exhaust tube" diagram I posted previously. This is the main shift shaft bellcrank, otherwise known as the "Shaft and Arm". The link for the attachment of the upper shift rod is on the inner end of this arm. This is what I described previously as possibly coming loose.

If you can take your fingers and move the upper shift rod up-and-down with very little force (this is when it's not attached to the lower shift rod with the brass coupler in place), then the screw is loose on the "Shift Rod Lever" and you'll have to remove the powerhead to access these parts.

The "Shaft and Arm" rides on a plastic bearing and salt builds up around the bearing, which decreases clearances and squeezes on the arm so it can't move freely. The proper way to fix this is to pull the powerhead, remove the Shaft and Arm, remove the bearing, and manually scrape out all the salt/debris.

The grease fitting pressed into the end of the Shaft and Arm is what's supposed to keep that whole arm lubed so it doesn't seize up. If you have a bunch of hardened grease in the grease passage of the arm, well then you can't get any new grease to flow in there and the hydraulic pressure of the grease gun pops the fitting right out.

I'm suggesting that it won't do any good to install a new grease fitting until you clean out the Shaft and Arm assembly. Which requires pulling the powerhead.

There is one thing you can try before doing that; use a propane or MAPP torch to heat up the area around the Shaft and Arm and then try spraying some penetrant in there. It may help loosen up the stuck part. If you heat the Heck out of the area, it may deform the plastic bushing enough to allow free movement of the shaft and arm. Also, the heat might help loosen the old grease inside.

Note that you're gonna have to pull the rear cowling cover for the center section for access to the above parts. You can do no more than grease the shaft by removing that small access cover on the side. It's just a bunch of screws that hold the cover to the front section, and if this isn't a salt motor, those screws should come right out.

With the rear cowling off, you can disconnect the shift rod linkage to the Shaft and Arm. Then you can grab that arm with some pliers and see how hard it is to move it. You can also "exercise" the shift handle and see if the shift linkage from the Handle to the Arm is free to move. Process of elimination to determine cause of hard shifting.

Regarding your new grease fitting, it is only a press-fit. Find a very small socket that will just fit over the end of the fitting, and use that to tap it into the end of the Shaft and Arm with a hammer.

You might want to try cleaning the end of the shaft with some degreaser, also degrease the grease fitting so both parts are oil-free. Then use some Loctite Red threadlocker, or one of their Bearing and Stud Mount products. Use it only on the sides of the fitting where it will contact the Arm. Don't get any on the end.

Let the Loctite cure for a number of days before attempting to grease the shaft. If it's cold out, heat the area with an incandescent light bulb. Maybe it'll work, maybe not. Depends on whether the heat from a torch knocks the old grease out.

I'm thinking in the end you'll be pulling the powerhead to fix it. Especially if that upper shift rod lever is loose. And that is the Only way to remedy that problem.
Attachments:

Please Log in or Create an account to join the conversation.

  • Page:
  • 1
Time to create page: 0.221 seconds

Donate

Please consider supporting our efforts.

Glassified Ads

1967 23 ft powercat flybridge
( / Boats)

noimage
11-17-2024

Mercury outboard
( / Engines)

noimage
11-03-2024

Classic Mercury Outboard Motors
( / Engines)

Classic Mercury Outboard Motors
10-18-2024

FG Login

FiberGoogle

Who's Online

We have 8895 guests and one member online