Welcome, Guest
Username: Password: Remember me
A place to discuss the problems/solutions and peculiarities of inboard engine installations, operation and trouble-shooting. Covering all types of inboard engines..Ford, Chevy, Chrysler and AMC based, flatheads and all types of inboard transmissions.
  • Page:
  • 1

TOPIC: Engine Alignment

Engine Alignment 8 years 1 week ago #128784

  • Tomahawk
  • Tomahawk's Avatar Topic Author
  • Offline
  • Senior Boarder
  • Senior Boarder
  • Posts: 238
  • Karma: 15
  • Thank you received: 2
I have a 76 ski nautique that was crashed. the engine is .200 offset from the flange of the drive shaft. I need move the motor on the engine mounts. they have been fighting the idea of moving. I recently came up with the idea of jacking up the motor to take weight off the mounts while i try to shift it. anyone have experience with this? am i on the right track?

Please Log in or Create an account to join the conversation.

Re:Engine Alignment 8 years 1 week ago #128787

  • Nautilus
  • Nautilus's Avatar
  • Offline
  • Contributing Member
  • Contributing Member
  • Posts: 1577
  • Karma: 87
  • Thank you received: 58
To move the transmission that small a distance, loosen all the lock bolts (front and rear, both sides) that allow side to side movement and pry the transmission sideways with a large crowbar. Afterward, you will also most likely need to realign the front of the engine to allow the flanges to mate flush. These small adjustments can generally be done without lifting. If the crowbar doesn't work, a short handled sledge hammer in back of a good oak wood block can do the trick. Don't forget to re-tighten all the locking bolts.

Please Log in or Create an account to join the conversation.

Website: NautilusRestorations.com

Mentor to the unenlightened!

"Never allow logic to interfere with a boat purchase." - J. S. Hadley
"Vintage quality beats new junk every time." - J. S. Hadley
"Anything supposed to do two things does both of them half-assed." - J. S. Hadley
"Success makes...

Re:Engine Alignment 8 years 1 week ago #128801

  • 63 Sabre
  • 63 Sabre's Avatar
  • Offline
  • Contributing Member
  • Contributing Member
  • Posts: 4676
  • Karma: 147
  • Thank you received: 167
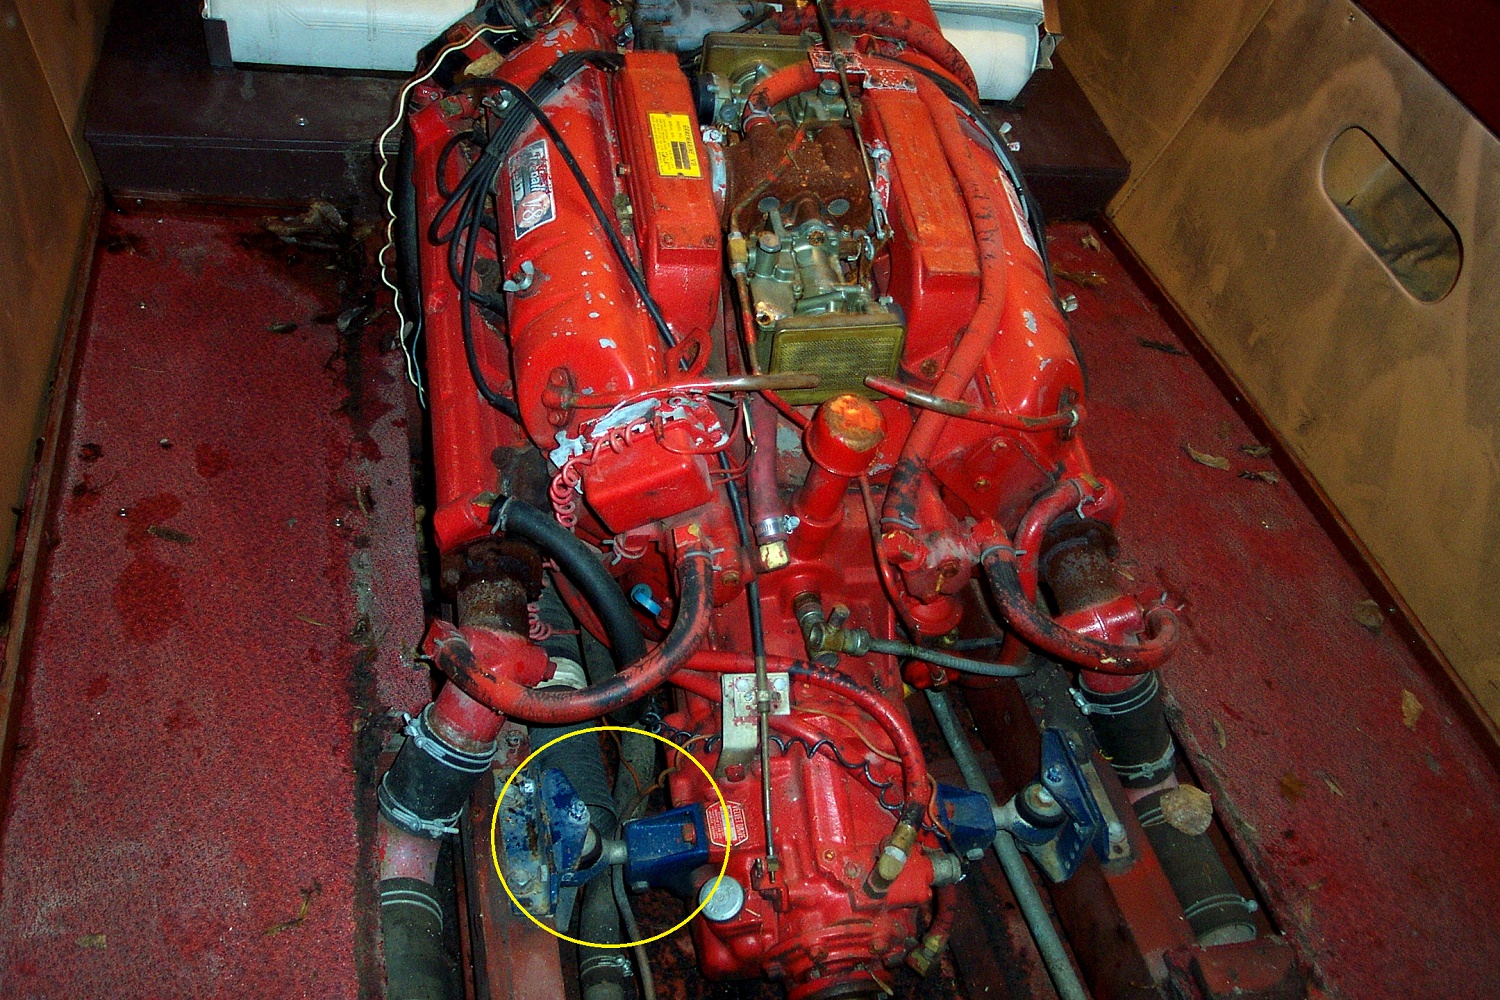
Dredging up an old pic here before a rebuild but there might be some lateral and vertical adjustment you can do with a wrench??
Attachments:

Please Log in or Create an account to join the conversation.

Re:Engine Alignment 8 years 1 week ago #128807

  • Nautilus
  • Nautilus's Avatar
  • Offline
  • Contributing Member
  • Contributing Member
  • Posts: 1577
  • Karma: 87
  • Thank you received: 58
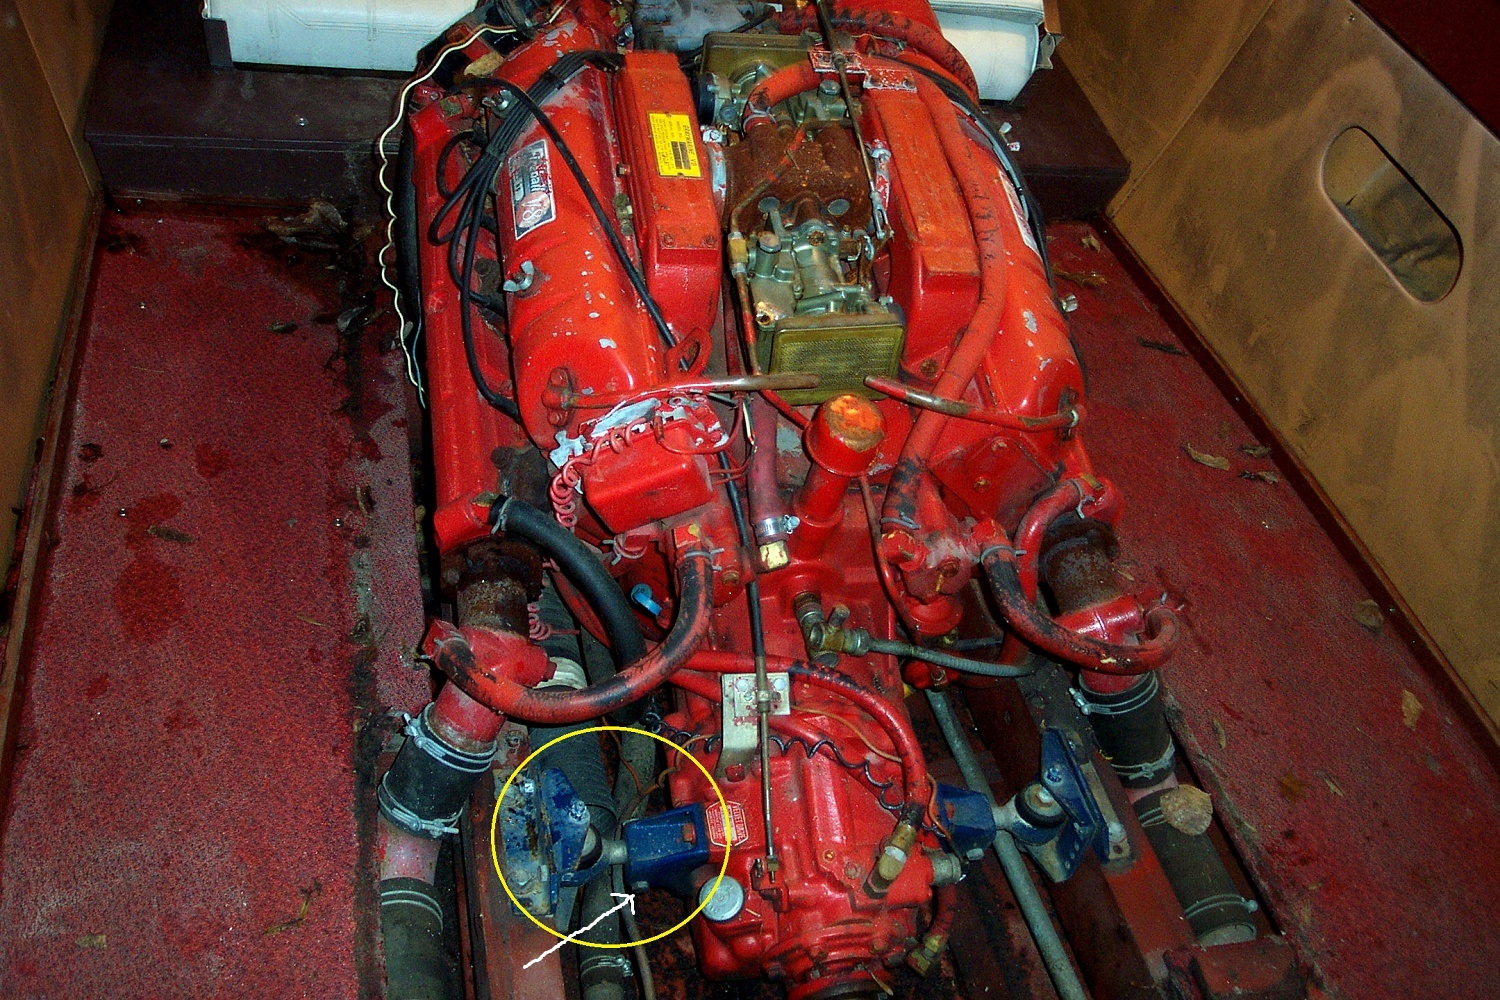
The vertical adjustment is done with a wrench but the lateral movement can only be done by prying. Loosen the bolts shown (white arrow) and then pry with a long crow bar. A little lifting to barely take some of the weight off the rear motor mounts would make it easier but it's usually not necessary.
Attachments:

Please Log in or Create an account to join the conversation.

Website: NautilusRestorations.com

Mentor to the unenlightened!

"Never allow logic to interfere with a boat purchase." - J. S. Hadley
"Vintage quality beats new junk every time." - J. S. Hadley
"Anything supposed to do two things does both of them half-assed." - J. S. Hadley
"Success makes...

Re:Engine Alignment 8 years 6 days ago #128847

  • 63g3
  • Offline
  • Contributing Member
  • Contributing Member
  • Posts: 465
  • Karma: 62
  • Thank you received: 2
Yippee we have our inboard catagory....let's not forget V-drives....
All above is correct I will add a few tid bits. I use a ball joint fork wedge to facilitate side to side prying.
You want to find the centered location of the prop shaft as this is the correct spot to align to. The shaft will be cockeyed down due to gravity where the shaft will be hitting the lower leading edge of the strut bore and the upper trailing edge of the strut bore. What I do is pull up, push down and move the shaft left and right, the middle of these is the "free" center position you should align to, just do those 4 positions as the engine flange gets near to verify you are aligning to this free center. You don't want to have the flanges aligned with the shaft angle biased.
Generally on motor mounts, the trunion shaft is held in a split clamp at the engine side so to ease side to side motion loosen the clamp bolt and squirt some WD 40 or equivalent in the slot so it soaks in and use a screwdriver blade as a wedge to spread the split clamp some. Also, relative to most alignment tweaks .2 inch is large enough that you should loosen all 4 split clamps and work the motor back and forth to get it closer you don't want to be loading the rubber on the mounts not loosened so it's best to get things close in the "free state". The clamps fit the rods tight enough that the motor should not drop any when they are loosened.
If you find that once close there is a big difference side to side of how much rod is seen between the stringer mount and the motor mount it might be best to replace the strut or get it straightened to get the motor more centered when aligned. It was pretty common to replace struts after a good dinger. This is why I would use a bronze prop, you want that to bend before the strut or shaft does in case of a boo boo.
On the side angle adjust when tweaking it is sometimes helpful at that point to lock one of the clamps down so the motor will change angle rather than translate, observe which way motor wants to pivot to align and lock down the appropriate mount.
Up down if not done evenly on each side will also skew left /right a tad. Sometimes you can use that to your advantage. Remember flanges must be within .003 in of parallel so tweaks matter. Recheck alignment as you tighten things and adjust accordingly, this us an iterative process.
Once you have good alignment now you have a pretty good reference for the prop shaft to see if it's tweaked
Spin the shaft, the flange clearance should stay the same when measured at the same clock position.
I really wish threaded adjustment were also the norm for left/right similar to the up down, Merc, PCM and Crusader all have threaded up down but ya gotta pry for left right .......never understood the reasoning.
Randy

Please Log in or Create an account to join the conversation.

Re:Engine Alignment 8 years 5 days ago #128853

  • Nautilus
  • Nautilus's Avatar
  • Offline
  • Contributing Member
  • Contributing Member
  • Posts: 1577
  • Karma: 87
  • Thank you received: 58
Whenever I replace an engine, I always replace the cutlass bearing and repack the shaft log. By tightening the nut on the shaft log with the new packing, the shaft is pretty much perfectly centered. Also, I do this with the prop off. Without the weight of the prop, the shaft has no downward pressure being applied to the rear that could cause the shaft to ride slightly high in the shaft log.

The ball joint fork wedge is a great idea. I'll pick one up before the engine goes in the Barracuda.

Please Log in or Create an account to join the conversation.

Website: NautilusRestorations.com

Mentor to the unenlightened!

"Never allow logic to interfere with a boat purchase." - J. S. Hadley
"Vintage quality beats new junk every time." - J. S. Hadley
"Anything supposed to do two things does both of them half-assed." - J. S. Hadley
"Success makes...

Re:Engine Alignment 8 years 4 days ago #128879

  • 63 Sabre
  • 63 Sabre's Avatar
  • Offline
  • Contributing Member
  • Contributing Member
  • Posts: 4676
  • Karma: 147
  • Thank you received: 167
Jan, do you use that dry packing rope, sorta square that you cut to size? I used that on my Sabre. Worked great but you have to be careful not to tighten the packing nut too tight...you can smell the heat, don't ask how I know. Rule of thumb with those things is to always have a small drip of water coming through to keep it cool.

Please Log in or Create an account to join the conversation.

Re:Engine Alignment 8 years 2 days ago #128907

  • Nautilus
  • Nautilus's Avatar
  • Offline
  • Contributing Member
  • Contributing Member
  • Posts: 1577
  • Karma: 87
  • Thank you received: 58
I use this crazy stuff I bought several years ago. I think it's packing for steam valves and it's pretty weird. It comes on a roll, is about 3/8" square and is caked with what looks and smells like animal fat. I cut it to length and stuff two layers in there with the seams 180 degrees apart. I've done about a dozen boats with this stuff and it works great. Unfortunately, I have no idea where or when I bought it but there's enough of it left to do another 12 boats, maybe more.

Please Log in or Create an account to join the conversation.

Website: NautilusRestorations.com

Mentor to the unenlightened!

"Never allow logic to interfere with a boat purchase." - J. S. Hadley
"Vintage quality beats new junk every time." - J. S. Hadley
"Anything supposed to do two things does both of them half-assed." - J. S. Hadley
"Success makes...

Re:Engine Alignment 7 years 10 months ago #129866

  • Tomahawk
  • Tomahawk's Avatar Topic Author
  • Offline
  • Senior Boarder
  • Senior Boarder
  • Posts: 238
  • Karma: 15
  • Thank you received: 2
I talked to a Ski Nautique guy at the Minneapolis boat show that I had met before and his advice was to remove the motor mounts, get them freed up, reinstall and then complete the alignment. This is sounding like great advice and I will tell you how it goes.

Please Log in or Create an account to join the conversation.

Re:Engine Alignment 7 years 10 months ago #129870

  • 63g3
  • Offline
  • Contributing Member
  • Contributing Member
  • Posts: 465
  • Karma: 62
  • Thank you received: 2
Yup if trunion is not free to slide in and out of the mount it's a near impossibility to align.
Work WD 40 and wedge the split portion of the mount open, usually that works and you don't have to remove the mounts. Maybe you have some serious corrosion as none of this is stainless and removal is the only way to free them up. I was an inboard dealer for 12 years, good to see you are aware of the need for alignment,
not many are and thought I was fishing to do unneeded work when I suggested this as a good thing to check every once in a while.
Good luck,
Randy

Please Log in or Create an account to join the conversation.

Re:Engine Alignment 7 years 10 months ago #129877

  • ed-mc
  • Offline
  • Platinum Boarder
  • Platinum Boarder
  • Posts: 1412
  • Karma: 232
  • Thank you received: 117
Acetone and ATF mixed 50/50 makes an excellent penetrant, better than PB Blaster or Kroil. Couldn't hurt to soak the rusted bits for a period of time before disassembly.

Acetone is very volatile, of course and needless to say, use in a well-ventilated area and no open flamage!

Please Log in or Create an account to join the conversation.

  • Page:
  • 1
Moderators: kensikoraNautilus
Time to create page: 0.188 seconds

Donate

Please consider supporting our efforts.

Glassified Ads

1967 23 ft powercat flybridge
( / Boats)

noimage
11-17-2024

Mercury outboard
( / Engines)

noimage
11-03-2024

Classic Mercury Outboard Motors
( / Engines)

Classic Mercury Outboard Motors
10-18-2024

FG Login

FiberGoogle

Who's Online

We have 9242 guests and no members online