Welcome, Guest
Username: Password: Remember me
  • Page:
  • 1

TOPIC: ThunderHawk Jr Restoration

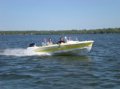
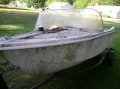
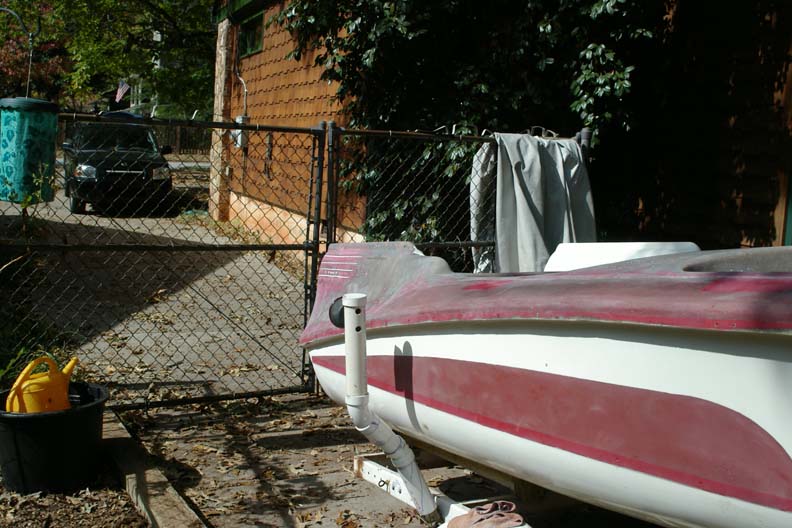
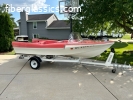
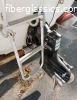
ThunderHawk Jr Restoration 13 years 10 months ago #9075

Greetings All,

Yet another newbie to the ranks of fin boat owners here.

I've got a '58 Thunderhawk Jr. I'm working on abd need a little advice about the deck/hull seam. As you can see in the attached picture, there are places where the seam has some separation and others where it's pretty solid.

I've been looking it over and pondering what to do about it. It looks like I'll have to cut the fiber inside and remove the screws to separate the sections.

The other possibility I've considered is sanding and filling.

Has anyone dealt with this with a TH,jr.?

Thanks in advance for your help.

Rob
Attachments:

Please Log in or Create an account to join the conversation.

Re:ThunderHawk Jr Restoration 13 years 10 months ago #9153

  • bogman
  • bogman's Avatar
  • Offline
  • Junior Boarder
  • Junior Boarder
  • Posts: 77
  • Karma: 1
  • Thank you received: 0
Can't see your problem all that well but if I understand you I don't think you have to do anything to that area. If it's built like the Thawk Sr the top is glassed to the bottom from the inside, I assume thats all intact. The only thing you need the flange on the outside is to rivet the rubrail to, and you have plenty of good flange to accomplish that, buy the way the mold for the rubrail does exist if you need a new one. Hope that answers your question. Are you doing a full restoration transom, core ect ? If so good luck and let me know if you have any questions...

Dan

Please Log in or Create an account to join the conversation.

Re:ThunderHawk Jr Restoration 13 years 10 months ago #9154

  • bogman
  • bogman's Avatar
  • Offline
  • Junior Boarder
  • Junior Boarder
  • Posts: 77
  • Karma: 1
  • Thank you received: 0

Please Log in or Create an account to join the conversation.

Re:ThunderHawk Jr Restoration 13 years 10 months ago #9266

Dan,

Thanks for the reply and the link to pics.

I'm not planning a full restore. The transom seems solid. Most of the issues with the boat appear cosmetic...

I was primarily concerned with the seam as a point for moisture transfer to the transom. It looks like the seam tracks to the aft and may deposit moisture in the transom. Any thoughts on this or how to best seal the seam up and make it pretty?

Overall the hull looks and feels solid. There are a couple of spots where small holes have been filled and the bottom paint has been worn down. I'm guessing from repeated beachings.

Work to date:

I stripped all the hardware except what needed for towing and kept the windshield on because it helps fill out the rain cover.

I've taken the top layer of red detail paint off the starboard side and I have a couple of questions about how deep to go. It came off pretty easy with 150 grit but there was a sub layer that remained. It looked like maybe the original coat or a better applied re-paint.

I'm really new to this and not sure of the right question to ask about sanding down for a repaint. How deep should I go? How do I tell where to stop? How do identify the gelcoat layer? etc...

My assessment of the boat is that most of the upper hull and deck white finish is pretty good and could benefit from a good polish/wax job. The red needs to be completely redone. It was repainted some time in the past but it is streaky. (it's possible that a forum member may have owned and painted this boat and I don't want to belittle anyones efforts. Please, no hard feelings. The paint looks decent from about 15ft but I'd like to get to "up close" pretty.)

There are some ripples in the white on the vertical surfaces near the fins. I thought I'd hit them with some 220 grit and see how they come out.

The floor isn't in bad shape but there's glue from a former carpet that needs to be removed. I followed a discussion either here or on iBoats about carpet glue removal and Removall seemed to be a popular product. Unfortunately, the only site I could find that carried it is out of stock until sometime this fall. The second most suggested product was Krud Kutter. Third most popular suggestion was a flap wheel, caution and patience.

Thanks again for your reply. Sorry if the above is a little disjointed. Any advice or suggestions happily accepted.

Attached are a couple more pics of the boat... I think.

Regards,
Rob
Attachments:

Please Log in or Create an account to join the conversation.

Re:ThunderHawk Jr Restoration 13 years 10 months ago #9274

  • MarkS
  • MarkS's Avatar
  • Offline
  • Moderator
  • Moderator
  • Posts: 5348
  • Karma: 118
  • Thank you received: 5
Welcome to FG Rob. I'm still a rookie when it comes to the Glassics, (only been at it a couple years), and my experience with the fine art of fiberglassing is very limited. Keeping this in mind, I would share your concern with the moisture entry into the cracks in the seam you have illustrated. If the inside of the seam/joint is intact as Dan (bogman) indicated, you may want to consider this option: Bondo brand makes a gel-resin kit, that I believe could be forced up into the crack to re-seal it. You would want to clean it out completely and sand or lightly grind the edges for adhesion, I believe, but the thicker consistency of the gel version should allow you to apply it in the vertical, overhead spot you are repairing. I've used this product to repair some very small "dings" in the hull without inverting the boat, and it works really well. You can then sand and paint, for a strong sealed repair.

(it's possible that a forum member may have owned and painted this boat and I don't want to belittle anyones efforts. Please, no hard feelings......)

I was impressed with your diplomacy and consideration there, most people never even give that a thought! +1 Karma

I work in Forest Park, live in Jackson about 15 min. from the lake. We'll have to get together for an "on the water" outing when you get the Thunderhawk done! Good luck with it, and keep us posted on your progress.

Please Log in or Create an account to join the conversation.

Mark

Re:ThunderHawk Jr Restoration 13 years 10 months ago #9295

  • bogman
  • bogman's Avatar
  • Offline
  • Junior Boarder
  • Junior Boarder
  • Posts: 77
  • Karma: 1
  • Thank you received: 0
DecaturBob wrote:


I was primarily concerned with the seam as a point for moisture transfer to the transom. It looks like the seam tracks to the aft and may deposit moisture in the transom. Any thoughts on this or how to best seal the seam up and make it pretty?


Work to date:


I've taken the top layer of red detail paint off the starboard side and I have a couple of questions about how deep to go. It came off pretty easy with 150 grit but there was a sub layer that remained. It looked like maybe the original coat or a better applied re-paint.

I'm really new to this and not sure of the right question to ask about sanding down for a repaint. How deep should I go? How do I tell where to stop? How do identify the gelcoat layer? etc...


The floor isn't in bad shape but there's glue from a former carpet that needs to be removed. I followed a discussion either here or on iBoats about carpet glue removal and Removall seemed to be a popular product. Unfortunately, the only site I could find that carried it is out of stock until sometime this fall. The second most suggested product was Krud Kutter. Third most popular suggestion was a flap wheel, caution and patience.


Rob I will give it a try but I'm no expert and hopefully others with more experience will chime in.

Is the glass strip on the inside holding the top to the bottom in good shape ? If so i don't think you have much of a problem as this is where the strength comes. I can't tell by the pictures but will the rubrail not cover this and make it pretty :) ? As far as moisture transfer the gaps appear on the sides of the boat the transom wood is only between the fins at the back so I don't see how that would be an issue. Can you post another picture of a side view of the seam ? I just want to see if your boat is made the same ways as ours.

As far as sanding down...If as you have surmised the boat has been painted, that layer will come off fairly easily. Once you reach the gelcoat you'll find that has a thickness to it, this varies depending on how much was applied to the mold during manufacturing, you'll need to get through the most of the " crazing " in the gelcoat as these cracks will appear through paint if not right away one day in the not so far future. When we did ours we dremeled the deeper crazing and filled with Cabosil ( sp? ) we started the sanding with an 80 grit and graduated to 400 before painting, turned out great.

If the floor is in OK shape, just the glue, maybe another carpet over top ?

I hope this helps.

Dan

Please Log in or Create an account to join the conversation.

Re:ThunderHawk Jr Restoration 13 years 6 months ago #18238

Hi honey, I'm home....

Can't believe it's been since June that I posted, or got any work done on the ThunderHawk for that matter...

When last I got any work done, I had sanded down the starboard side to glass. Yesterday I took of the port side red trim/detail paint...and the more I worked on the more I came to regret going so far on the starboard side.

In my head it made perfect sense - Take it all the way to glass and completely refinish it.

Now I think I've gone to far. Should I stop now, flip her, redo the bottom and then just refinish what I've taken down (if it's even possible)? Or, do I continue on? I think it was Voltaire that wrote "there is a certain inevitable futility in indecision".

Any advice would be most welcome.

I think there will be pictures attached...

Thanks - Rob

Please Log in or Create an account to join the conversation.

Re:ThunderHawk Jr Restoration 13 years 6 months ago #18239

Attachments:

Please Log in or Create an account to join the conversation.

Re:ThunderHawk Jr Restoration 13 years 6 months ago #18318

In regard to the surface prep for paint. Gelcoat is a perfectly suited base for most marine paint systems. Taking it all the way down to bare glass is unnecessary unless the gelcoat is severely crazed (from your pictures, it doesn't appear to be).

If you go here: fiberglassics.com/restoration/book-part-2-refinishing and scroll down to the "Boat Painting" chunk, I think you'll find most of the information you're looking for.

That's a great boat.

Please Log in or Create an account to join the conversation.

Re:ThunderHawk Jr Restoration 13 years 6 months ago #18326

  • bogman
  • bogman's Avatar
  • Offline
  • Junior Boarder
  • Junior Boarder
  • Posts: 77
  • Karma: 1
  • Thank you received: 0
I agree taking down to glass is not an issue. As for the other side sand it until the crazing is gone and your ready to paint. I wouldn't regret what you did already it'll make for a great finish when painted...

Please Log in or Create an account to join the conversation.

Re:ThunderHawk Jr Restoration 13 years 6 months ago #18371

Bogman and Godelescher,

Thanks for the replies. I appreciate the input.

Please Log in or Create an account to join the conversation.

  • Page:
  • 1
Time to create page: 0.211 seconds

Donate

Please consider supporting our efforts.

FG Login

Glassified Ads

The Pink Lady
( / Boats)

The Pink Lady
05-02-2024

Gator 9" wheels Wanted
( / Wanted)

noimage
04-24-2024

1969 Stern Craft Boat 19'
( / Boats)

1969 Stern Craft Boat 19'
04-08-2024

FiberGoogle

Who's Online

We have 6545 guests and 3 members online