Welcome, Guest
Username: Password: Remember me
  • Page:
  • 1

TOPIC: 1963 500 strip down problem

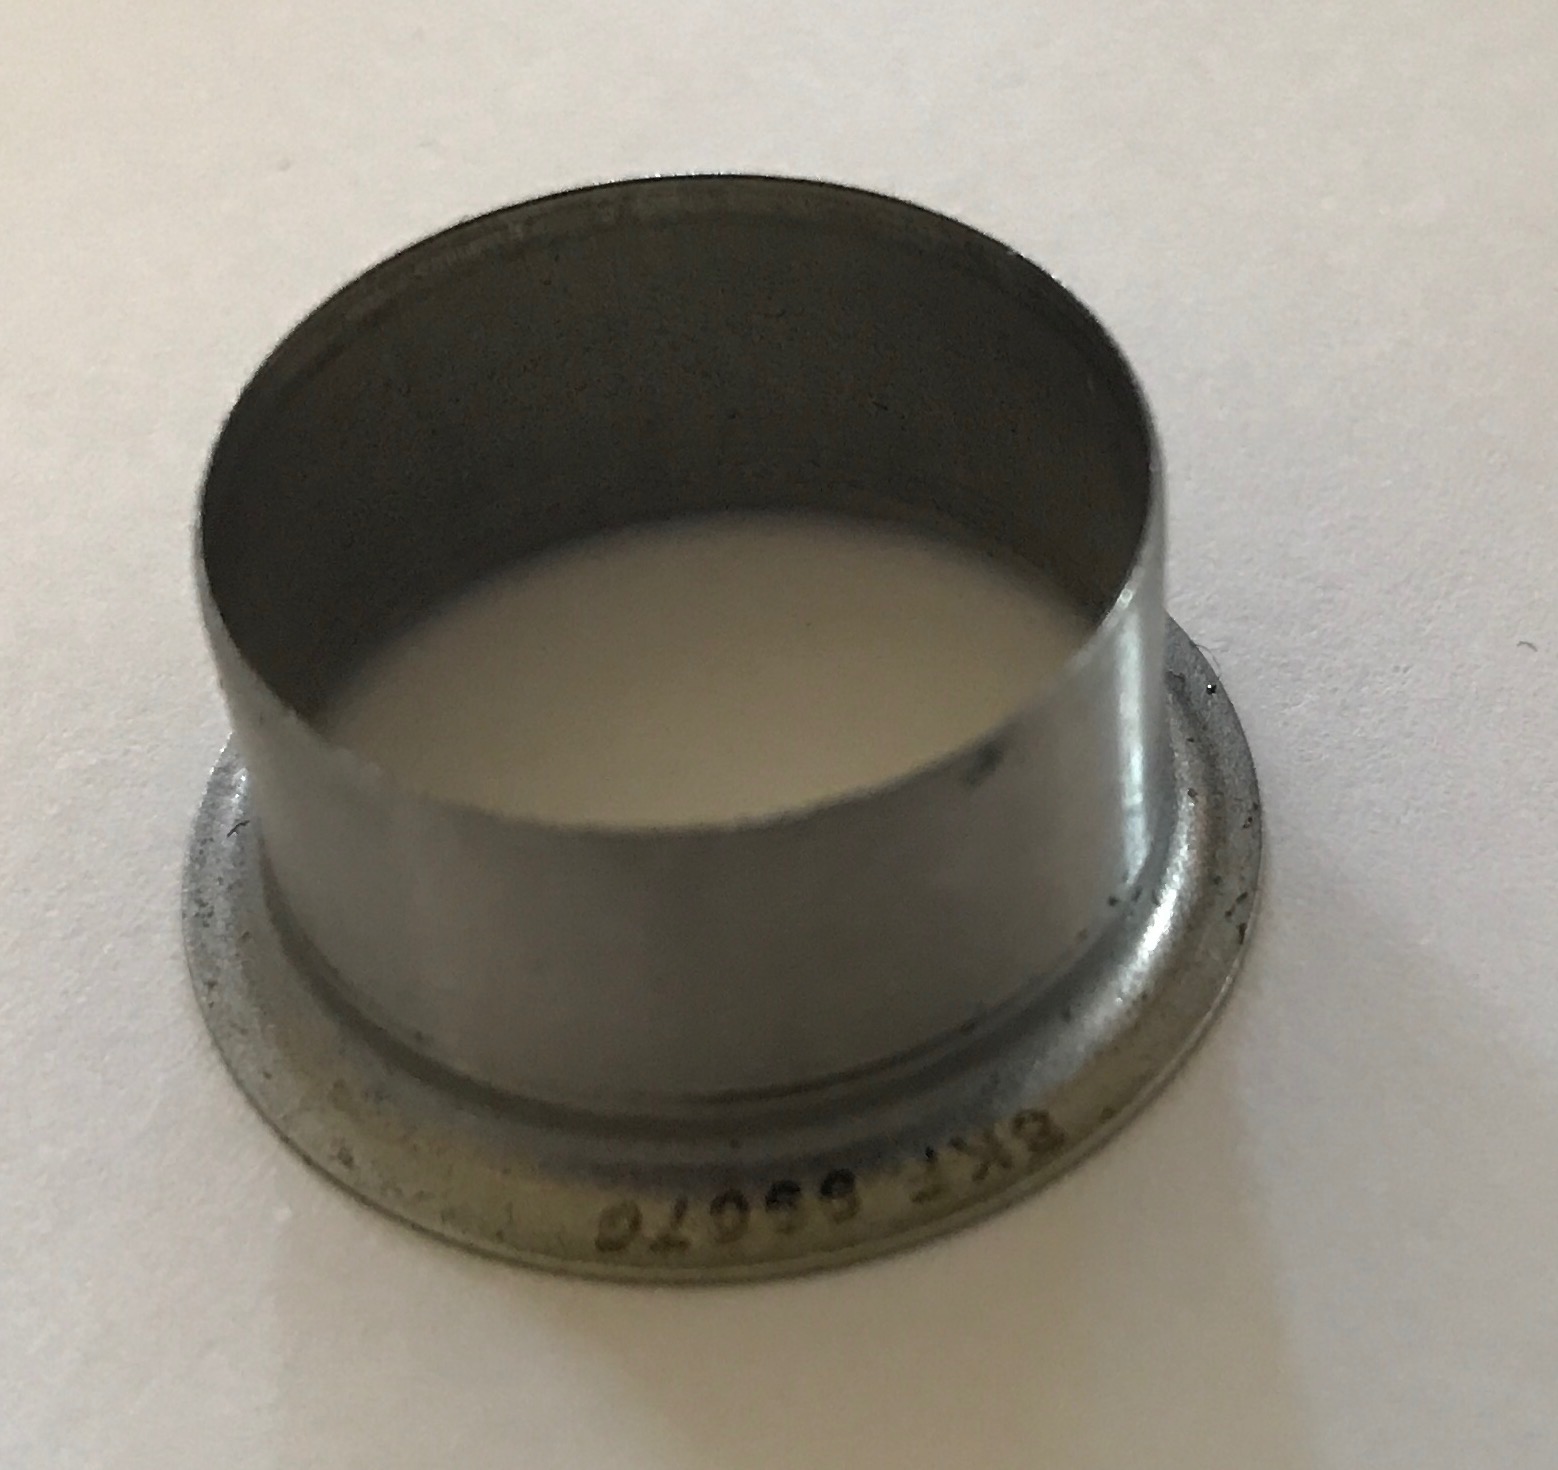
1963 500 strip down problem 7 years 1 month ago #130530

I'm suffering from a problem that seem to permeate through the entire engine, Aluminium Oxide. It's bonding all the fasteners better than any Loctite product ever could.

The latest component refusing to budge is the water pump lower housing. Such is the close tolerance of the studs coupled with the gasket sealant used that I can't see a way of removing it without destroying it. I've already had problems with the mounts where the lower bolts sheered off.

Ideally I would like to strip down so that the various casings could be chemically stripped, etch primed and repainted. So far the only thing I've nearly got stripped down completely is the bottom cowl. But the control brackets are solid and there's no chance of them coming apart without sheering the bolts.

Generally the unit is in good condition and there is a high probability it has only seen fresh water use.

Has anyone found a way round the problem of Aluminium Oxide?

Please Log in or Create an account to join the conversation.

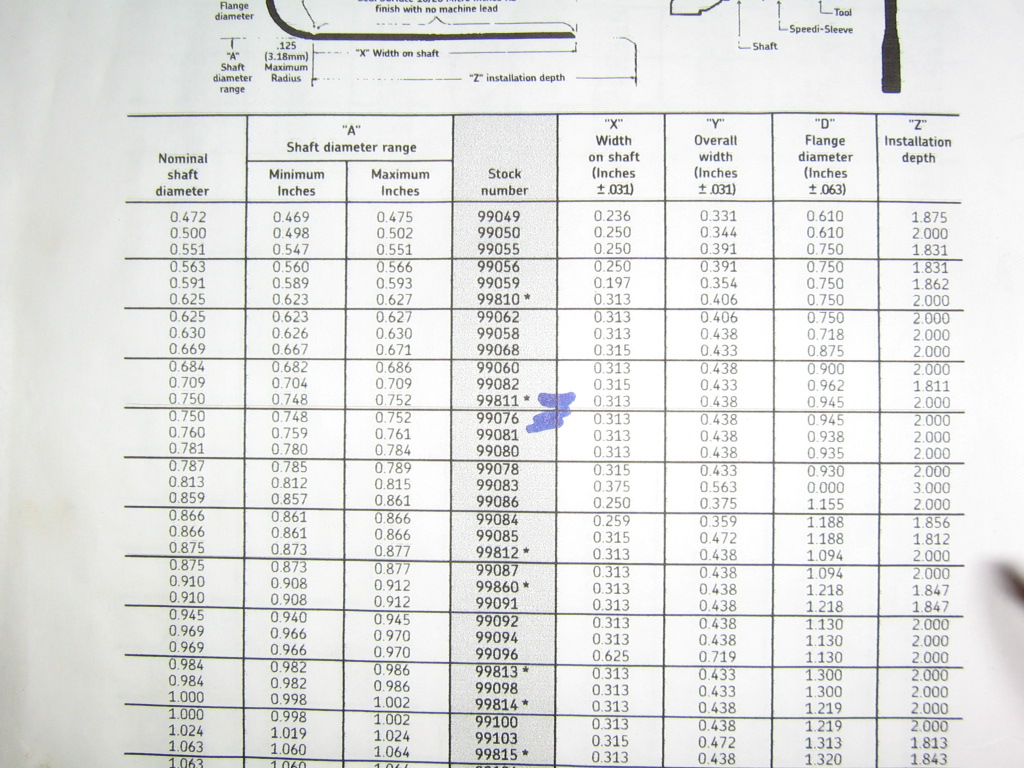
Re:1963 500 strip down problem 7 years 1 month ago #130531

Ye Old stubborn Tear down. Always a great Pleasure!

Good Luck

This stuff and Heat.

blastercorp.com/PB-Blaster-Penetrant-remove-stuck-parts-spray

Travis

Please Log in or Create an account to join the conversation.

www.liquidassetsonline.org , 63\'PowerCat14-C w/twin64\'650\'s,14\'Glen-L Zip w/Mark58E,58\'TeeNee,
Mark55AE,Mark55E,PairMark58E\\\'s,Mark58AE,Mark78AEL, 6-7RBM\'s.Keep EM\' Alive! Always looking to add to collection.

Re:1963 500 strip down problem 7 years 1 month ago #130538

  • 63g3
  • Offline
  • Contributing Member
  • Contributing Member
  • Posts: 464
  • Karma: 62
  • Thank you received: 2
Ya it's a bear, I feel your pain. Now it's easy to understand the term corrosion welding. Made worse because for the most part no stainless fasterners were used Stainless was not a readily available fastener material back then.
The powerhead disassembly of the exhaust cover and the rear waterjacket cover will also be challenging.
Heat heat and more heat. I use a MAPP set up where it's hotter than propane. I have not found penetrant helpful as most of the fasteners are blind bolts so it can't really get into and wick down the threads. In fact for the most part it just smokes and sometimes burns till it's gone while heating which is doubly annoying.
The saving grace is the aluminum expands faster than the bolt so it will pull away fracturing the corrosion but you really have to heat. It takes time, let the torch do the work, concentrate the heat on the surrounding aluminum, heat the area of the part where the treads are but the bolts also seize to the plain hole part too so make sure both parts need to be good and hot don't worry about the bolt itself but never hurts to focus heat on it too. Keep in mind it's hard to keep the specific area hot as the larger casting wants to heat sink a hot spot away so get it real hot and work quick, the wrench will get hot so have a pair of gloves on. In the end it's faster than a drill out and helicoil repair so keep that in mind if loosing patience take 5 to 10 min per bolt, I spread it out over a few days if needed but, best if all can be done at the same time as the larger castings get hot as you go along which helps lessen heat sinking. Once the bolt turns and loosens it sometimes helps to turn back and forth to help break up the corrosion further reheat as needed. The PB blaster might help as now it can wick in but I find the parts are so hot it smokes bad, boils off and works against you as it cools down the area. Use that only if parts have cooled.
Most likely some will break anyways, if you are lucky a stub will protrude once parts are separated so a vise grip
And heat on that gives a second chance. I heat with the vise grip clamped so gloves are a must.
Sometimes a sharp rap to the wrench or vise grip helps to break it free. The 1/4 inch (7/16 head) fasteners are particularly vulnerable to breaking. Some of the holes will still need a helicoil if threads are found to be corroded enough. This is not too bad where no broken bolt needs to come out.
The water pumps are hard because it is also aluminum so no differential expansion. Concentrating the heat on the lower unit casting helps.
I find in the end there are a few parts that get destroyed and must be obtained. Fortunately there is a large parts network out there eBay helps a lot as does this site and others.
Good luck, disassembly is the not so fun part. Stainless bolts on reassembly obviously is the way to go, I usually dip the treads in silicone too before install, that helps seal the threads from water. I know from experience it makes disassembly a breeze so this should be a one time pain.

Please Log in or Create an account to join the conversation.

Re:1963 500 strip down problem 7 years 1 month ago #130539

Thanks for the replies. I've taken the advise of Travis and bought a case of PB-Blaster. I bought a case as it was cheaper per can and it's not widely available here in the UK. Judging by the reviews from the UK, it beats our usual penetrative 'WD 40' hands down.

Also from progress so far I think I'll need a lot. Luckily I have a range of 5 sizes of propane torch to choose from.

In respect of the power head and gearbox I'd like to keep the strip down to the minimum. If it were a car engine I would not be as concerned, but given dependency on it once on water I think it only prudent to ensure all is well. Of course with an unlimited budget I'd replace all I could but my pockets aren't that deep.

As the boat and engine were purchased from beside the river Trent I think there is a reasonable chance neither have seen salt water regularly. This is my first boat, bought to be towed by one of my previous projects.


I can't see any obvious signs of internal corrosion indeed the intake pipe is remarkably clean and I've more corrosion on household pipes. The intake hole in the block also looks very clean. I'm hoping that removing the exhaust cover will verify this. The gearbox seems good, there is no lift in any of the bearings and forward / reverse and the dog clutch all operate fine. my only concern is that when I removed the gear casing I found the top of the water pump had been taken off and a crude attempt made to remove the impeller. the top had then been put back on but the nuts were only on by a couple of turns. My suspicion is that someone attempted a repair and left the gear casing off until I bought the engine. i say that as I got an egg cup full of clear water out of the gear case drain. Rotation of the input shaft or prop provides smooth operation with an assuring whirring sound with no hint of bad bearings.

But it does leave some doubt, so although I'd rather leave it alone I'm going to have to strip it for peace on mind.

The absence of special tools is also in my mind especially where stripping down the prop shaft is concerned.
Attachments:

Please Log in or Create an account to join the conversation.

Re:1963 500 strip down problem 7 years 1 month ago #130541

Besides all the struggles with corrosion, be sure and remove item 44 in the attached parts image before attempting to remove the base of the water pump housing.
You will probably need to magnify the image to see it better.
Were you able to remove the old impeller?

In regards to the bolts being seized in corrosion, besides Mapp torch heat, I smack the head of the offending bolt with a punch.
I smack straight down oh the head, and also smack the sides of the head at a 45 degree angle - from as many angles as possible.
Like at 2 o'clock, 4 o'clock, 6 o'clock, 8 o'clock, 10 o'clock, & 12 o'clock.
I smack 'em pretty hard too. What this does is compress the corrosion back away the the bolt.
Then, if you get the slightest rotation of the bolt with your wrench, stop and repeat the actions with your punch & hammer.

Like Randy stated, sometimes they stinkers break off anyway, and once you get the cover removed,...Hopefully there is a stub of the bolt sticking up, and with more heat - now more directly at the surrounding castings, you can get them out.

Please keep us posted on your progress.
Doc F
Attachments:

Please Log in or Create an account to join the conversation.

Re:1963 500 strip down problem 7 years 1 month ago #130543

Hi Doc

Noted, I managed to get the drain plug out and the 2 seals before I applied heat. I've use the punch tactic in the past.

Another thing I will try again once I have the PB-Blaster is to lock nut the water pump studs out, probably after heating the gear casing a little more than the pump. I've cleaned out the 10-24 jacking thread but I can only afford to give this a light tap every 8th of a turn in the hope of breaking the gasket adhesion.

The other tactic I employ nearly every time, once I get even the smallest amount of anti clockwise movement I immediately follow up with a clockwise movement back to the starting point effectively undoing and re tightening successively. In this way the fastener, nut or bolt, acts something like a tap then I just keep increasing the degree of rotation back and forth until I feel comfortable it's going to undo. On rare occasions I have found that tightening first by a very small amount can give that initial movement.

Before I removed the outer covers from the lower mounts I took the opportunity of centre drilling the bolts with the aid of the bush from a Snap On stud remover kit.


What I may also try is tig welding a thick washer to the remains of the bolts and then tig weld a nut to that in the hope that the heat transference will cause the aluminium to expand away from the bolt, and it would be nice to think that removing material from the core of the bolt will allow some shrinkage of the bolt.

Has anyone ever tried using a battery drill on a low impact setting? I don't own one but it's a thought I had.
Attachments:

Please Log in or Create an account to join the conversation.

Re:1963 500 strip down problem 7 years 1 month ago #130545

shmbry,
Those are all great tactics!

Yes,...I use my battery powered driver quite a bit.
It is a pretty amazing tool, but as you mentioned - you have to be careful just how much power you apply.
I have found that it also works really well with those small self-tapping Phillips machine screws. Much better than the very best Phillips screw driver. These little screws can be smacked sideways, etc prior to attempts to remove with success too.

Sometimes, you just can't win, and something has to be sacrified to save the other part.

Doc
Attachments:

Please Log in or Create an account to join the conversation.

Re:1963 500 strip down problem 7 years 1 month ago #130551

Impact action is absolutely the best method for freeing corroded fasteners. My usual method has always been with a box end wrench and hammer, so you get the most direct punch right where it's needed. The key really is to "break" it loose, not twist it. Hitting the bolt on the head too can help, like Doc said, to compress the oxidation layer and pull the threads loose from the bottom of the female threads in the housing, where they have been seated. Many years ago, I had nearly 100 landscape lights at a law firm that they wanted bulb upgrades installed in. The covers were held on with phillips screws, and the first 3 I tried to remove broke right off. Not being able to use the wrench and hammer method, I went and bought a Bosch 12v impact tool, very small but powerful for it's size with a nice, sharp impact action. I changed all the bulbs on the property without breaking one more screw! Now I use that same tool for most all fasteners 1/2" and smaller. You just have to be careful on really small ones not to use too much power, and let the impacting do the work. I know heat works very well, but I never use it myself.

Please Log in or Create an account to join the conversation.

Re:1963 500 strip down problem 7 years 1 month ago #130562

Ouch Doc!

Please Log in or Create an account to join the conversation.

Re:1963 500 strip down problem 7 years 1 month ago #130564

  • Dr.Go!
  • Dr.Go!'s Avatar
  • Offline
  • Contributing Member
  • Contributing Member
  • Posts: 1719
  • Karma: 19
  • Thank you received: 125
All good info here - thanks.

Ouch Doc is right...was that a salt water motor or fresh water motor?

Please Log in or Create an account to join the conversation.

Dr.Go!

Re:1963 500 strip down problem 7 years 1 month ago #130567

  • ed-mc
  • Offline
  • Platinum Boarder
  • Platinum Boarder
  • Posts: 1386
  • Karma: 232
  • Thank you received: 113
Dr.Go! wrote:

All good info here - thanks.

Ouch Doc is right...was that a salt water motor or fresh water motor?


There are no shortage of Salty Dogs out here in the PNW, but the Doc is Very Very persistent!

Please Log in or Create an account to join the conversation.

Re:1963 500 strip down problem 7 years 1 month ago #130568

  • 63g3
  • Offline
  • Contributing Member
  • Contributing Member
  • Posts: 464
  • Karma: 62
  • Thank you received: 2
I realize you are in the U.K. now.......good to see you are working on a Merc instead of a native Seagull one lunger! I used one as a kid when I'd steal our neighbors row boat...what a pain to start, best theft deterrence there is...a motor that won't start. I think I may have had that Zodiac in a Matchbox, I did have the travel trailer one. Great combo. Some how I envision you doing your work in a shirt and tie with a sweater on...ha,ha proper Britts.
I would strongly suggest you get what we call MAPP gas in the US instead of propane. The bottles and nozzles look nearly identical but are not interchangeable. Here in the US propane is in a red bottle, MAPP is in a yellow bottle. Anyways, MAPP burns much hotter and heat matters a lot.
Caution don't think about using Acetylene welding torches these are too hot and to easy to melt the aluminum so stay away from that. Propane is not the best, it just doesn't throw enough heat where the bulk castings are sucking heat away from around the bolt of interest.
My additional 2 cents.
Randy

Please Log in or Create an account to join the conversation.

Re:1963 500 strip down problem 7 years 1 month ago #130583

Hi Randy

Thanks for that, I'll look into MAPP gas. No shirt and tie today, rather woolly hat and body warmer. I decided to set to on the engine as it's still too cold for fibreglass. I have to make up a new transom and reinforce the Starboard side of the hull which is noticeably thinner I suspect because to laminators were working, one Port one Starboard. The technique quite different side to side.

The fact that there was an engine with the Owens runabout was one of the major factors in my buying the combo. At the time as a newbie I wasn't fully aware of what a comparative rarity a cloud white is, especially in the UK.

The design of the Zodiac was heavily influenced by American cars of the time and origins of the engine, a 2550cc straight six, and the Borg Warner overdrive pre date the car by quite some margin.

Please Log in or Create an account to join the conversation.

Re:1963 500 strip down problem 7 years 1 month ago #130585

WOW, and WOW again

My consignment of PB-Blaster arrived today! Very impressive results, I'm glad I bought more than one can. I fact I might use it on my own joints!

Its smell is reminiscent of something I used many years ago, but neither my father or I could place it. Something like a degreasing bath with a hint of Trichloroethane.

Anyway it proved very effective and I have managed to remove the water pump base with the aid of a cunning plan that came to me.


I used a ball joint splitter under the heel of the pump body were it projects very slightly from the casing.


This provided enough lift to break the gasket adhesion and get a good shot of Blaster underneath. I then tapped the body back down and with successive doses of heat and blaster was able to lock nut out the 3 studs. Once I'd done that I reapplied the splitter finger tight and with the aid of the jacking screw was able to remove the lower pump body.


I'm glad I went to the trouble as the sight of the bearing confirmed I wouldn't have got far as it is.


Note also the pitting on the drive shaft. As it wasn't clear from the manual I have (downloaded from mercury-vintage.marineservicemanuals.com ) if the drive shaft should come out before or after the prop shaft I turned my attention to the prop shaft.

Although I don't have the correct tool I did find a piece of tube amongst my collection that I was able to adapt. However it soon became clear the cover nut wasn't going to move. I had carefully checked but there was no lock washer as mentioned in the manual and striking the nut resulted in a ringing only heard when hitting something solid like an anvil. Consequently I took Doc's advice and sacrificed the nut by drilling out one of the lugs, opening out with a small burr tool and collapsing the nut inwards.


I had a quick attempt at removing the carrier assembly but decided to quit while I was ahead, retreat and read up further.

Attachments:

Please Log in or Create an account to join the conversation.

Re:1963 500 strip down problem 7 years 1 month ago #130589

  • ed-mc
  • Offline
  • Platinum Boarder
  • Platinum Boarder
  • Posts: 1386
  • Karma: 232
  • Thank you received: 113
To get that bearing carrier out, use a slide hammer on the end of the prop shaft. You'll need to heat both sides of the gearcase in the area of the carrier.

Please Log in or Create an account to join the conversation.

Re:1963 500 strip down problem 7 years 1 month ago #130590

get 2x4 blocks drill a hole in the center. build it up till the prop nut and washer start with a few threads then tighten down then heat. and washers as needed.

Please Log in or Create an account to join the conversation.

Re:1963 500 strip down problem 7 years 1 month ago #130691

Well I managed to remove the bearing carrier with the aim of a slide hammer.


The gears are in good order with only some very minor corrosion on the input gear.


The secret was to remove the bearing carrier first then use an 11/16" short single hex socket and a knuckle bar to remove the input gear retaining bolt.


The worst damage was to the drive shaft around the area of the impeller and water pump seals.


Have seen the price of a new shaft I'm going to see if I can get it metal sprayed and reground.

I also succeeded in stripping down the top cover today. The Aluminium top trim is very beaten about as are the front cover and chrome trim moulding. I'm going to see if I can beat out the dents in the Aluminium parts and have them polished smooth and re- plated.

Please Log in or Create an account to join the conversation.

Re:1963 500 strip down problem 7 years 1 month ago #130693

Hey! I get to help out with an answer instead of always asking questions!
For the pitted shaft, you can buy a SKF Speedi-sleeve (there are different brands) that slips down the shaft. Much cheaper than a new or repaired shaft.

The little flange on the sleeve gets broken off after installation.
Attachments:

Please Log in or Create an account to join the conversation.

Re:1963 500 strip down problem 7 years 1 month ago #130694

use only in the seal area.

Please Log in or Create an account to join the conversation.

Re:1963 500 strip down problem 7 years 1 month ago #130697

How do you successfully drive it down the length of the drive shaft?
Also do you have to fit the impeller before the second sleeve?

And lastly is there supposed to be the reduced diameter area were the impeller sits?

Please Log in or Create an account to join the conversation.

Re:1963 500 strip down problem 7 years 1 month ago #130699

best way is to put it in a lathe and sand it till it is a SNUG fit. I then use locktite before install. and set in so the seal will ride on it. the impeller area needs no attention the impeller should slide loosely when in place. a little heat on the sleeve is best.

Please Log in or Create an account to join the conversation.

Re:1963 500 strip down problem 7 years 1 month ago #130700

Like dave said, sand the shaft smooth (you are not taking any diameter off the shaft, just making sure there are no nicks, rust or high spots anywhere along the shaft from top down to where the new sleeve is needed). I did something like Dave suggested about the lath except I used an electric drill. I used an old bolt that fitted the threads in the bottom of the shaft, tightened the drill on the bold (cut the head of the bolt off) then supported the other end of the shaft between two blocks of wood. With the drill running and turning the shaft, I was able to use various grits of sand paper to easily clean and remove any nicks (I used a heavier file for bigger nicks.

The diameter of the shaft should be the same all the way to where the sleeve is needed. (unless the 500 has a different setup....then I guess you are screwed and not able to use the sleeve if the upper portion of the shaft has a larger diameter than where the sleeve is needed.

Yes, I think you need to fit the impeller sleeve first. The fit of the sleeves are very very close, one sleeve will not fit over another.

I'm not sure about your last question.

Please Log in or Create an account to join the conversation.

Re:1963 500 strip down problem 7 years 1 month ago #130701

In addition to the notes I just mentioned, you can look at a prior discussion thread called
Speedy Sleeve installation advice
Randy (63g3) and others gave a lot of input on the subject.
(sorry, I don't know how to include links to other threads)

Please Log in or Create an account to join the conversation.

Re:1963 500 strip down problem 7 years 1 month ago #130702

  • ed-mc
  • Offline
  • Platinum Boarder
  • Platinum Boarder
  • Posts: 1386
  • Karma: 232
  • Thank you received: 113
After you clean up the driveshaft, be sure you measure the O.D. with a set of vernier calipers or micrometer to get the correct size for the Speedi-Sleeve.

On the older 500's there is only one oil seal in the water pump base, so you should only need one sleeve there.

Later plastic bases have 2 seals in them, and they ride on the driveshaft in different places than the old single seal.

You could upgrade your old pump base with a newer plastic item, but you'd have to measure where the lips of the seals hit to be sure it's on uncorroded shaft.

You'd probably still be OK on the lower of the 2 seals, because the shaft looks pretty good where those seal lips would ride. I'd expect the upper seal's lips would still be riding somewhere on the corroded area, though.

BTW there is no need to install a sleeve on the shafting above the impeller.

Merc doesn't even put a seal anymore in the replacement plastic upper pump bodies. All they use is a rubber "slinger" ring, so I'd make sure to install a new one of those.

The ribbing around the top center of the impeller is what does the sealing up there, anyway. So the upper seal is superfluous. I always put some waterproof grease on the top of the pump body before sliding the slinger down against the pump.

Even if you re-use your metal upper pump body (assuming you still have one of those), the condition of that seal doesn't matter. Just use the slinger ring. One of which should be in the impeller repair kit.

HTH.............ed
Attachments:

Please Log in or Create an account to join the conversation.

Re:1963 500 strip down problem 7 years 1 month ago #130703

As I said before you do not need a sleeve for the impeller area or the seal area of the top of the pump housing ONLY for the lower seal for the OIL. don't forget to put the slinger on the DS on top of the pump housing.

Please Log in or Create an account to join the conversation.

Re:1963 500 strip down problem 4 years 10 months ago #139624

Well after 2 years and 2 months I'm back on the rebuild. Several other projects got in the way! in the interim I've been gathering up new and used parts when I've seen them come up.

I've started by cleaning up the various castings and have applied a two pack etch primer and a two pack top coat. I would upload some pictures but I'm ashamed of the finish, too much air pressure, so I'll have to rub the top coat down to get the runs out and then spray them again.

In order to clean up the parts I built a shot blast 'cabinet'


Having seen them advertised at 220 litres capacity, it struck me that's just over 45 gallons (Imperial) so I bought a plastic barrel, blast gun kit, gloves - portals and some blast media for $80 and made up my own. The neck is exactly 15 3/4" just big enough to get the ride guide wheel through.

The results of the blasting were very successful.


I need to do some more work on the drum blaster, but I was in a hurry. I may make a mark 2 version using a new barrel and I definitely need to make some surrounds for the portals and window. I'll be using my Shopsmith for this, a fantastic tool I invested in (second hand and quite difficult to find im the UK) I cry when I see some of the prices in the US.

I've now got a colleague who travels to the US regularly, so he's able to bring back Mercury parts for me. I'm awaiting gaskets, seals, brackets and other small parts from OldMercs and Joe Poole. Eventually I decided to buy a NOS drive shaft from Joe. I will pursue repairing the old one as I also now have a 1440 'Engine' lathe. If that doesn't work out I use the NOS shaft.

Rather than buy genuine bearings I have sourced them (Koyo) elsewhere to the same spec. However the new bearings are exactly to size whereas the bearings that came out are 0.002" to 0.003" undersize. I fitted one of the new needle bearings in one of the drive gears using the press but it was a very tight fit. So much so I couldn't get the prop drive shaft in. I had to scrap the bearing once I got it out again. The bearings are now in the freezer and have been for a week.

Has anyone had similar bearing size issues?

Please Log in or Create an account to join the conversation.

Re:1963 500 strip down problem 4 years 9 months ago #140166

Nice job on the blasting cabinet - really creative. FYI - Harbor Freight sells a steel cabinet for pretty cheap - but you need to get a better blast gun to make it work decently

Please Log in or Create an account to join the conversation.

  • Page:
  • 1
Time to create page: 0.300 seconds

Donate

Please consider supporting our efforts.

FG Login

Glassified Ads

FiberGoogle

Who's Online

We have 5700 guests and no members online